

Skipping the method of assigning semantic wrappers can really feel tempting. It incessantly manner construction the web page first, then going again to configure tags for every component, and repeating that paintings on each and every new phase or web page.
Divi 5 eliminates this friction by means of the usage of presets. You’ll be able to outline semantic tags as soon as on the default degree, and each and every component you upload later on will mechanically practice the proper HTML construction.
On this put up, you’re going to be told which preset settings to configure so your builds are semantically sound from the beginning, even ahead of you start growing pages. Take a look!
What Are Semantic Tags?
Each and every component on a webpage is wrapped in a tag. Some tags describe the kind of content material they include. Those are semantic tags. The phrase semantic manner “in the case of that means,” so semantic tags upload that means in your markup.
Tags like header, nav, primary, phase, article, apart, and footer fall into this class. A header tag tells browsers this content material purposes as a header. A nav tag signifies navigation. An editorial tag marks content material that stands on my own, like a weblog put up. Every tag describes what’s within it, now not simply that one thing exists there.
Different tags function impartial wrappers that don’t describe the content material sort. Those generic boxes hang components in combination for styling or format, however put across not anything to browsers concerning the web page’s serve as or function.
And Why They Subject
Display readers depend on semantic tags to assist guests transfer via your website comfortably. Whilst you label your sections correctly, other folks can skip directly to what they want. They don’t need to plow through each and every component so as. Your markup turns into practical, now not simply visible.
Serps learn the similar code. Their bots scan for semantic indicators to determine how your content material connects and which portions lift essentially the most weight. Blank tagging provides them a transparent map of your website. They may be able to’t see your format or styling anyway, so the markup itself does the heavy lifting.
Divi 5’s Presets: A Tough, Attached Design Machine
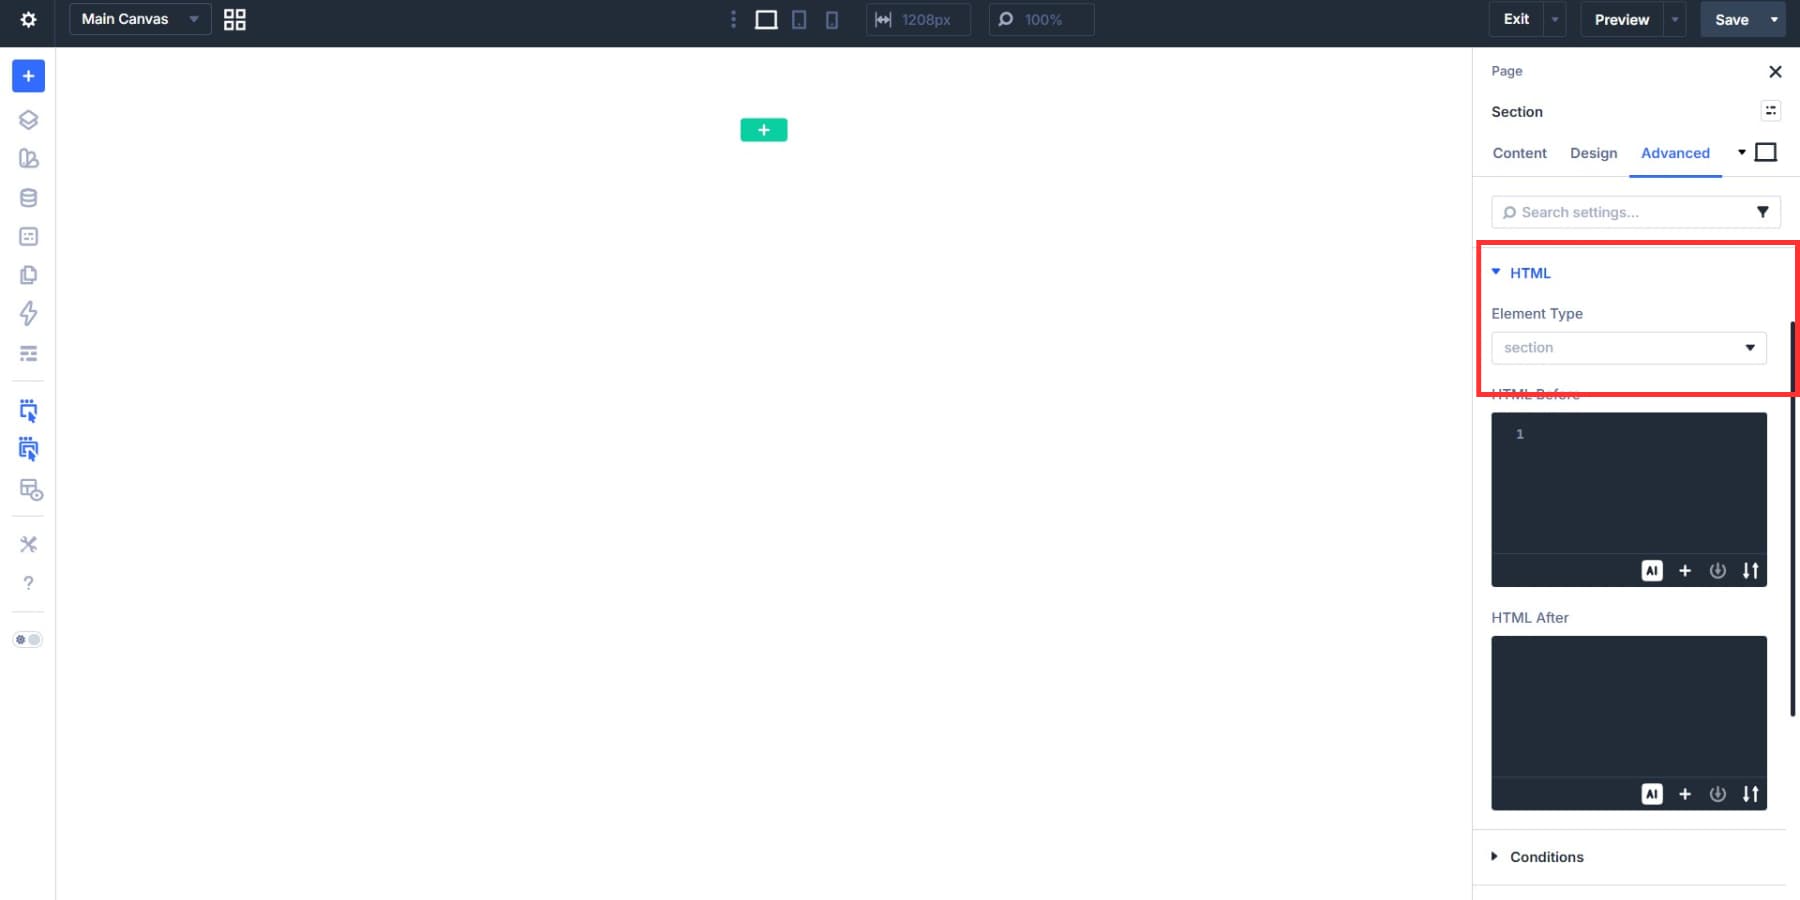
Divi 5 provides an HTML option group to the Complex tab of each and every component’s settings, together with sections, rows, columns, and modules. Open any component’s settings, and you’ll make a choice an Part Kind from semantic tags like header, nav, primary, article, apart, footer, and extra.
This surroundings replaces the default wrapper tag with the tag you select, anywhere wanted. You’ll be able to additionally bake the ones possible choices into presets, so each and every new component you create already has the proper Part Kind connected. The preset device in Divi 5 has a selected construction, and realizing the place semantic tags have compatibility into that construction determines how neatly your workflow scales.
Right here’s how Divi 5’s preset device works:
Choice Team Presets And Part Presets
Option Group Presets shape the spine of Divi 5’s design device. Every one controls a unmarried possibility workforce. You get presets for borders, shadows, textual content, animations, and interactions.
Save a border radius as one preset. That radius can pull from a Design Variable. Save a shadow setup as every other preset. Now practice each to totally other spots for your website. A border preset you made for a column works the similar approach in a blurb or name to motion.
Not anything ties those presets to at least one component sort. They transfer freely any place the similar possibility workforce exists. You’ll be able to nest them, too.
Element Presets cross deeper. They seize each and every taste element of person components, reminiscent of buttons or sections. They simply paintings inside of matching modules. Save an Part Preset for a button, and also you retailer all of it. Colours, spacing, fonts, shadows, borders. The whole thing will get bundled in combination. Practice that preset to any button and your design remains constant.
Part Presets can stack as neatly.
How They Paintings In combination
This two-tier construction will give you flexibility. Choice Team Presets assist you to keep watch over person possibility teams with precision. Part Presets provide you with pace when you wish to have entire designs able to head. Part Presets too can reference Choice Team Presets.
This creates a attached device. Consistency will get in-built mechanically.
Use a textual content possibility workforce preset in a blurb component. That very same preset can taste textual content to your accordions, tabs, and different components. When you wish to have to make adjustments, you replace as soon as. No want to search out and edit every component preset one after the other.
The Preset Supervisor
The Preset Manager will give you one workspace for all of your preset library. Click on the icon within the sidebar to look each and every preset you’ve created, arranged in a searchable, filterable record with each Choice Team Presets and Part Presets.
Upload new presets proper from this panel, plus edit, replica, delete, reorder, or set defaults with out looking via person components on other pages.
This keep watch over saves time as your library grows. Whilst you edit a preset right here, a are living preview seems subsequent in your settings so you spot precisely how adjustments glance with out touching your exact web page content material.
You’ll be able to set the preview towards other background colours out of your website’s variables, catching distinction problems ahead of they cross are living.
Why Bring together Optimum Semantic Tags In Presets
Presets already hang your visible types: colours, spacing, typography. Including semantic tags assists in keeping your markup choices along your design possible choices in a single position.
This turns into related as websites develop. A three-page portfolio would possibly keep manageable, however a 50-page industry website with a couple of staff contributors can fall aside temporarily. Any individual would possibly wrap content material in article tags, whilst every other would possibly skip them fully. Semantic possible choices get started being spotty, and pages finally end up inconsistent. Solving it manner manually checking each and every unmarried example.
Storing semantic tags in default presets solves this on the supply. Whilst you alter one thing, you replace the preset. The exchange flows to each and every component the place the preset applies, and also you get a unmarried reference level for all of your markup construction.
Configuring Semantic Tags In Presets
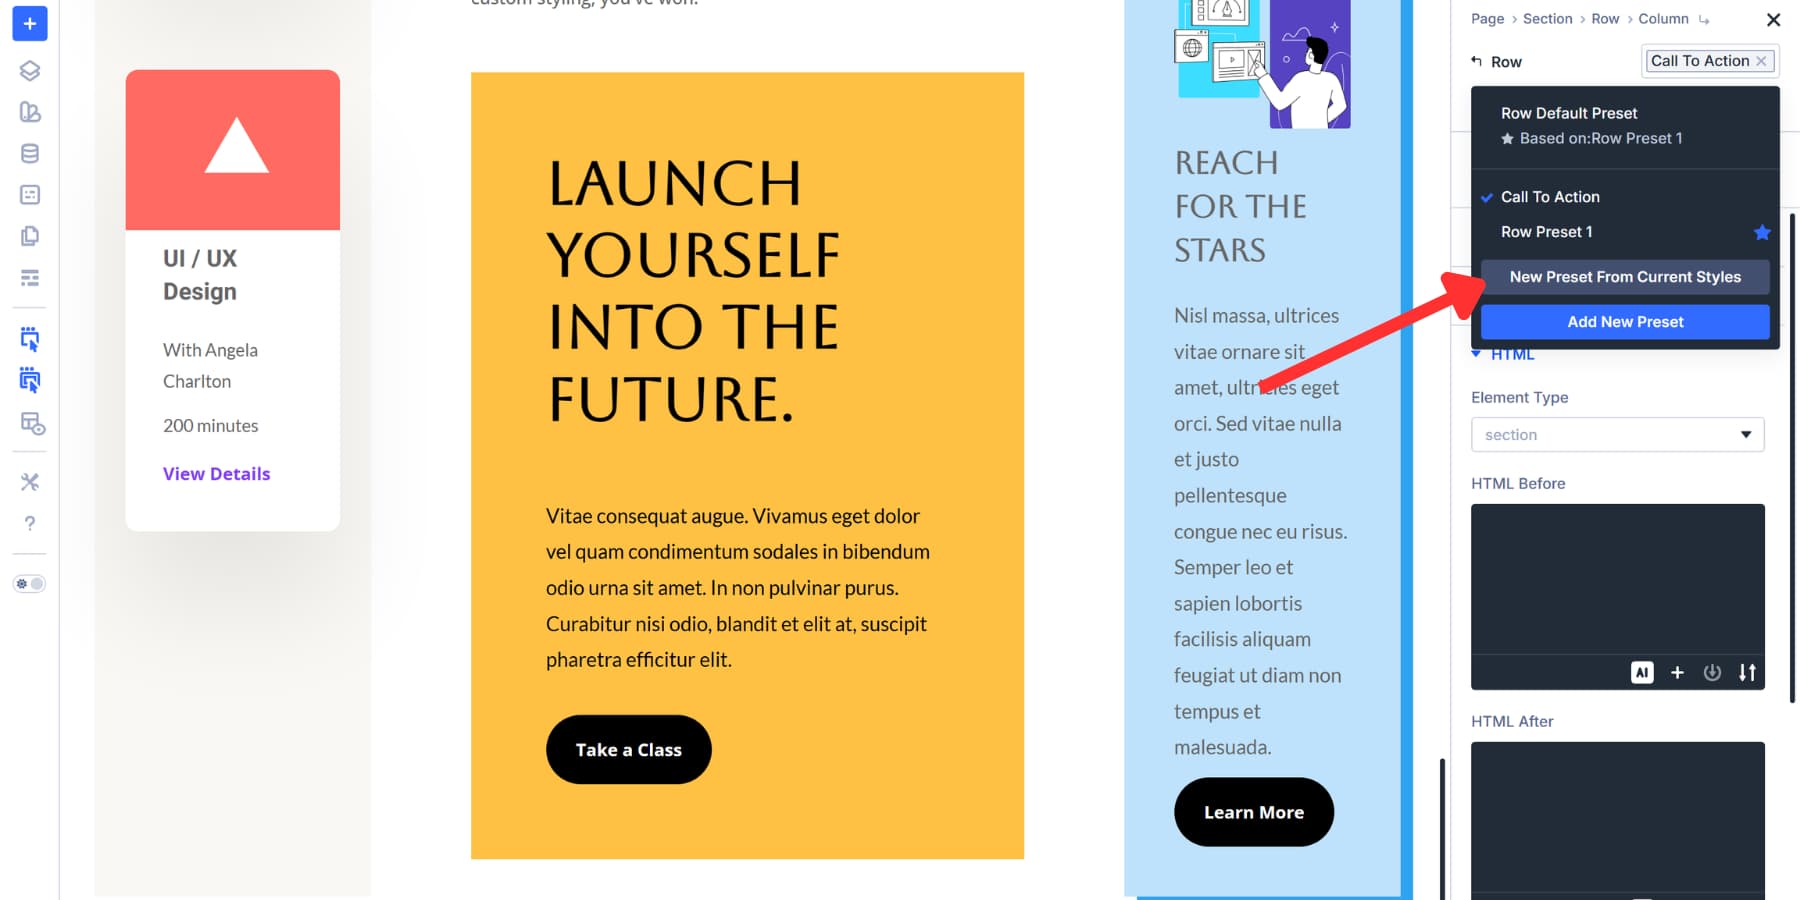
Let’s get started by means of growing column presets, since columns are some of the used components. Click on the Preset Supervisor icon to your sidebar. This opens a panel with two tabs: Parts and Teams.
![]()
Prior to You Make A Selection…
You’ll be able to save a column’s semantic tag in two puts: within a Column Part Preset or as an HTML Choice Team Preset. Each approaches paintings. The variation is in how reusable they’re.
Part Presets are tied to a unmarried component sort. A Column Part Preset can come with the HTML possibility workforce settings, together with Part Kind. This is handy when one preset equals one entire column development. But when you need the similar styled column for use with other semantic wrappers (for instance, now and again primary, now and again apart), you find yourself duplicating the similar column styling throughout a couple of Column Part Presets simply to switch the Part Kind.
Choice Team Presets are reusable any place that the similar possibility workforce exists. So in case you create an HTML Choice Team Preset that simplest units Part Kind, you’ll stay your column styling in a single Column Part Preset, then layer the semantic wrapper selection on best by means of deciding on a special HTML Choice Team Preset when wanted. That assists in keeping the styling and the semantic wrapper impartial, which is most often more uncomplicated to deal with at scale.
Development Commonplace HTML Choice Team Presets For Columns
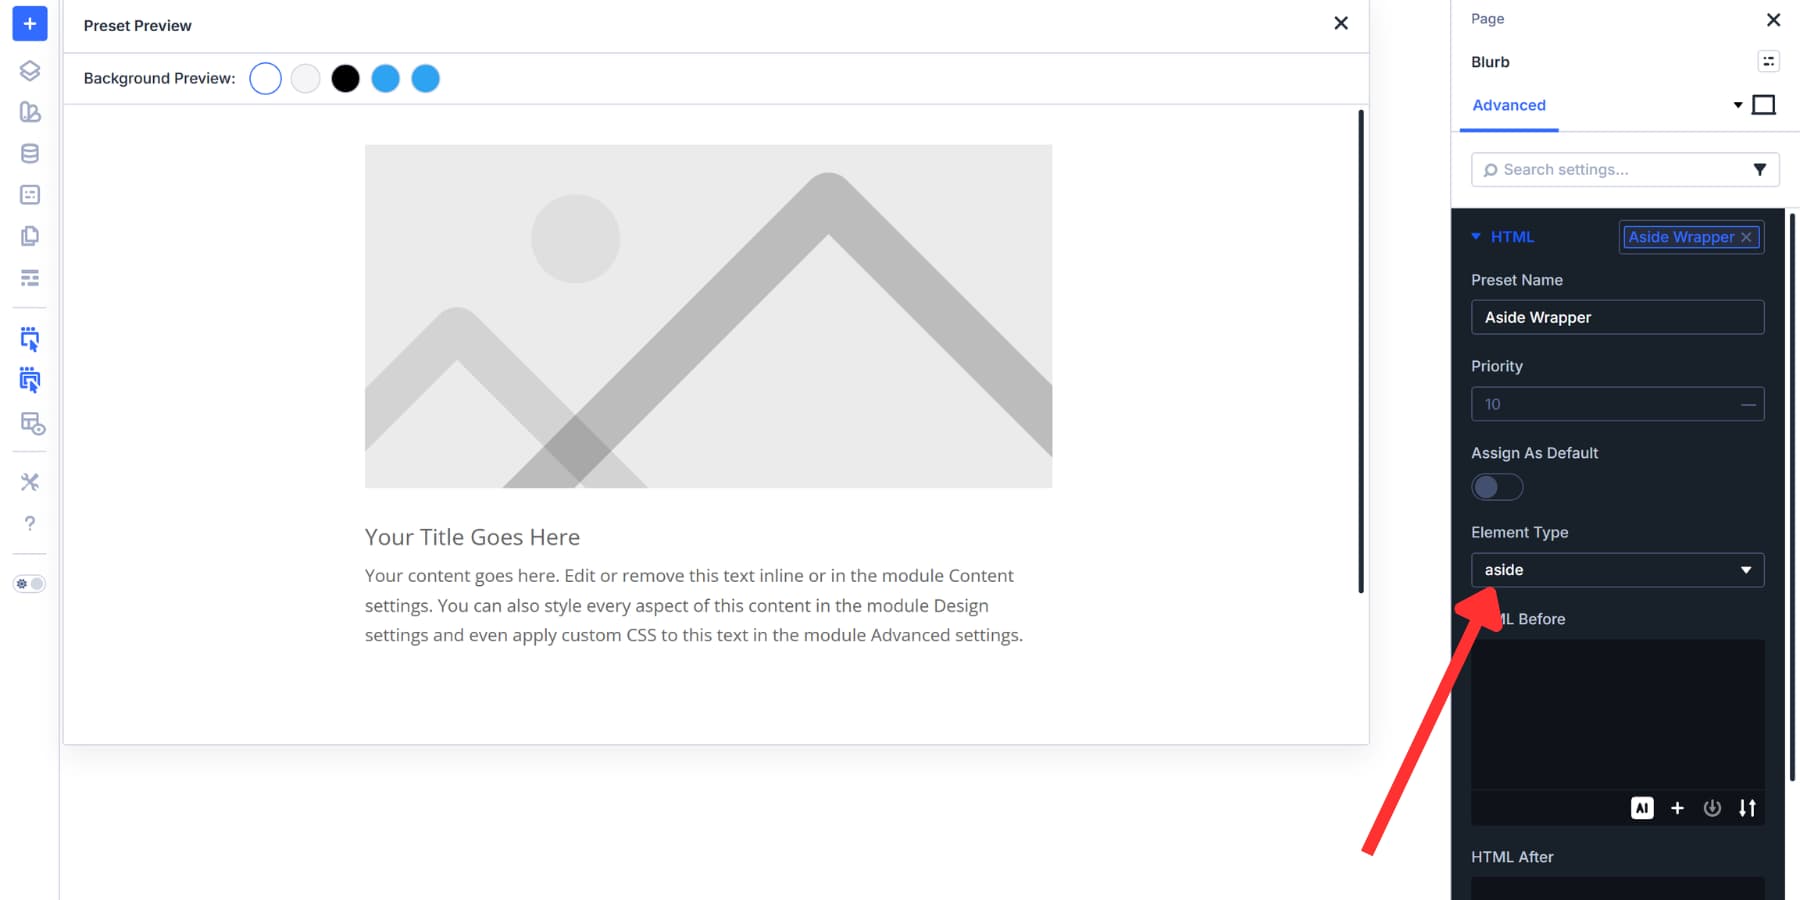
Cross to the Teams tab. Seek for “HTML” or scroll to search out the HTML possibility workforce. Make a choice it and click on Upload New Preset. The settings panel opens.
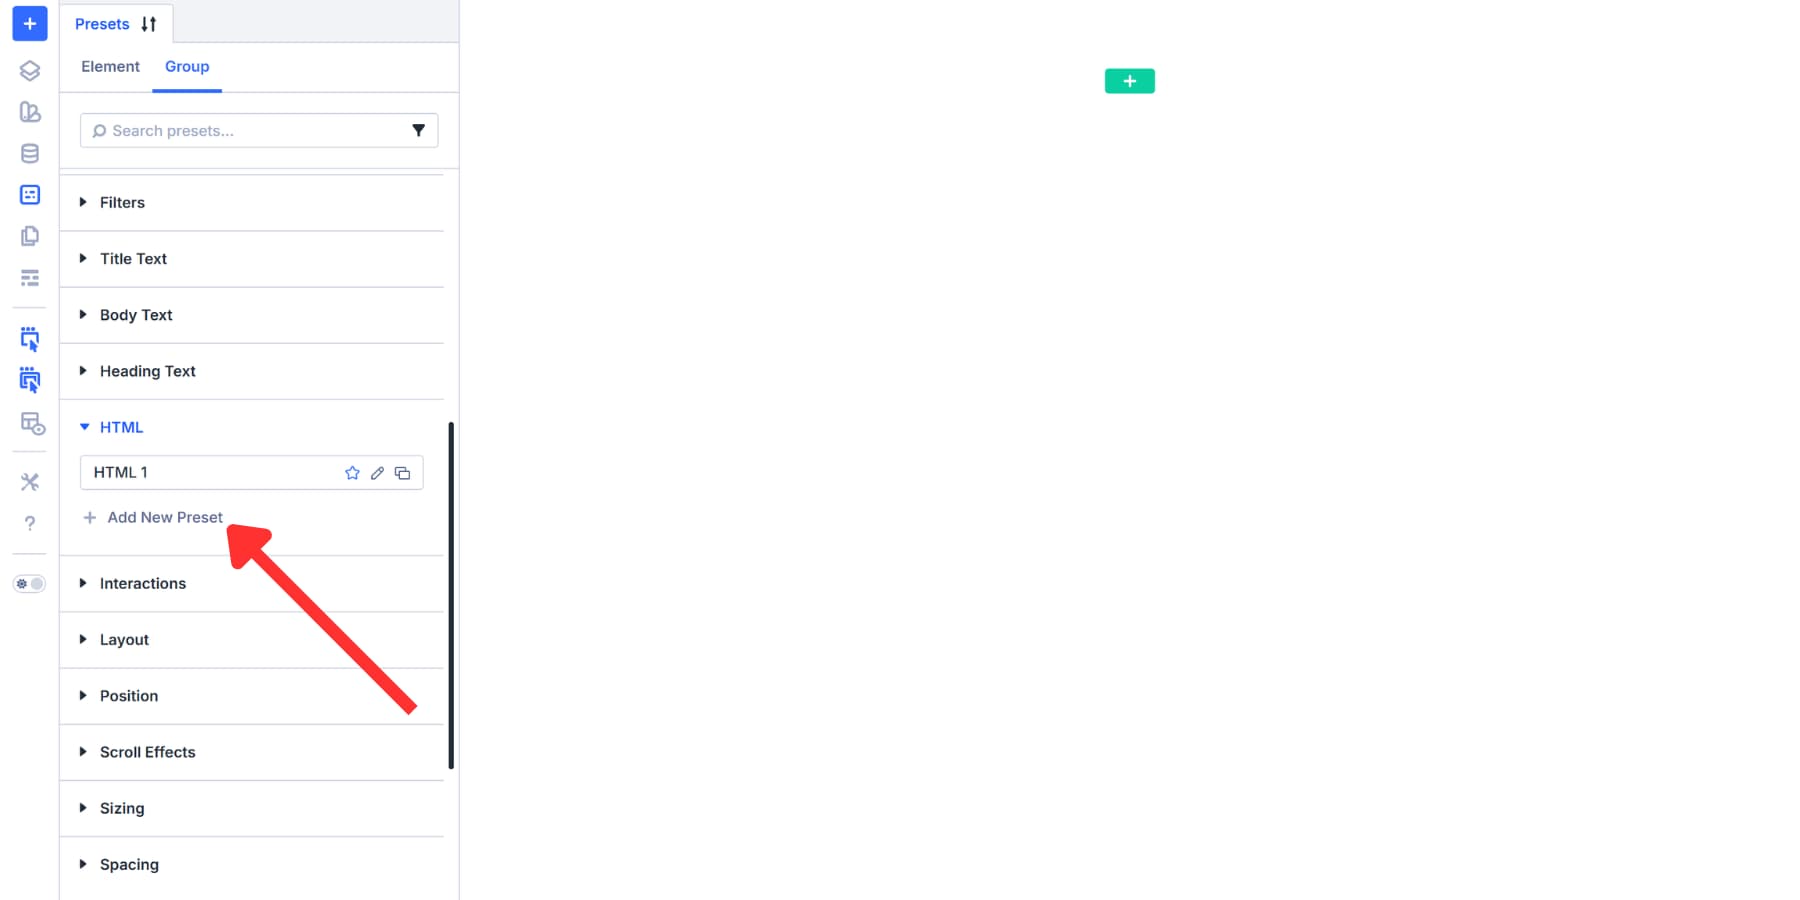
Set the Part Kind dropdown to apart. Identify this preset “Apart Wrapper” and save. This tag will have to be used for supplementary content material like writer bios, similar posts, or promotional widgets that relate to, however stand cut loose, the primary tale.
Believe including presets for different commonplace wrappers as neatly:
- Primary Wrapper: Set Part Kind to primary. This identifies the principle content material column. Use as soon as in step with web page for the core content material that guests got here to look.
- Nav Wrapper: Make a choice nav for columns containing menus, class lists, or website navigation hyperlinks.
- Phase Wrapper: Pick out phase for columns grouping similar content material beneath a theme. Product options or carrier listings have compatibility right here.
- Article Wrapper: Make a choice article for standalone content material like weblog posts, information tales, or product descriptions.
Now, you’ve presets able for the 5 maximum commonplace column tags.
We didn’t assign any of those as a default as a result of every column on a web page serves a special function. Surroundings one tag as default manner each and every column you drop onto the web page inherits the similar wrapper, and maximum of them shall be incorrect. Mistaken semantic tags lie to display readers and serps the similar approach lacking tags do. Practice those presets as wanted.
Return to the Part tab, to find “column”, and create Part Presets to your columns. Upload colours, spacing, borders, shadows, and extra. The most productive workflow here’s to create Choice Team Presets to your types and reference them, whilst additionally the usage of Design Variables to stay values constant throughout modules.
Configure Default Presets
Columns be offering flexibility, so Choice Team Presets paintings neatly there. There are cases the place assigning a default Part Preset makes extra sense. Let’s have a look.
Development A Preset For Sections
Get started with sections. Open the Preset Supervisor and to find Phase beneath Parts.
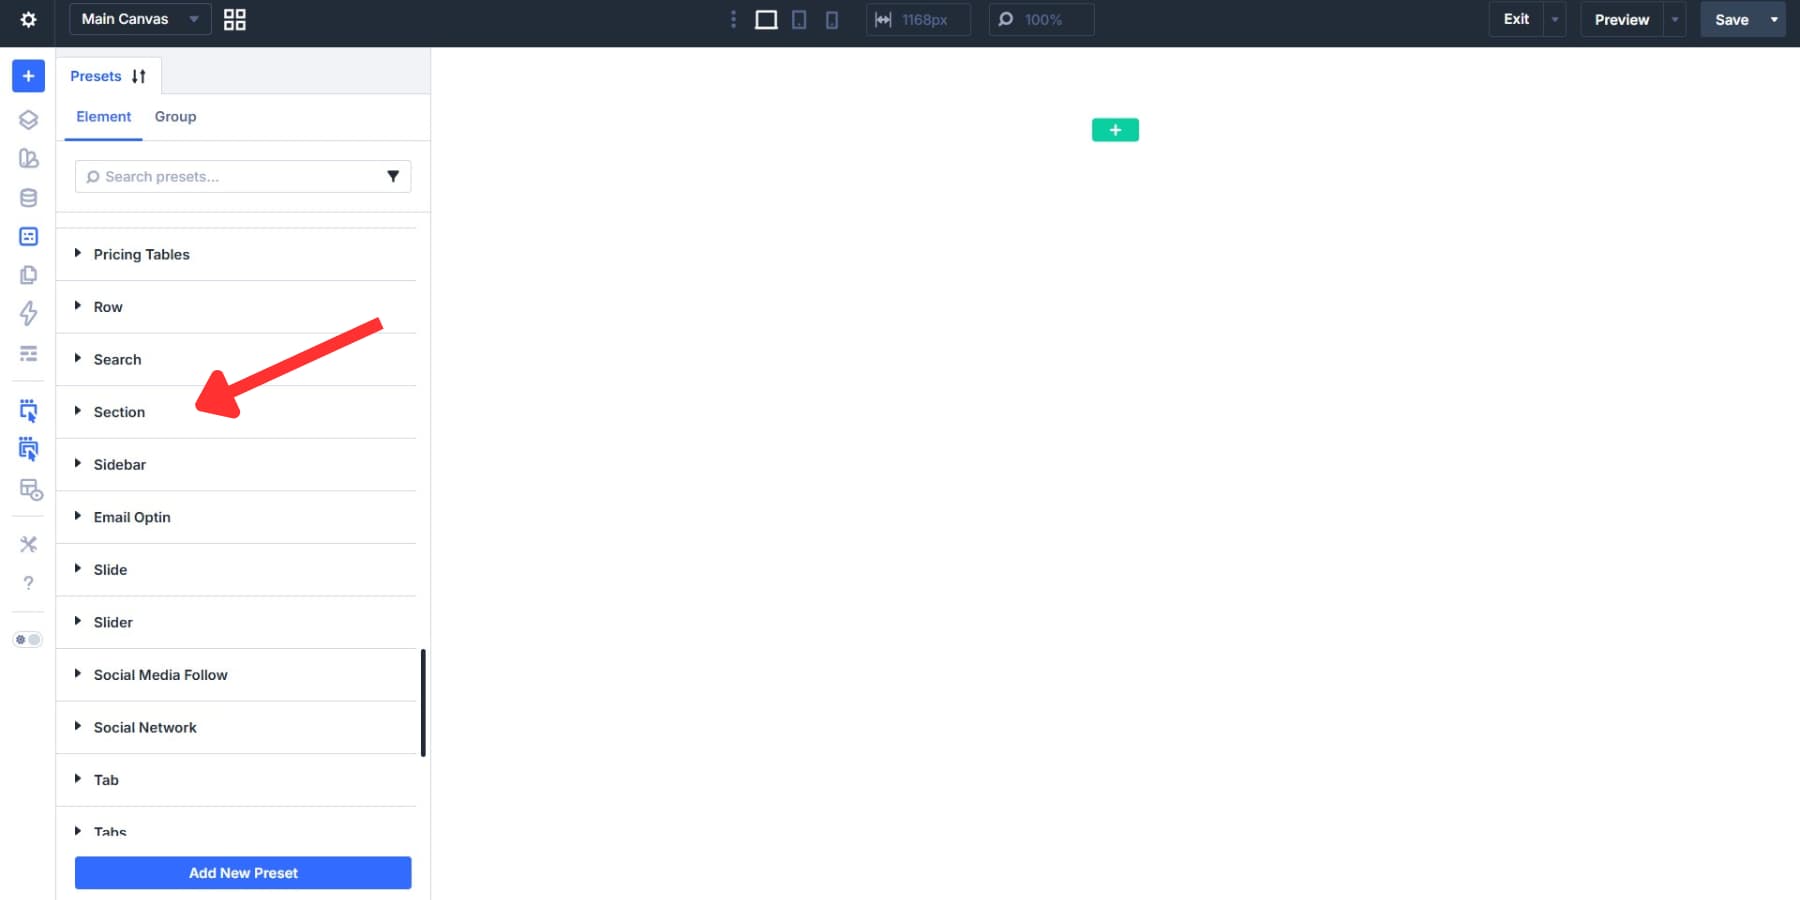
Click on Upload New Preset. Taste it as wanted, then cross to the HTML possibility workforce and set Part Kind to phase.
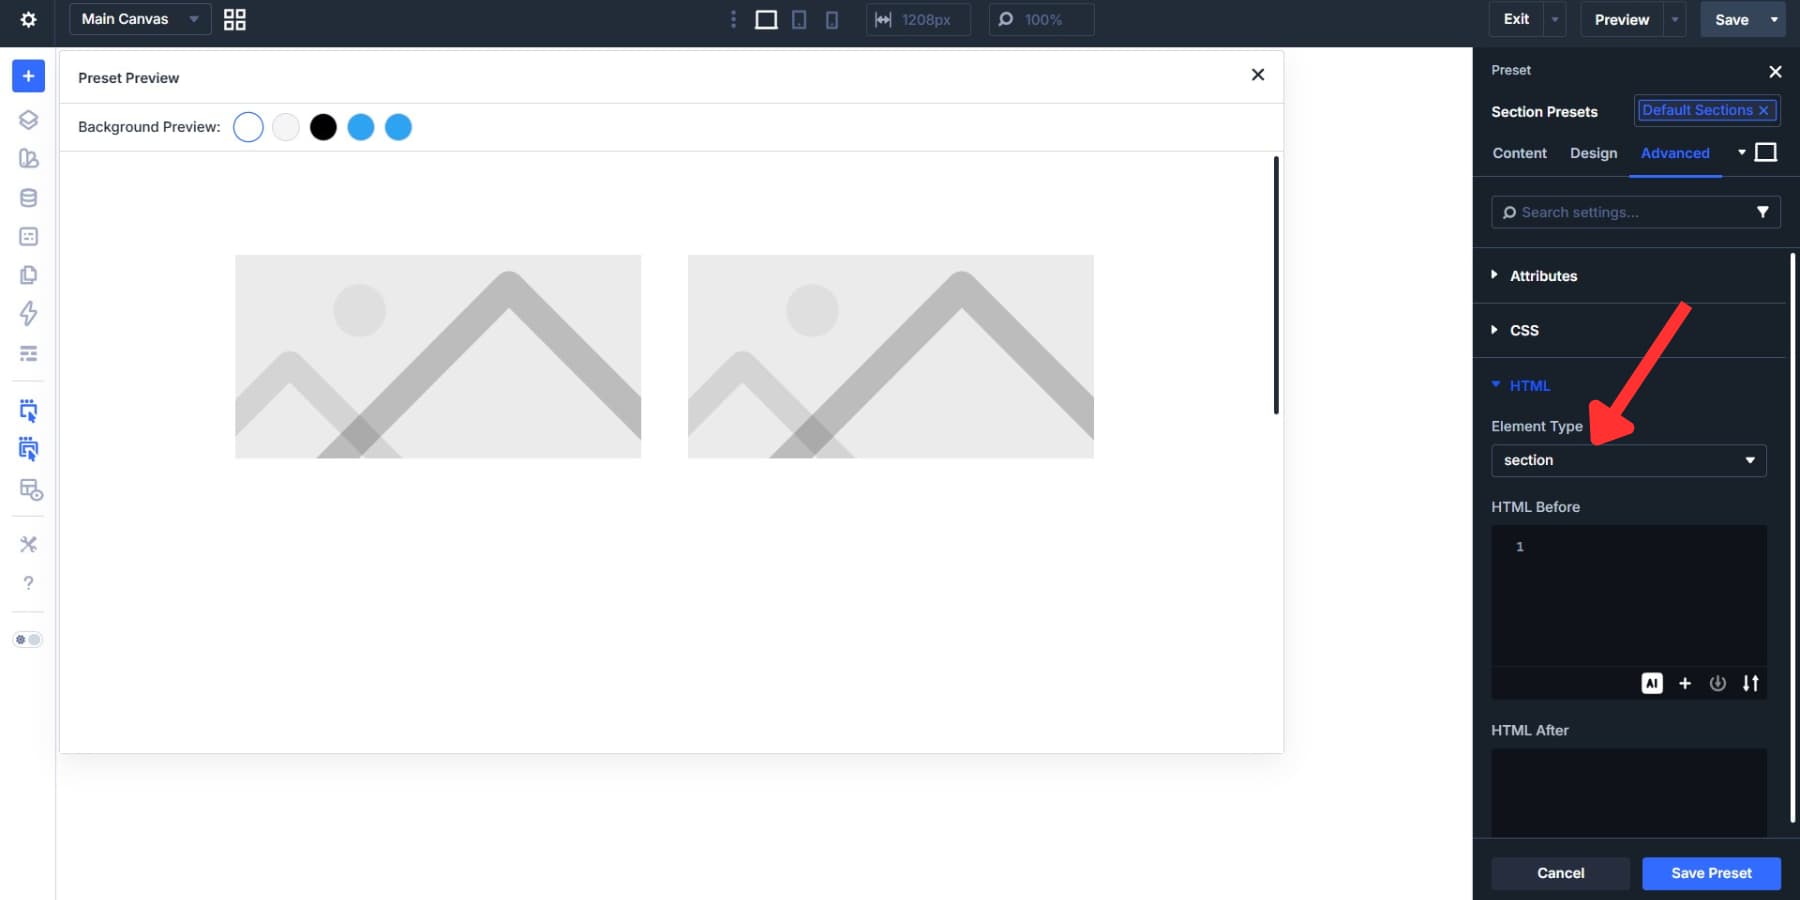
Toggle “Assign As Default” on and save.
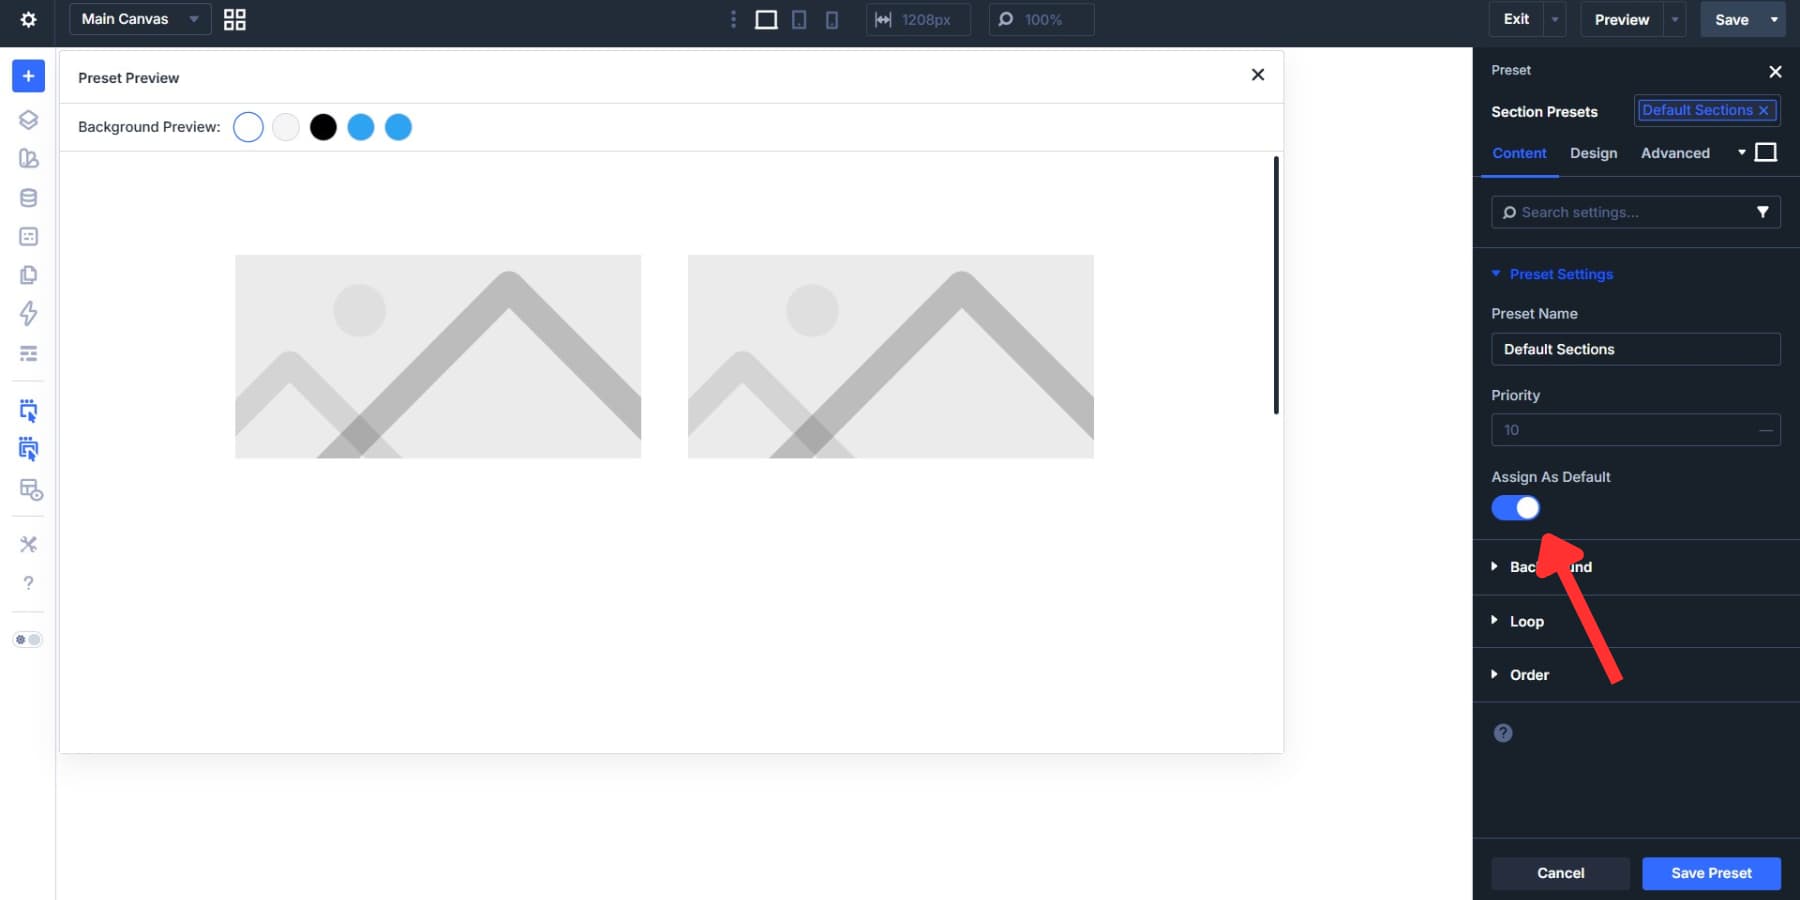
Now upload a contemporary phase to any web page. Open its Complex settings, and the HTML possibility workforce already reads phase. The tag is there ahead of you set a unmarried row or module within it. That toggle makes a preset energetic slightly than conserving it to your library.
If a specific phase wishes a special tag, simply make a choice one of the vital HTML Choice Team Presets you created previous from the HTML possibility workforce. That switch simplest impacts the surroundings you modified. The whole thing else remains intact with out breaking the device.
This manner maintains construction whilst nonetheless permitting customization. Construct with presets as your basis, then alter particular components when your design calls for one thing other.
Including HTML Tags For Icon Lists
Let’s stroll via every other instance the usage of an Icon Listing and Icon Listing Pieces:
Now, to find Icon Listing beneath Parts within the Preset Supervisor. Click on Upload New Preset. This creates an Part Preset that captures the entirety about your icon record in one position.
Taste your record first. Set colours, spacing, and typography. Pick out your icon taste and measurement. Now upload the HTML wrapper. Set Part Kind to ul for an unordered record. This makes your record semantically proper by means of default.

Then, to find the Icon Listing Merchandise within the Parts record. Click on Upload New Preset. This types your personal record pieces. Set colours, spacing, and typography for the textual content. Pick out your icon taste and measurement.
Set Part Kind to li since every merchandise turns into a listing merchandise.
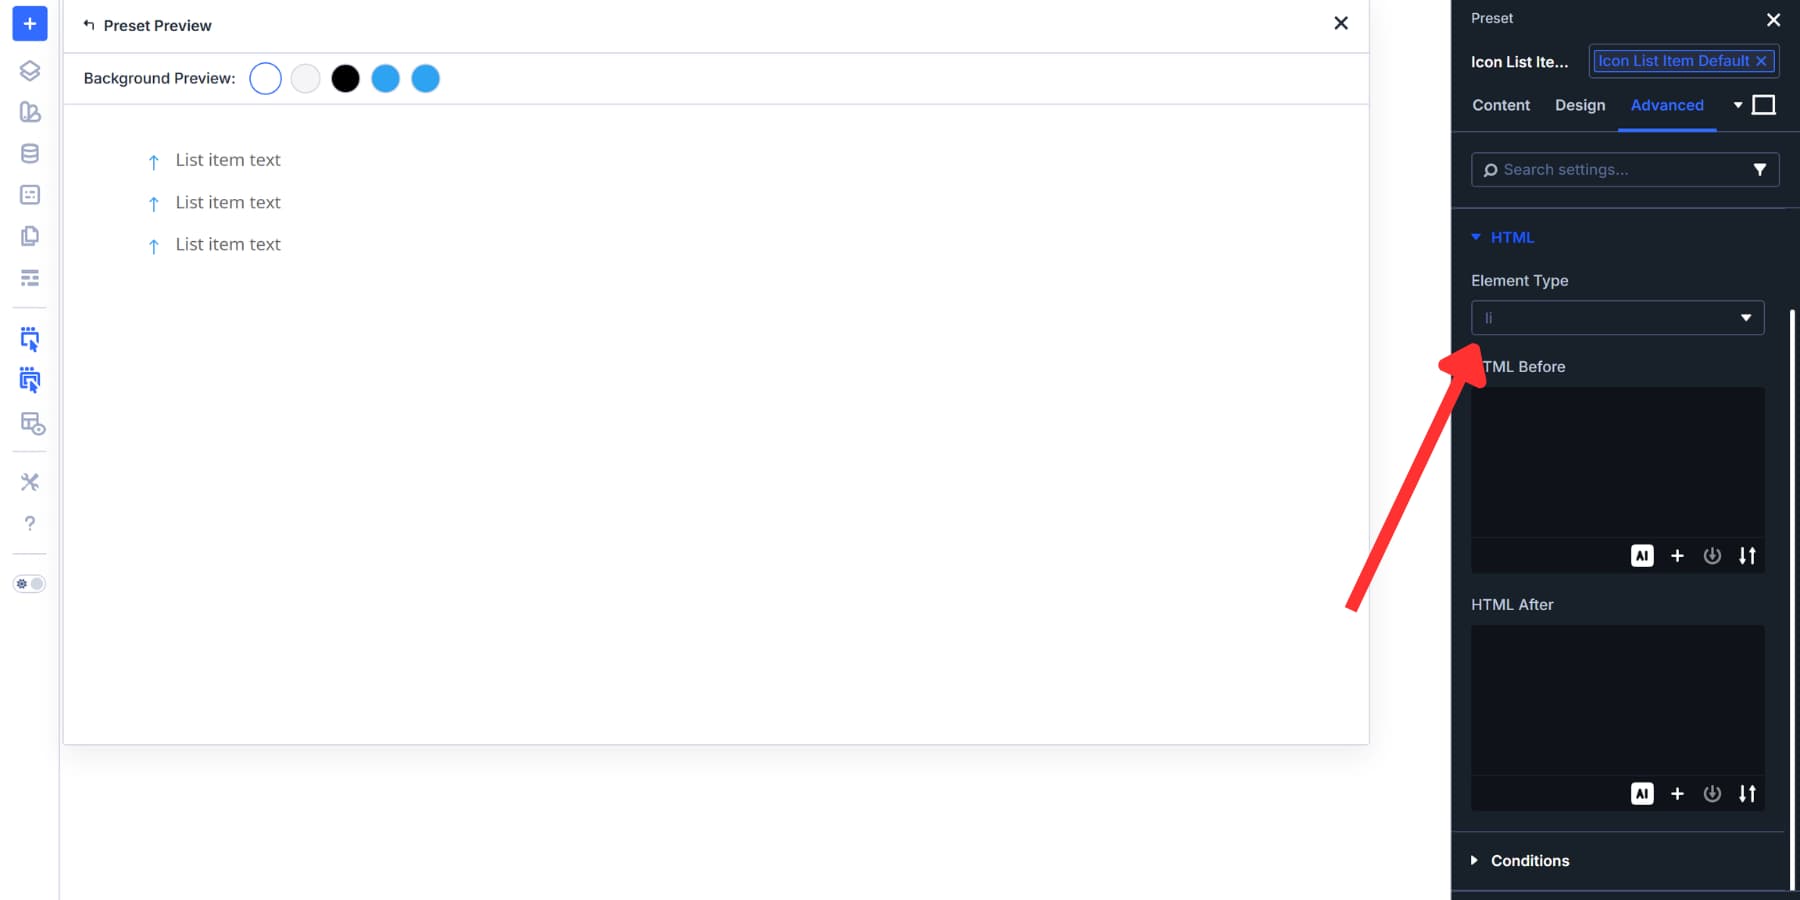
Prior to saving every preset, toggle “Assign As Default” on. Do that for the Icon Listing preset and once more for the Icon Listing Merchandise preset.
Now, upload a brand spanking new Icon Listing module in your web page. Open its settings. The Part Kind already reads ul. Open any record merchandise, and the Part Kind already reads li. Each tags are there ahead of you configure anything else. No dropdown opened. No possibility workforce touched.
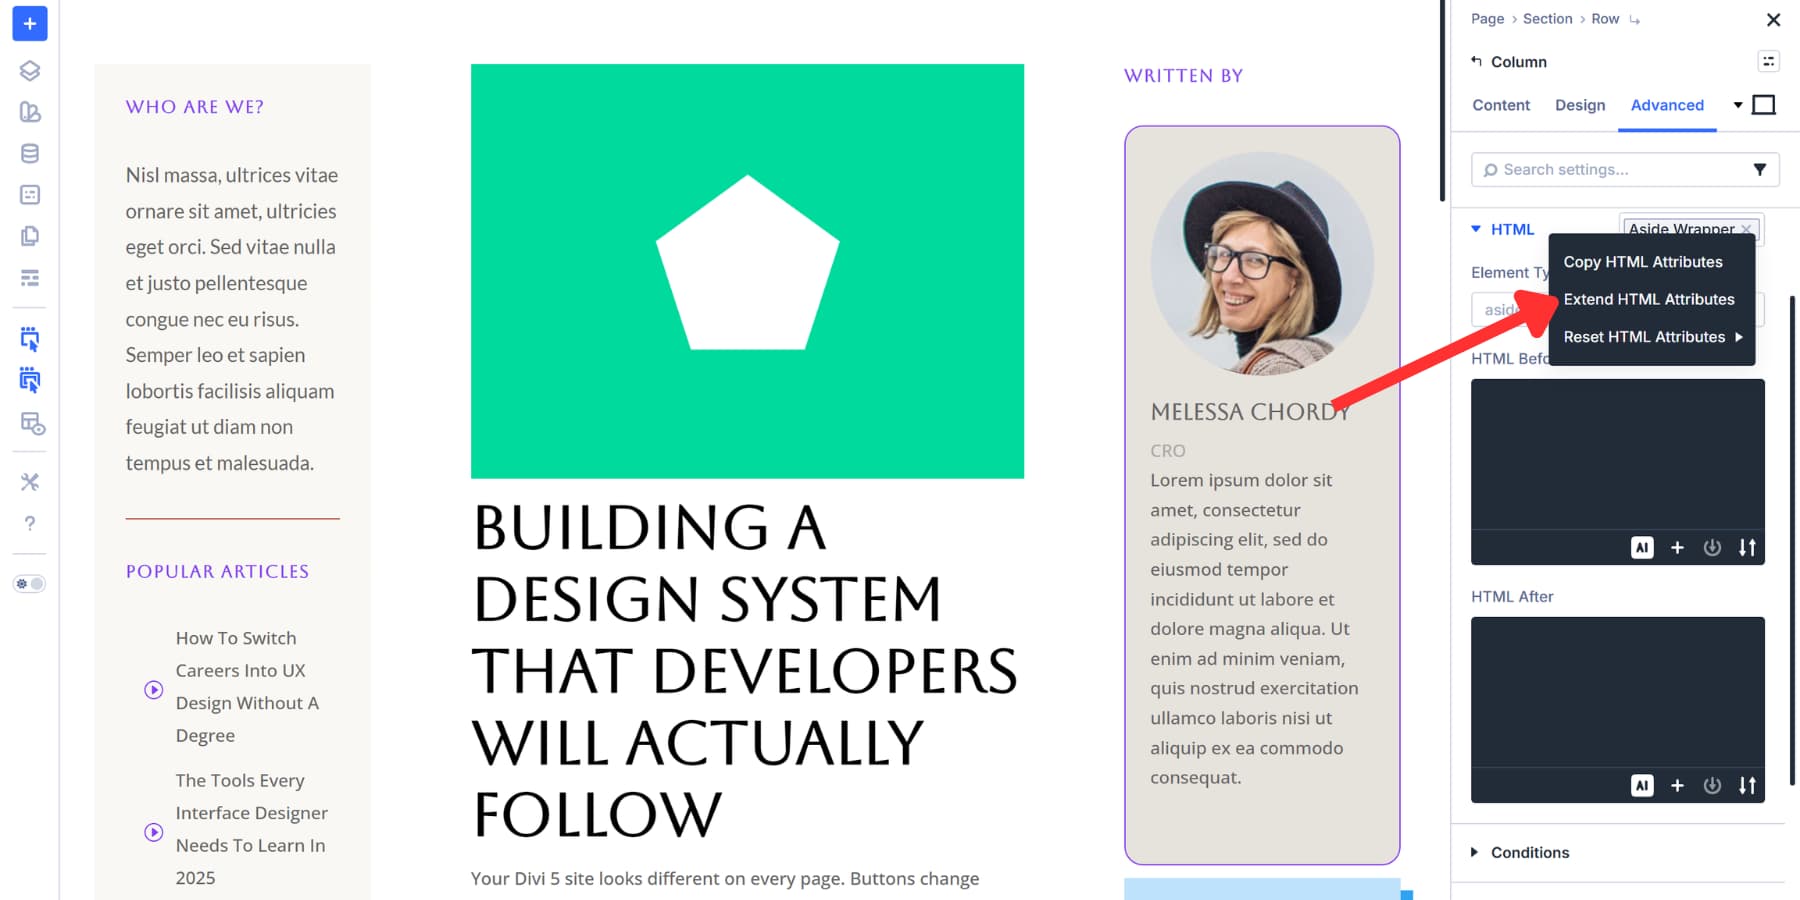
Including Accessibility Attributes
If you are there, beneath Attributes, click on Upload Characteristic. Set Goal Part to Symbol or Icon, Characteristic Identify to aria-hidden, and Characteristic Worth to true.
![]()
Icons in Icon Lists are most often ornamental. They upload visible pastime however don’t put across that means that display readers want to announce. Hiding them assists in keeping the enjoy cleaner for other folks the usage of assistive era.
On this case, we baked the wrappers (and attributes) without delay into the Part Presets as a result of you’re going to hardly want anything else past the wrapper and accessibility setup after they’re configured.
Those tags are superb defaults for the Icon Listing and Icon Listing Merchandise, however we incorporated the stairs anyway as a useful instance of when to make use of Part Presets as opposed to Choice Team Presets.
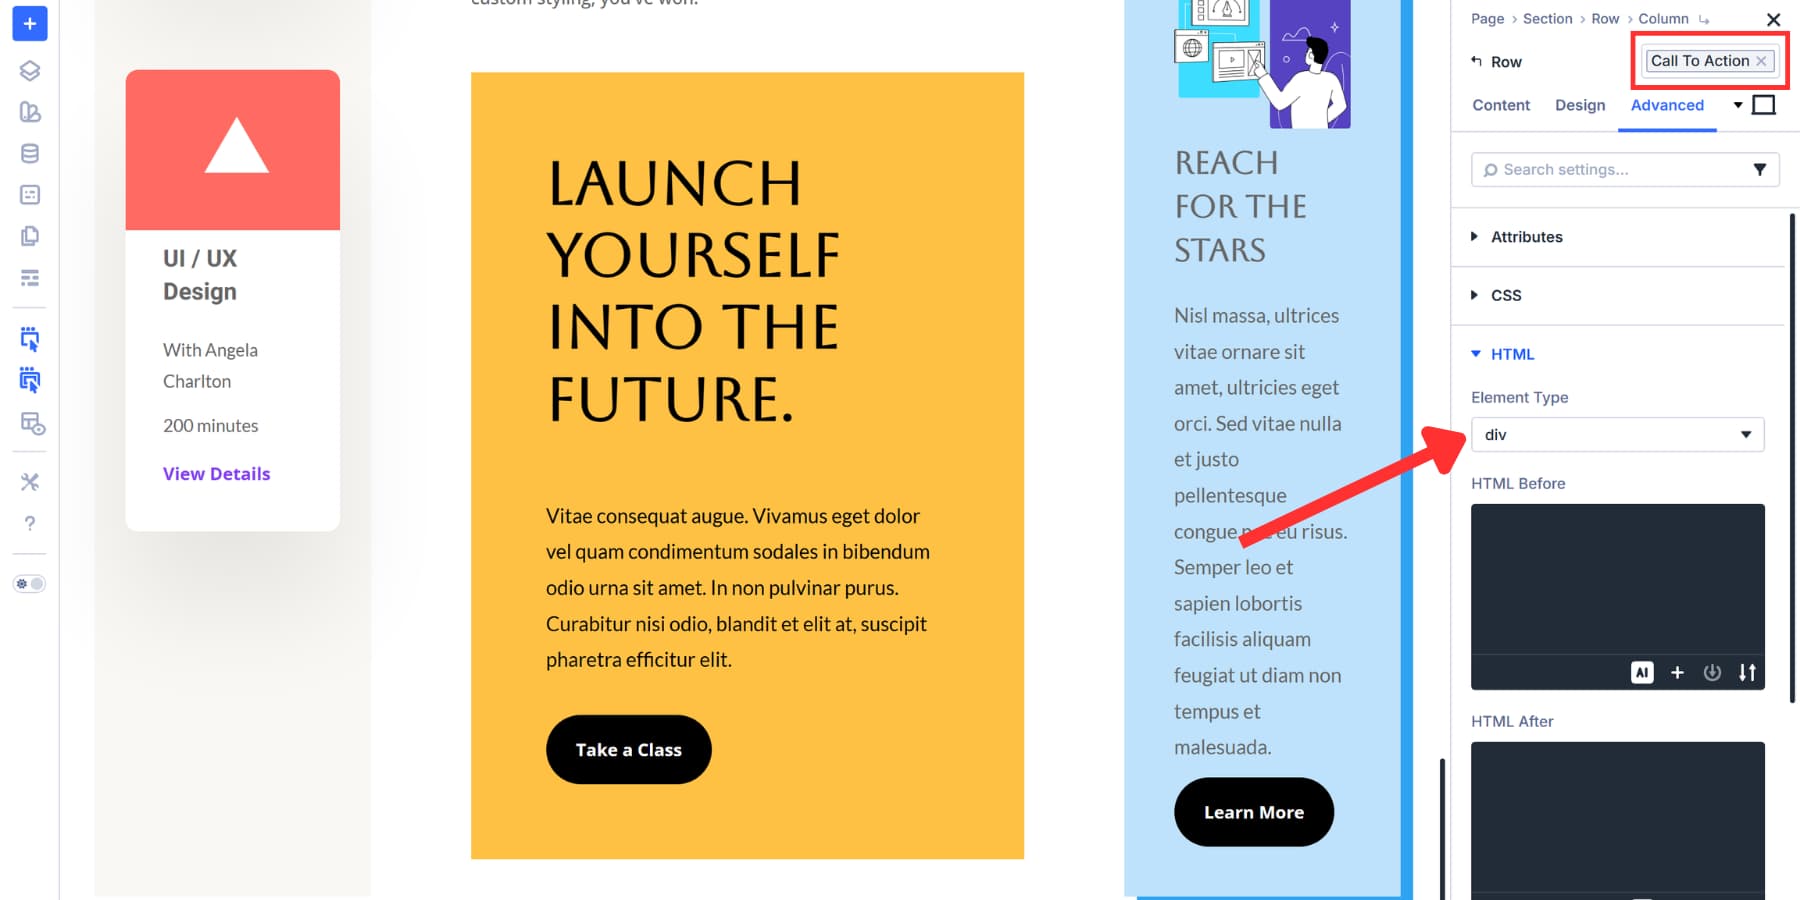
Likewise, components like Symbol and Button already use suitable tags by means of default, and respectively, so their Part Presets will have to center of attention purely on visible styling as an alternative. No Choice Team Preset is needed for the ones components both, since correct tags are carried out from the beginning.
Practice Those Presets Throughout Your Web page
Making use of your presets works via two easy paths, relying on the place you saved what:
For HTML wrapper Choice Team Presets: cross to Complex > hover over the HTML possibility workforce > preset icon, and make a choice your Choice Team Preset.
To use an Part Preset, click on the preset selector on the best proper of the settings panel and make a choice your Part Preset from the dropdown.
As we discussed previous, those presets aren’t mounted constraints. The whole thing stays adjustable. Practice an Part Preset, then switch out person possibility teams inside of it for various results. Or upload customized values without delay to express settings. Both approach, simplest the surroundings you contact adjustments. The whole thing else remains intact.
Growing Presets From Current Portions
Perhaps you constructed your website ahead of fascinated by semantic tags. The pages paintings wonderful, however the entirety nonetheless makes use of generic div wrappers. You’ll be able to upload correct markup to these current components and switch them into presets concurrently.
Open any phase, row, column, or module for your website. Cross to Complex settings and to find the HTML possibility workforce. Set the Part Kind to the fitting semantic tag for what that component does.
As soon as configured, hover over the HTML possibility workforce and click on the preset icon that looks. Make a choice Create a brand new preset out of your present settings. Identify it obviously, like “Article Wrapper” or “Nav Column.”
The similar works for Part Presets.
Lengthen HTML Wrappers To More than one Parts
Perhaps you place Part Kind to apart on one column, then discovered a couple of others throughout your web page want the similar semantic tag. Lengthen Attributes can practice that wrapper selection in one motion, slightly than opening every component one after the other.
Proper-click the HTML possibility workforce and make a choice Lengthen Attributes.
Set your scope to Complete Web page, pick out which component sorts to focus on, and click on Lengthen Attributes. This extends the Part Kind surroundings with out touching any styling.
Each and every matching component inherits that semantic wrapper right away. Use this when retrofitting websites or whilst you understand partway via a construct that a couple of components want constant markup. But when your presets already maintain wrapper allocation correctly, you received’t want this step in any respect.
Check out Semantic Parts In Divi 5 As of late!
Your website’s semantic basis will get set ahead of you set the primary module. Default presets maintain the markup paintings mechanically, so each and every new component follows correct construction with out further steps.
You received’t want to retrofit anything else later or manually test dozens of pages. And whilst you do want to, Divi 5 supplies gear like Lengthen Attributes that can assist you practice constant markup temporarily.
Obtain Divi 5 and let presets do the heavy lifting when you construct pages that paintings neatly for everybody who visits.
The put up Configuring Optimal Semantic Tags In Divi 5’s Default Presets seemed first on Elegant Themes Blog.
Contents
- 1 What Are Semantic Tags?
- 2 Divi 5’s Presets: A Tough, Attached Design Machine
- 3 Why Bring together Optimum Semantic Tags In Presets
- 4 Configuring Semantic Tags In Presets
- 5 Check out Semantic Parts In Divi 5 As of late!
- 6 Using DevOps and Kinsta’s staging environments for WordPress web site construction
- 7 Divi vs Brizy: Which Drag & Drop Builder is Easiest? (2024)
- 8 How To Construct A Workforce Listing The use of Divi 5’s Loop Builder

0 Comments