
Every now and then a label or icon needs one additional line of context, on the other hand you don’t wish to crowd the internet web page. Tooltips are perfect for form hints, serve as explanations, and subtle onboarding.
In this submit, we’ll show you how you can create responsive hover/tap tooltips in Divi 5 with Interactions. Let’s get to it!
What Are Tooltips (And Why Use Them)?
Tooltips are small messages that appear when you hover over or click on on a webpage. Switch your cursor over a button; a small box would in all probability say what it does. Click on on an icon, and likelihood is that you’ll see a handy guide a rough phrase.
Internet websites use tooltips to save lots of quite a lot of area. Instead of filling the internet web page with explanations, they just divulge details when sought after. Some web sites moreover use them to highlight new choices likelihood is that you’ll overlook. The most efficient ones keep the text brief, in most cases beneath 180 characters.
When designed well, tooltips be in agreement without transferring into one of the best ways. They resolution rapid questions so folks can merely keep moving through a internet web page.
Tooltips And Additional, Made Easy With Divi 5’s Interactions
Divi 5 incorporates a brand new serve as referred to as Interactions that mainly changes how web websites respond to visitors. Interactions will let you create dynamic behaviors where elements for your internet web page react to shopper actions, all without writing any code.
The new Interactions possible choices are to be had for the duration of the Complicated tab of any module, row, column, or section in Divi’s visual builder.
The tool has 3 parts: triggers, effects, and objectives. Triggers are shopper actions like clicking, hovering, or scrolling. Effects are what happen next, like showing hidden content material subject matter, changing colors, or moving elements. Targets are the parts of your internet web page that get affected.
Tooltips are just one use case. The identical equipment can toggle FAQ sections, animate hero content material subject matter on scroll, and assemble pop-ups without the need for custom designed code.
The interactions robotically artwork all over desktop, tablet, and mobile units.
Construction Your Tooltip In Divi 5
Now that what Interactions can do, it’s time to build your first tooltip. The process is modest and happens absolutely within Divi’s visual builder. You’ll artwork with the identical interface you understand, merely with some new possible choices that control how elements respond to shopper actions.
1. Growing Your Tooltip Content material subject matter First
Quicker than you set up any interactions, assemble the actual tooltip content material subject matter for your internet web page. Get began via together with a Text Module in your section and typing your tooltip message. You’ll be capable of moreover use an Icon File Module for tooltips. Keep the text and icons transient and helpful; spherical 20 to 30 words works best possible imaginable for plenty of cases.
![]()
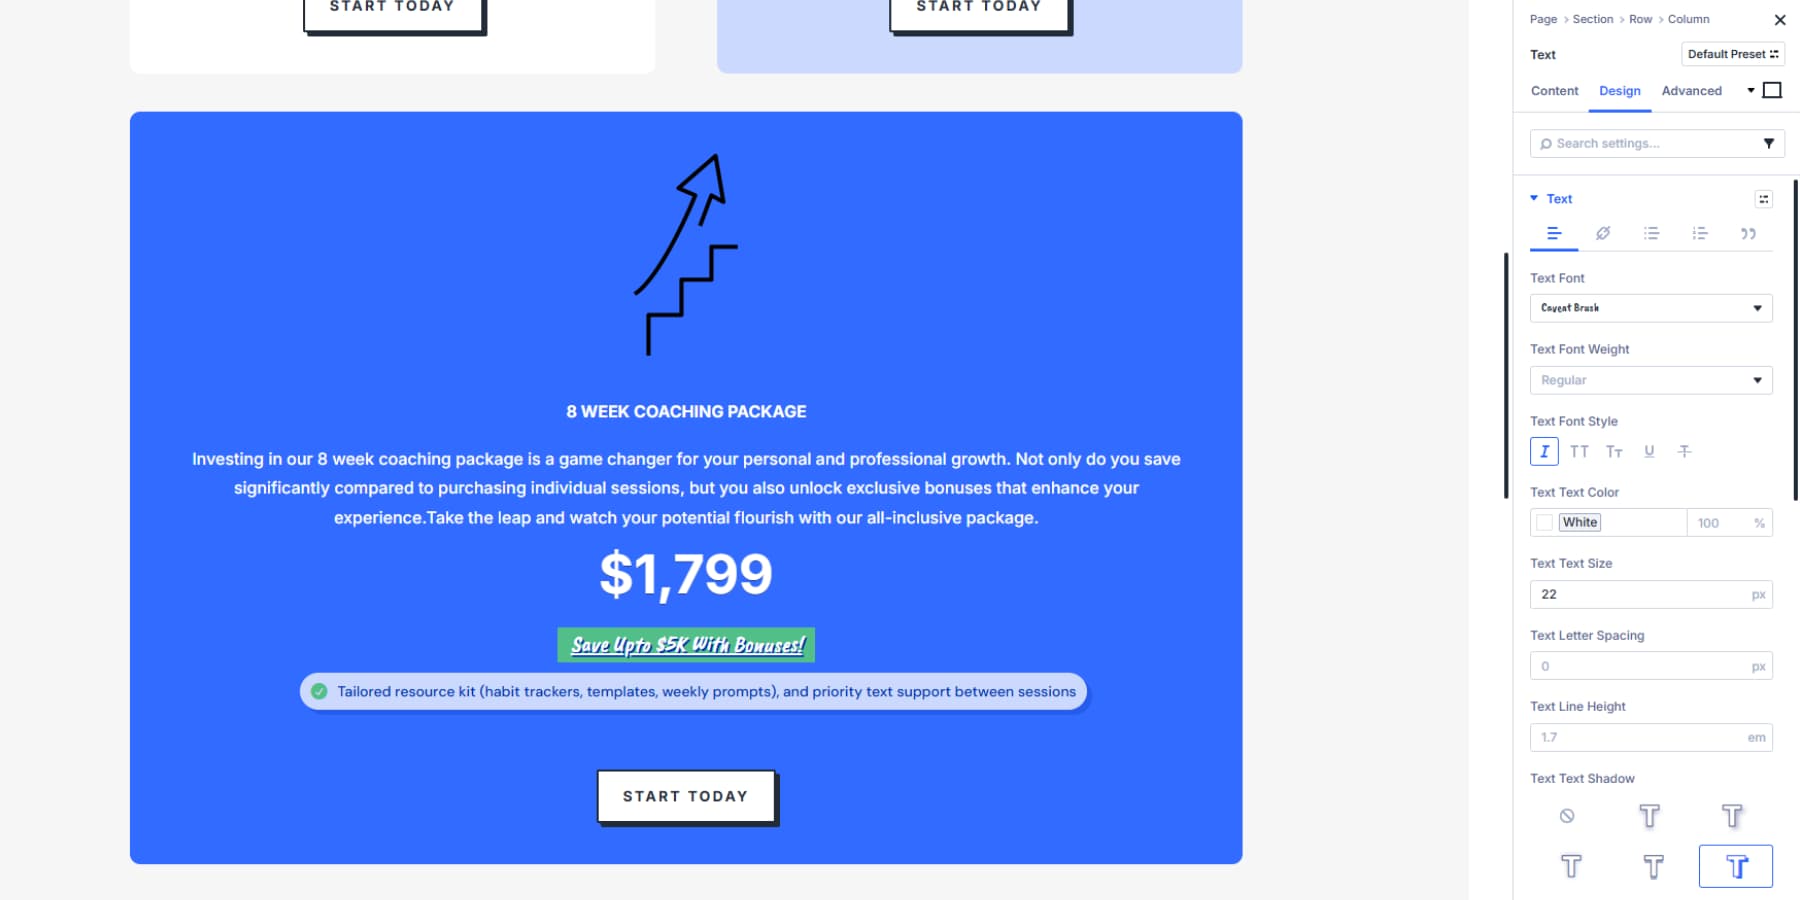
Style your tooltip to look the section. Give it a background coloration that stands out from your internet web page on the other hand stays readable. Add 5 to 10 pixels of padding so the text has breathing room. Set a border radius of 8 to 12 pixels for that antique tooltip bubble look. You’ll be capable of add a cultured box shadow to lift it off the internet web page.
For text styling, use a font dimension reasonably smaller than your body text, spherical 14 or 15 pixels. Make certain that the text coloration contrasts neatly along side your background variety. White or dark text on every dark and light-weight backgrounds works well. You’ll be capable of moreover use Design Variables for colors and spacing to tie tooltips into your internet web page’s broader styling tool.

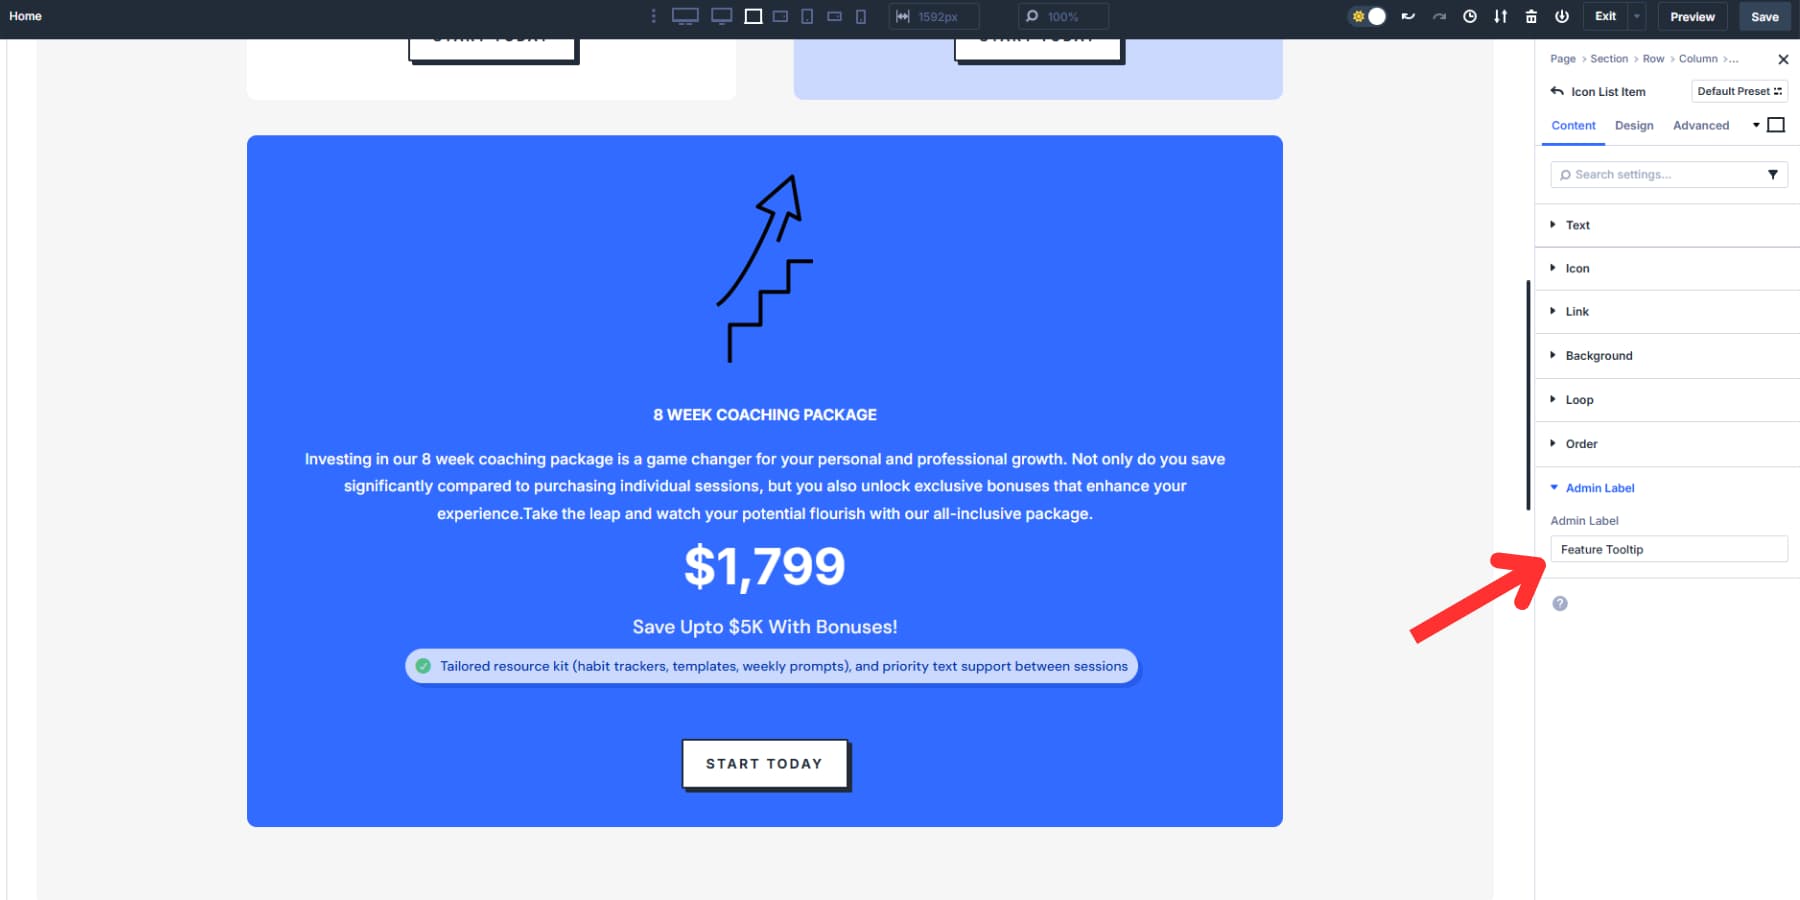
Determine it the use of the Admin Label field, like “Serve as Tooltip” for easy id all over setup.
Consider together with visual cues to the “father or mom” module where the tooltip would in all probability appear. For example, check out an underline for text elements or a cultured background coloration. The ones hints tell visitors that additional wisdom is having a look forward to them.
You may also add custom designed CSS to the daddy or mom module so that when hovered over, it displays the antique “?” cursor, indicating that more information is available.
Go to the module’s sophisticated settings and put the following CSS:
selector p {
cursor: be in agreement;
}
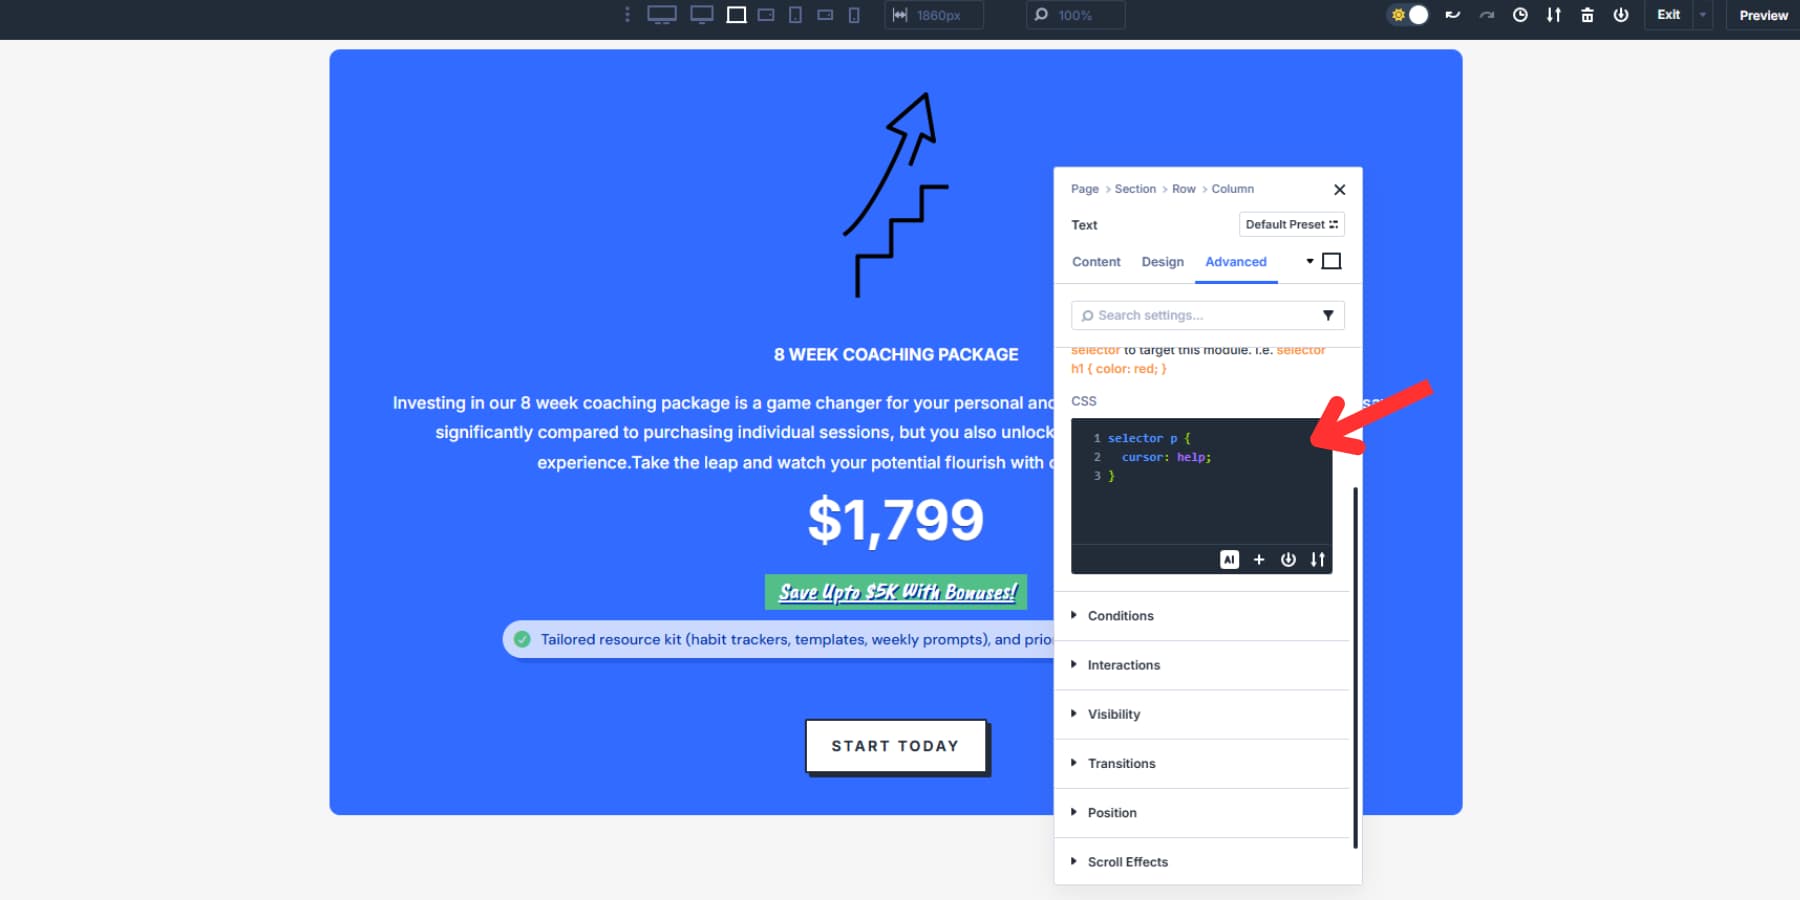
It’s worthwhile to need to adapt the code to test your module. For example, if your tooltip father or mom is a button, you might be able to change it p with button instead. This isn’t a required step, on the other hand it is a usual setup for tooltips.
2. Configuring Interactions And Triggers
Now, make a choice the module that may purpose your tooltip and head to the Complicated tab. Seek for the Interactions dropdown on the subject of the bottom.
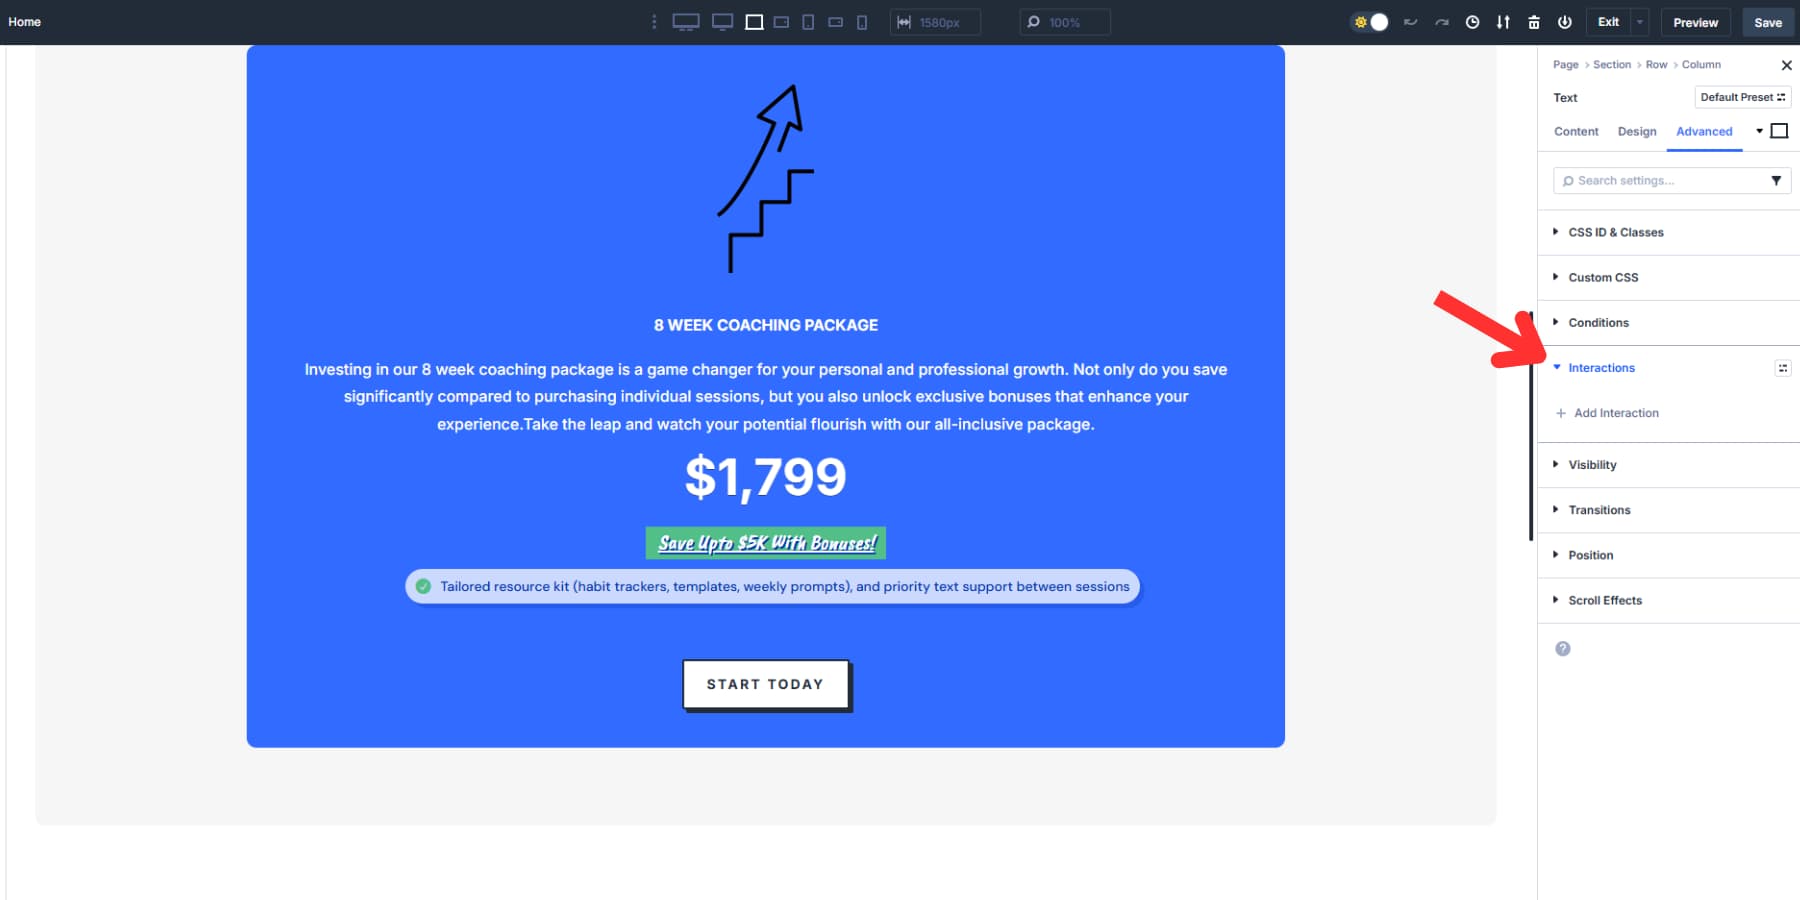
Hit “Add Interaction” and in addition you’ll see six purpose possible choices: Click on on, Mouse Enter, Mouse Cross out, Viewport Enter, Viewport Cross out, and Load. Go with “Mouse Enter” for the usual hover tooltip.
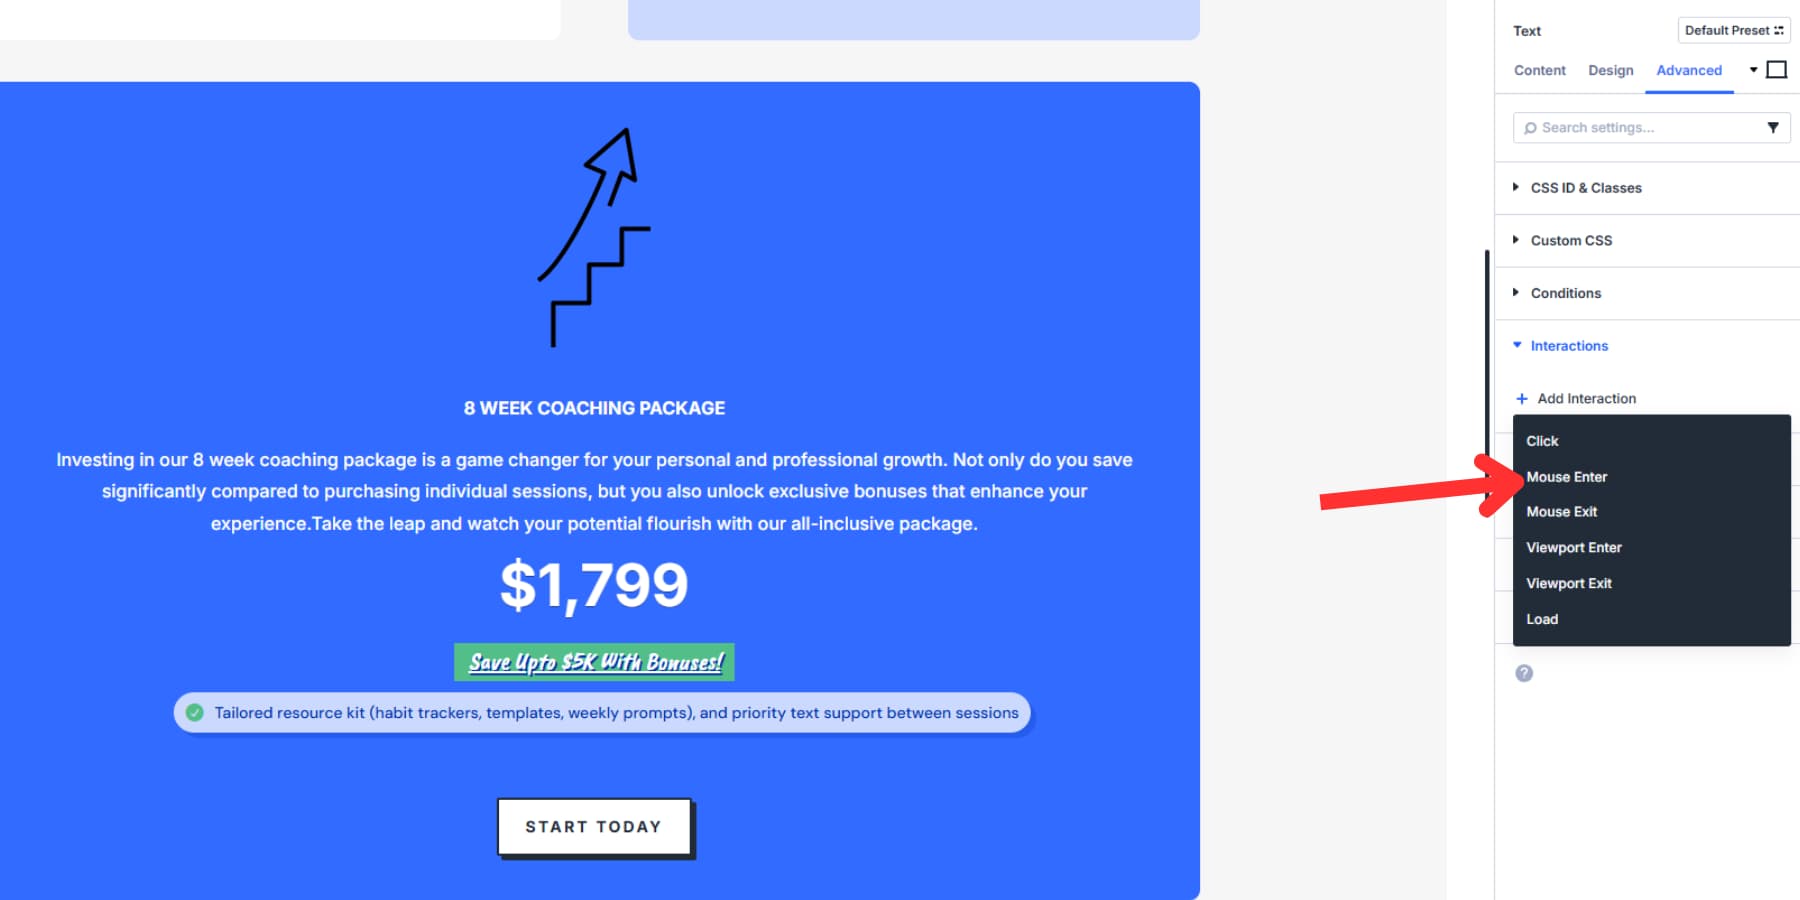
The interaction editor opens. Inside the Admin Label field, determine your interaction something clear, like “Show Tooltip.” Your Reason Match should show Mouse Enter. Since your tooltip starts hidden, choose “Show Phase” for the Affect Movement.
The Purpose Module dropdown lists every element for your internet web page via determine. To search out your tooltip proper right here. Superb naming will repay at this degree. Add a slight prolong of 200 to 300 milliseconds so the tooltip doesn’t pop up all over rapid mouse passes. Save the interaction when you’re completed.
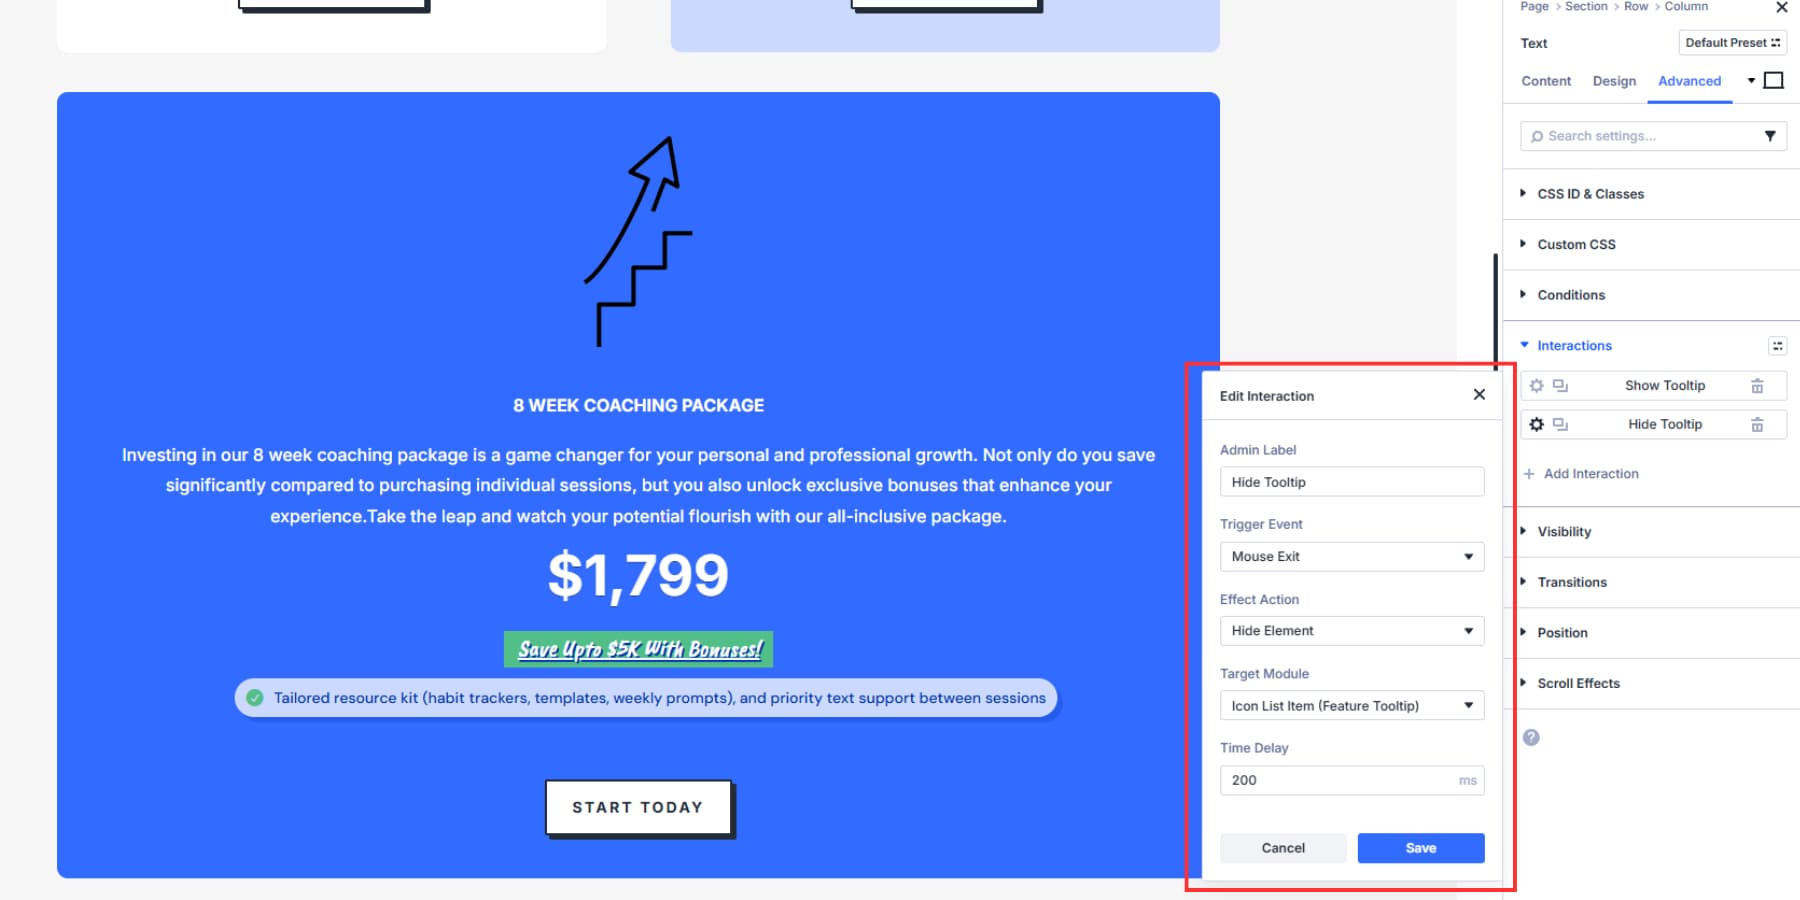
Create a 2nd interaction to hide the tooltip. Click on on “Add Interaction” another time, choose “Mouse Cross out” as your purpose, set “Cover Phase” for the reason that have an effect on, and function the identical tooltip. This handles the disappearing act when folks switch away.
Add a 200 to 300 millisecond prolong proper right here, too. This prevents the tooltip from disappearing too in brief, making it look jarring.
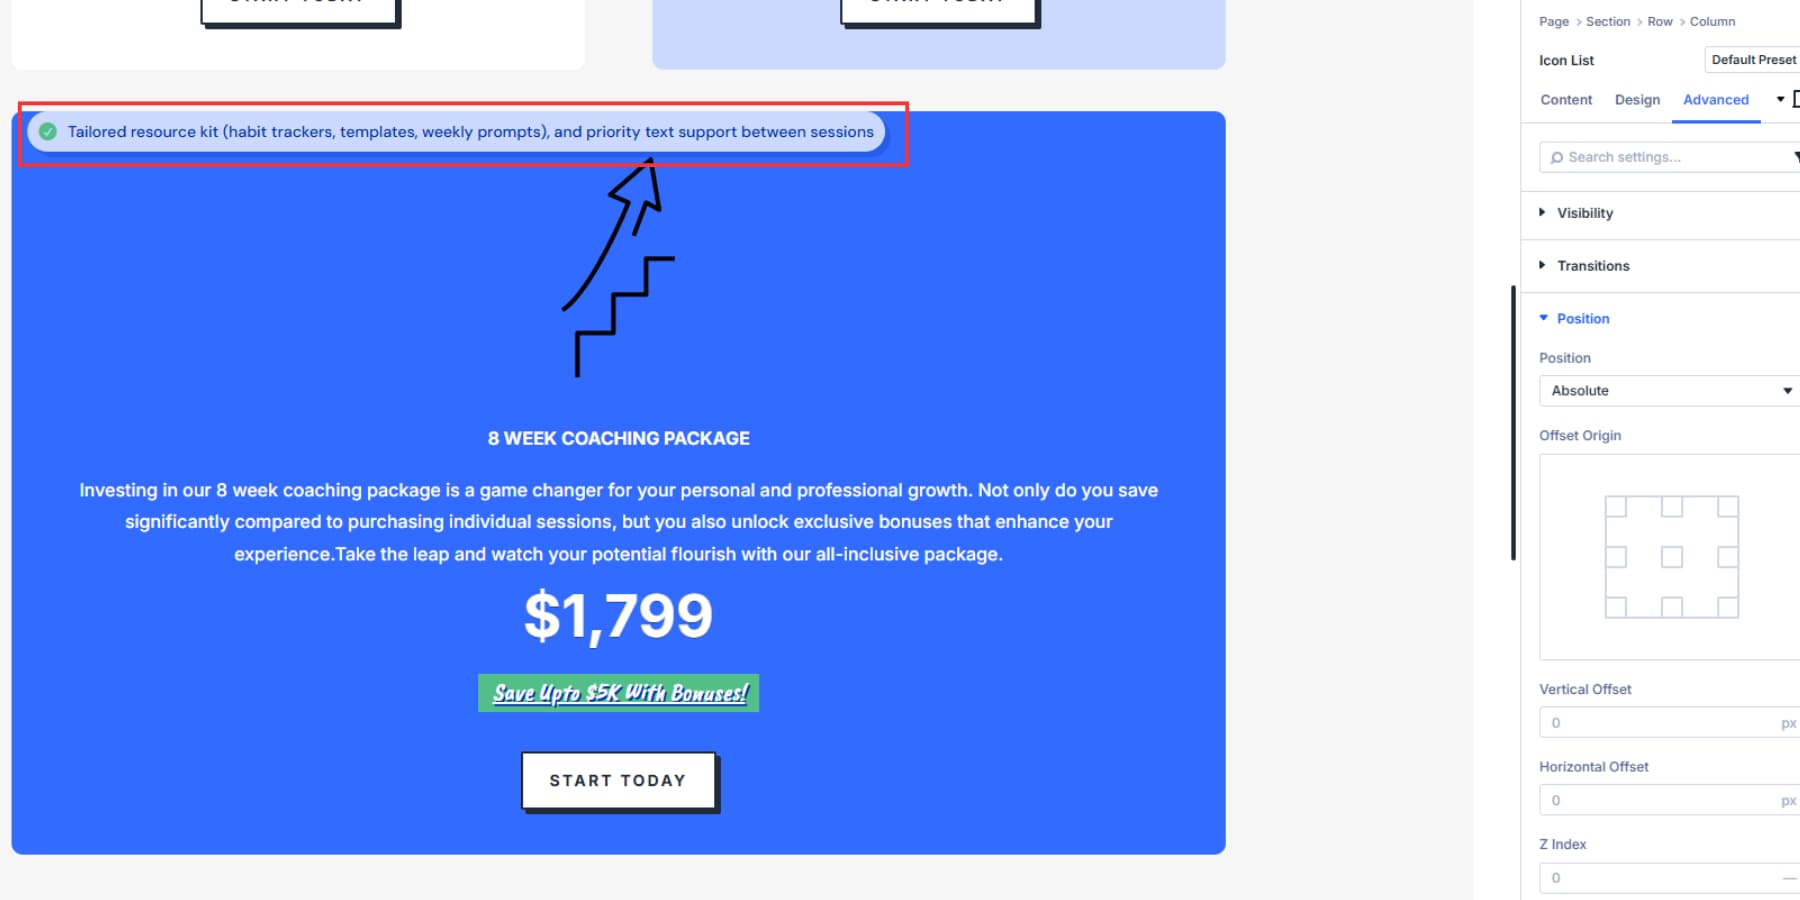
3. Positioning Your Tooltip
After construction your tooltip and setting show and hide actions, choose where they appear. Inside the tooltip module settings, transfer to Complicated > Position and switch from Default to Absolute.
Absolute positioning places the tooltip relative to its father or mom container, so the tooltip and purpose stay hooked up and switch together when consumers scroll. So it’s natural to see the positioning of your tooltip module change a great deal. We’ll restore this someday.
Divi 5 provides vertical and horizontal offset controls to fine-tune the tooltip’s placement. The ones offsets set how far the tooltip sits from its reference degree all over the container.
On the other hand, first, choose the offset starting, the corner or edge that acts for the reason that anchor: top, top left, top correct, bottom, bottom left, bottom correct, or heart, heart left, heart correct.
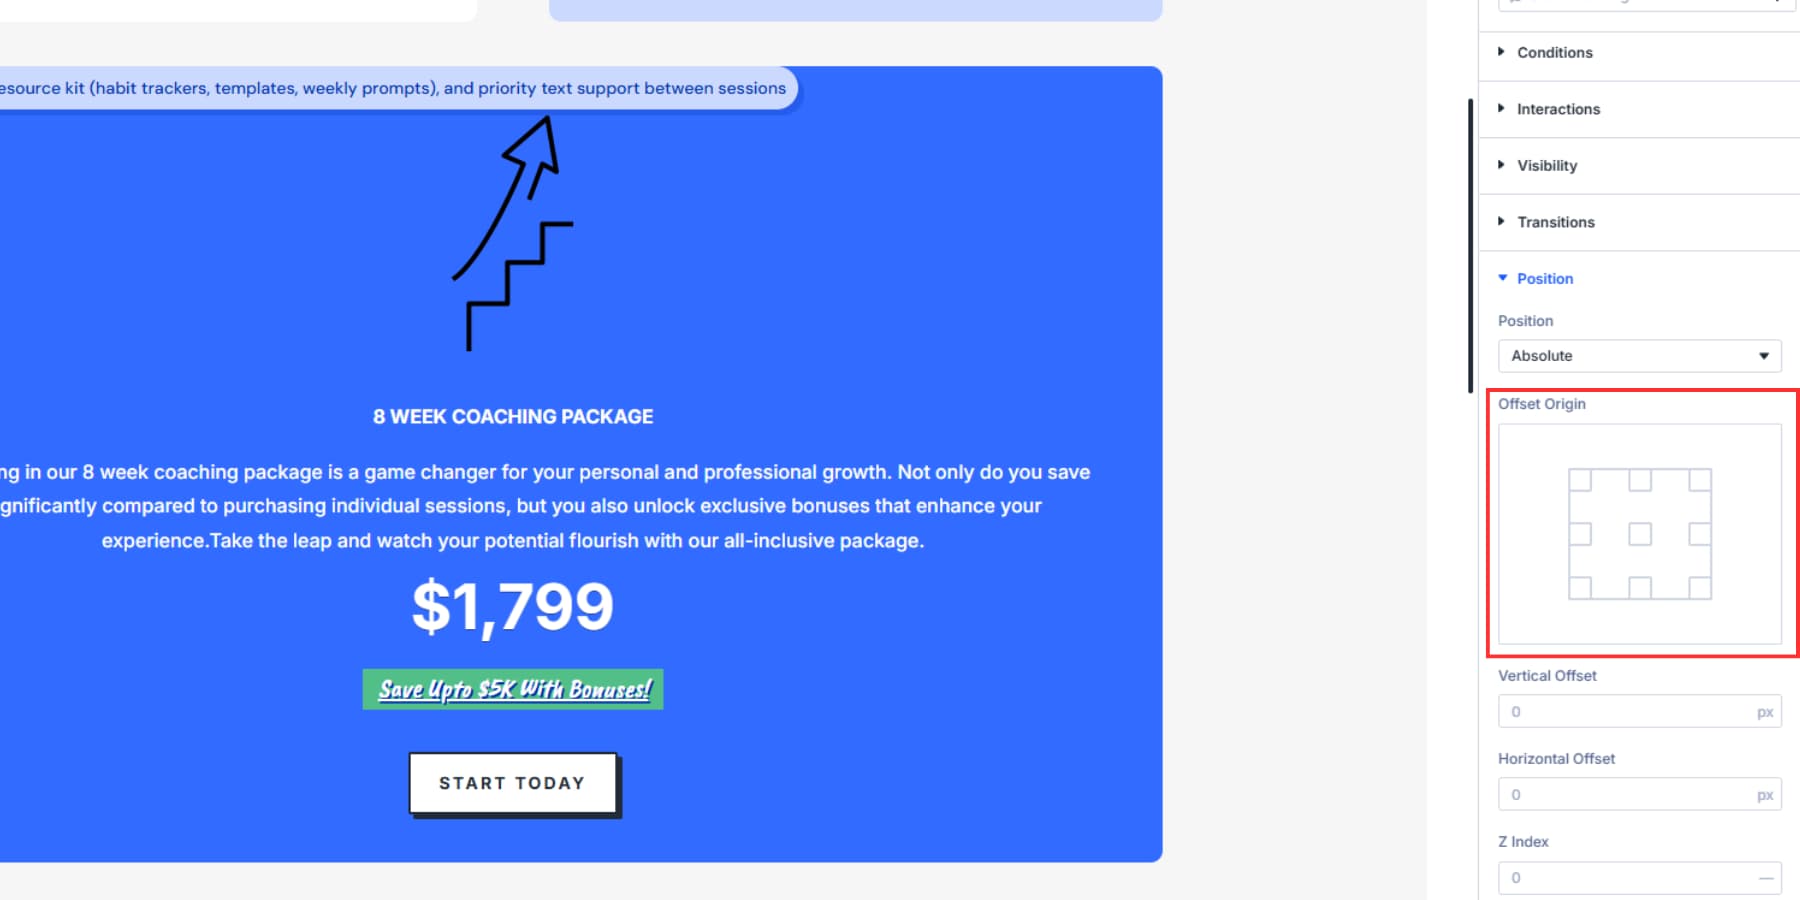
If the start is top left, offsets measure from the tooltip’s top left corner. If you choose bottom correct, the identical offsets measure from the tooltip’s bottom correct corner.
This changes how the offsets have an effect on position. For example, a top left starting with a 20px horizontal offset places the tooltip’s left edge 20px from the container edge, and a top correct starting with a 20px horizontal offset places the tooltip’s correct edge 20px from the container edge.
Working With Offset Controls
In case you choose any alignment fairly then heart, use the vertical and horizontal offset controls to put the tooltip. The ones offsets set the tooltip’s distance from the chosen starting all over the container. For responsive positioning, you’ll be capable of use complicated gadgets identical to viewport units or percentages instead of pixels.
Viewport units give consistent spacing relative to visual display unit dimension. A horizontal offset of 3vw helps to keep the tooltip 3% of the viewport width from its reference edge, scaling all over units. Moreover, make sure that you add a proper Z Index in your tooltip so it at all times turns out atop of all elements, underneath or above it.
Place the tooltip about 15–25 px from its purpose to keep away from crowding while retaining the connection clear.
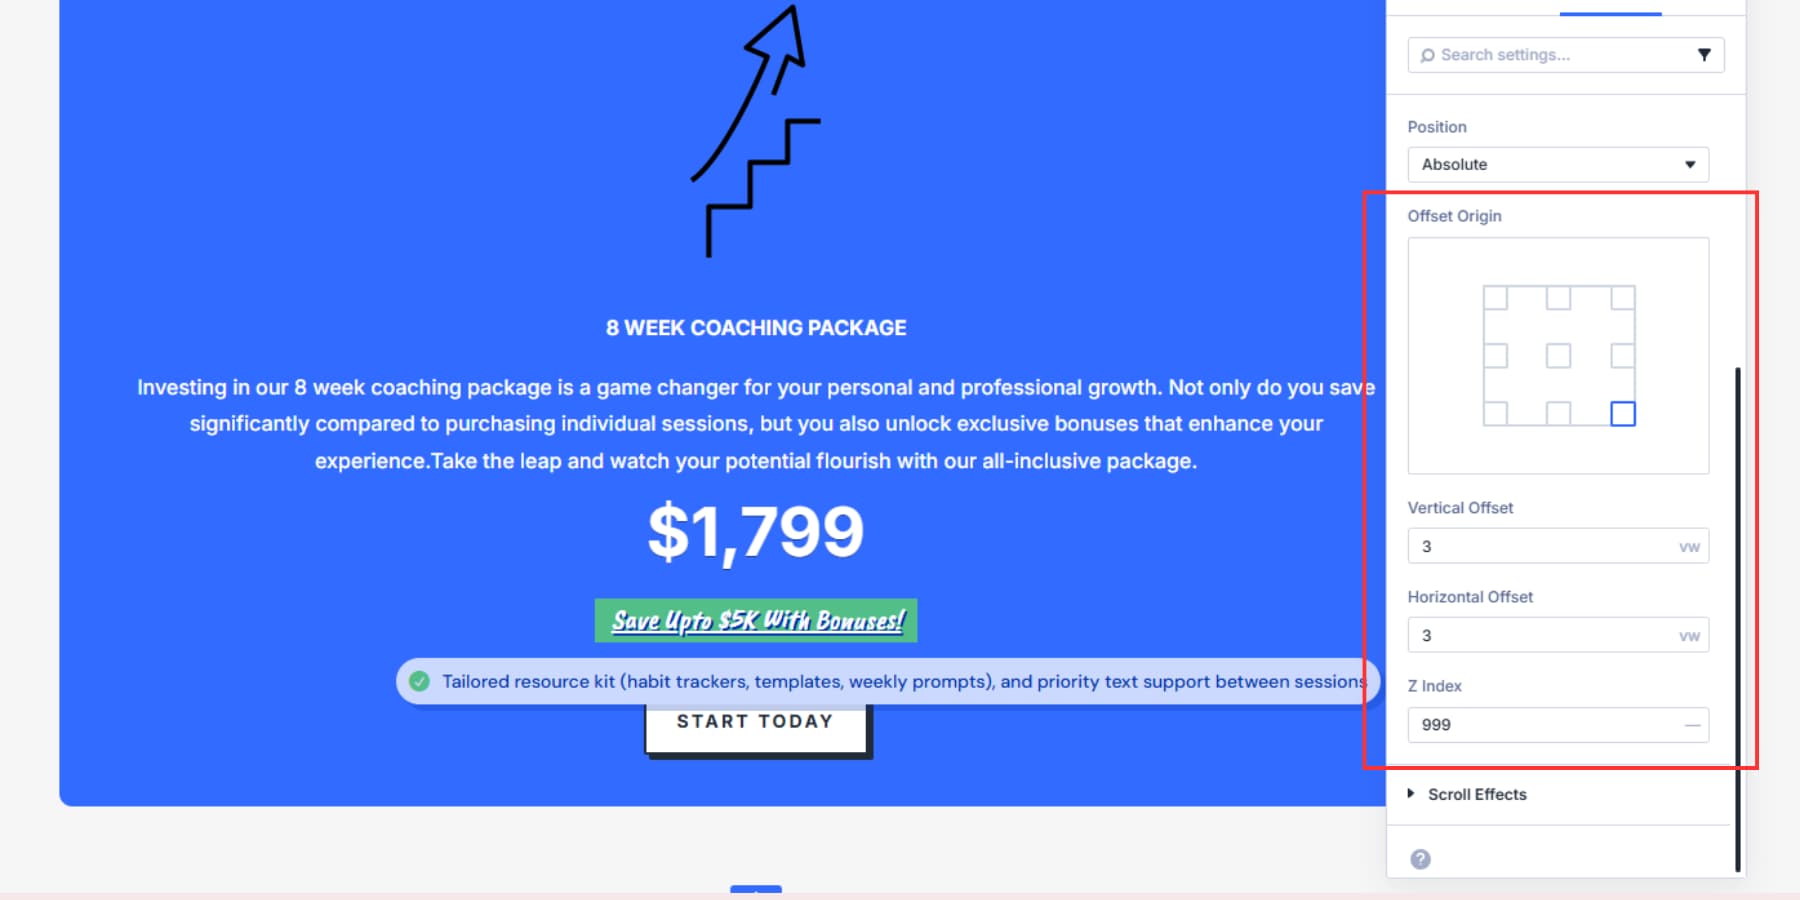
Damaging offsets can flip sides on the other hand add mental overhead. Instead, set the start where you want the tooltip (bottom for above, correct for left) so that you’ll be capable of use simple certain offsets.
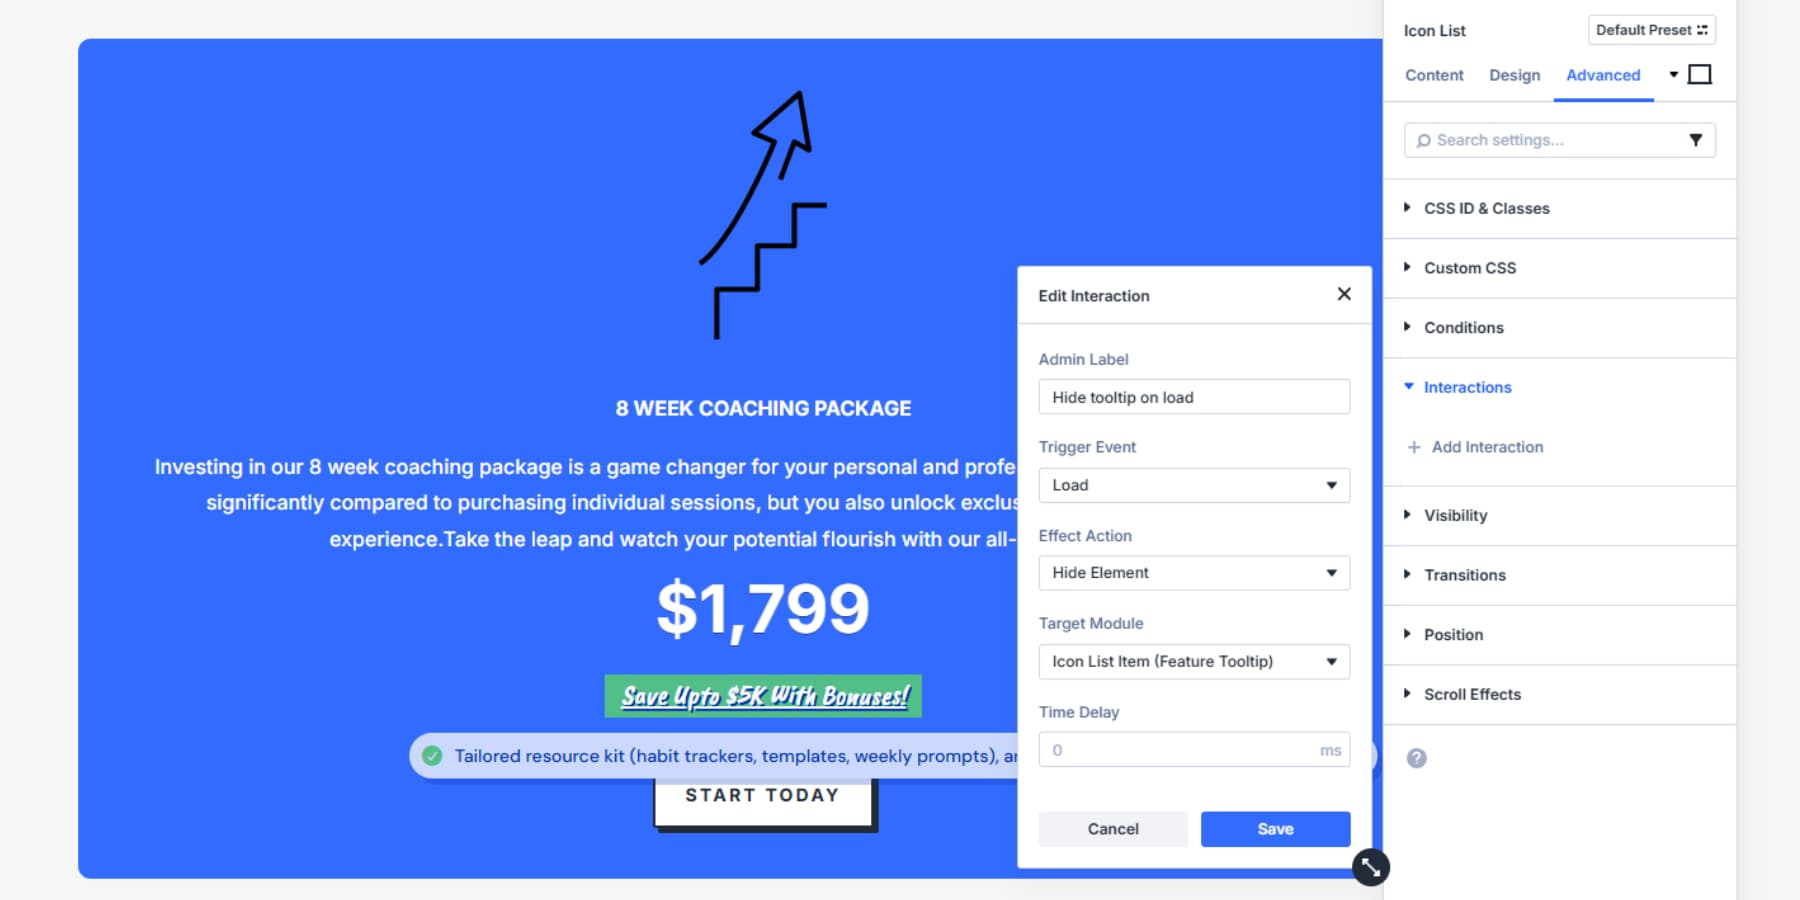
Once you decide on the exact position and behavior, duvet your tooltip module via going to the tooltip module’s settings panel > Complicated > Interaction and make a choice “Load” for the reason that purpose, “Cover Phase” as Affect Movement, and the module itself for the reason that Purpose. This will likely most probably make certain that the module remains hidden until the daddy or mom is hovered over.
That’s all, your tooltip is now in a position!
Download The Tooltip Layout
If you want to try the tooltip, download the construction underneath! Import the file in your Divi Library, once uploaded, you’ll be able to get admission to it inside any assemble you’re running on.
@media only visual display unit and ( max-width: 767px ) {.et_bloom .et_bloom_optin_1 .carrot_edge.et_bloom_form_right .et_bloom_form_content:quicker than { border-top-color: #ffffff !necessary; border-left-color: transparent !necessary; }.et_bloom .et_bloom_optin_1 .carrot_edge.et_bloom_form_left .et_bloom_form_content:after { border-bottom-color: #ffffff !necessary; border-left-color: transparent !necessary; }
}.et_bloom .et_bloom_optin_1 .et_bloom_form_content button { background-color: #f92c8b !necessary; } .et_bloom .et_bloom_optin_1 .et_bloom_form_content .et_bloom_fields i { coloration: #f92c8b !necessary; } .et_bloom .et_bloom_optin_1 .et_bloom_form_content .et_bloom_custom_field_radio i:quicker than { background: #f92c8b !necessary; } .et_bloom .et_bloom_optin_1 .et_bloom_border_solid { border-color: #f7f9fb !necessary } .et_bloom .et_bloom_optin_1 .et_bloom_form_content button { background-color: #f92c8b !necessary; } .et_bloom .et_bloom_optin_1 .et_bloom_form_container h2, .et_bloom .et_bloom_optin_1 .et_bloom_form_container h2 span, .et_bloom .et_bloom_optin_1 .et_bloom_form_container h2 strong { font-family: “Open Sans”, Helvetica, Arial, Lucida, sans-serif; }.et_bloom .et_bloom_optin_1 .et_bloom_form_container p, .et_bloom .et_bloom_optin_1 .et_bloom_form_container p span, .et_bloom .et_bloom_optin_1 .et_bloom_form_container p strong, .et_bloom .et_bloom_optin_1 .et_bloom_form_container form input, .et_bloom .et_bloom_optin_1 .et_bloom_form_container form button span { font-family: “Open Sans”, Helvetica, Arial, Lucida, sans-serif; } p.et_bloom_popup_input { padding-bottom: 0 !necessary;}

Download For Unfastened
Join the Divi Newsletter and we will email you a reproduction of the ultimate Divi Landing Internet web page Layout Pack, plus quite a lot of choice very good and free Divi assets, tips and strategies. Follow along and also you’re going to be a Divi grab in no time. If you happen to’re already subscribed simply type in your email deal with underneath and click on on download to get admission to the construction pack.
It’s worthwhile to have successfully subscribed. Please check out your email deal with to ensure your subscription and get get admission to to free weekly Divi construction packs!
Check out Interactions In Divi 5 At the present time
Tooltips keep pages clean while giving readers the extra component they would like. With Interactions in Divi 5, you’ll be capable of show and hide tooltip content material subject matter on hover or tap, add a temporary prolong to prevent flicker, and place each tooltip precisely with Absolute, Offset Starting, and Z-Index. The outcome’s consistent all over Divi 5’s seven responsive breakpoints.
Want to transfer deeper on the serve as itself? Be told the Interactions unlock put up for an summary of triggers, effects, and objectives.
The submit How To Create Tooltips With Divi 5’s Interactions appeared first on Chic Topics Weblog.
Contents
- 1 What Are Tooltips (And Why Use Them)?
- 2 Tooltips And Additional, Made Easy With Divi 5’s Interactions
- 3 Construction Your Tooltip In Divi 5
- 4 Download The Tooltip Layout
- 5 Download For Unfastened
- 6 It’s worthwhile to have successfully subscribed. Please check out your email deal with to ensure your subscription and get get admission to to free weekly Divi construction packs!
- 7 Check out Interactions In Divi 5 At the present time
- 8 WordPress Internet hosting in Guam: Limitless Garage and Bandwidth for Endless…
- 9 11 Best Wedding WordPress Themes in 2023 (Ranked and Compared)
- 10 WordPress vs Squarespace (2023) — The The most important Variations

0 Comments