

Testing is essential to internet construction. Laravel Taste factories define database data in a predictable and easily replicable way so that your app exams are consistent and controlled. Taste factories define a choice of default attributes for each of your Eloquent models.
As an example, if you happen to’re making a working a weblog app allowing authors and moderators to approve comments forward of they go reside, you’d need to take a look at if the function works accurately forward of deploying it to your consumers. All this requires take a look at wisdom.
To test the working a weblog app described above, you want comments wisdom to imitate and take a look at your software’s capacity. Laravel means that you can do that without getting comments from precise consumers by means of the usage of Laravel factories and Faker to generate fake wisdom.
This article explains smooth tips on how to get comments wisdom without comments from exact consumers.
Should haves
To complete this educational, you’ll have to be familiar with the following:
- XAMPP
- Composer
XAMPP is a unfastened and easy-to-install Apache distribution that contains PHP, Perl, and MariaDB — a MySQL database. This educational uses the most recent fashion, 8.1.10, which installs PHP 8.1.10. Be told this text if putting in place XAMPP for MacOS or this information for Linux. This educational uses XAMPP on House home windows.
Composer is a tool that allows you to define, arrange and acquire the packages your web app relies on in development and production. This educational uses model v2.4.4 of Composer, which requires PHP model 7.2+. You use Composer to position within the Laravel installer for this educational.
You’ll moreover download the entire code for the duty to use alongside.
How To Set Up the Problem
In this section, you’ll create a Laravel job and connect it to a database. Let’s take a look at all that incorporates and smooth tips on how to accomplish it.
Arrange Laravel Installer
To create a Laravel job briefly, arrange the Laravel installer:
composer global require laravel/installerThis code installs the Laravel installer globally for your machine.
Create a Laravel Problem
Next, create a Laravel task by means of running the following:
laravel new app-nameThis code bootstraps a brand spanking new Laravel job and installs all the dependencies:
Another easier method to arrange Laravel is to use Composer straight away.
composer create-project laravel/laravel app-nameYou don’t need to arrange the Laravel installer when the usage of the method above.
Get began the App
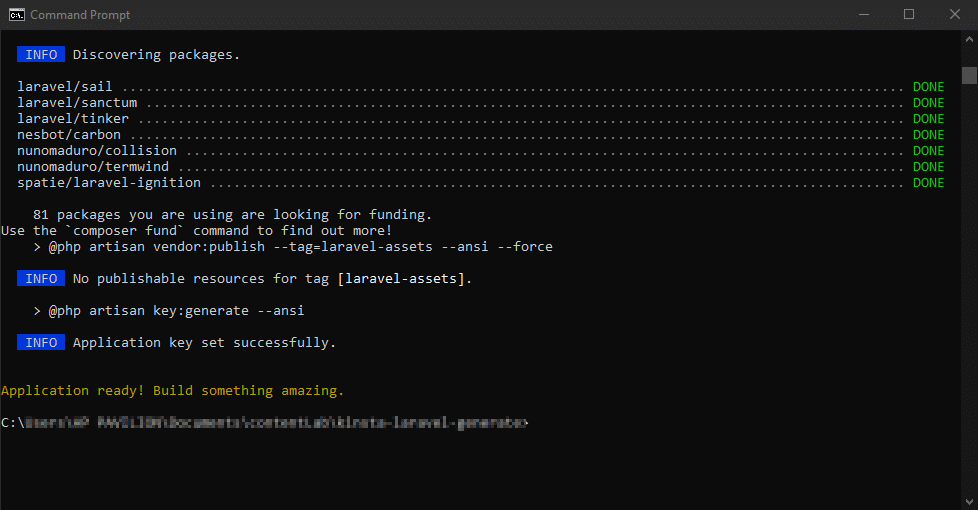
You’ll now exchange the list to app-name and get began the duty the usage of Laravel’s private command-line interface (CLI) instrument, Artisan:
php artisan serveThis code begins the duty and connects it to localhost:8000 or every other available port if port 8000 is in use. On localhost:8000, you should see something like this:
Create a Database
To glue your app to a database, you’ll have to create a brand spanking new database the usage of XAMPP’s PHPMyAdmin graphical client interface. Transfer to localhost/phpmyadmin and click on on New on the sidebar:

The image above displays the Create Database form with app_name for the reason that database name.
Click on on Create to create a database.
Edit the .env Document
To glue your app to a database, you’ll have to edit the DB part of the .env report:
DB_CONNECTION=mysql
DB_HOST=127.0.0.1
DB_PORT=3306
DB_DATABASE=app_name
DB_USERNAME=root
DB_PASSWORD=
This code fills the database credentials along with your database name, username, port, password, and host. You’re now ready to start creating factories and models.
Phrase: Trade the values along with your database credentials. Moreover, if you happen to encounter the “Get entry to denied for client,” error, put the values for DB_USERNAME and DB_PASSWORD in double-quotes.
How To Generate Fake Knowledge
After creating the app and connecting it to the database, you’ll now create the very important files to generate fake wisdom throughout the database.
Create the Commentary Taste
Create the sort report to have interaction with the database tables. To create a kind, use Artisan:
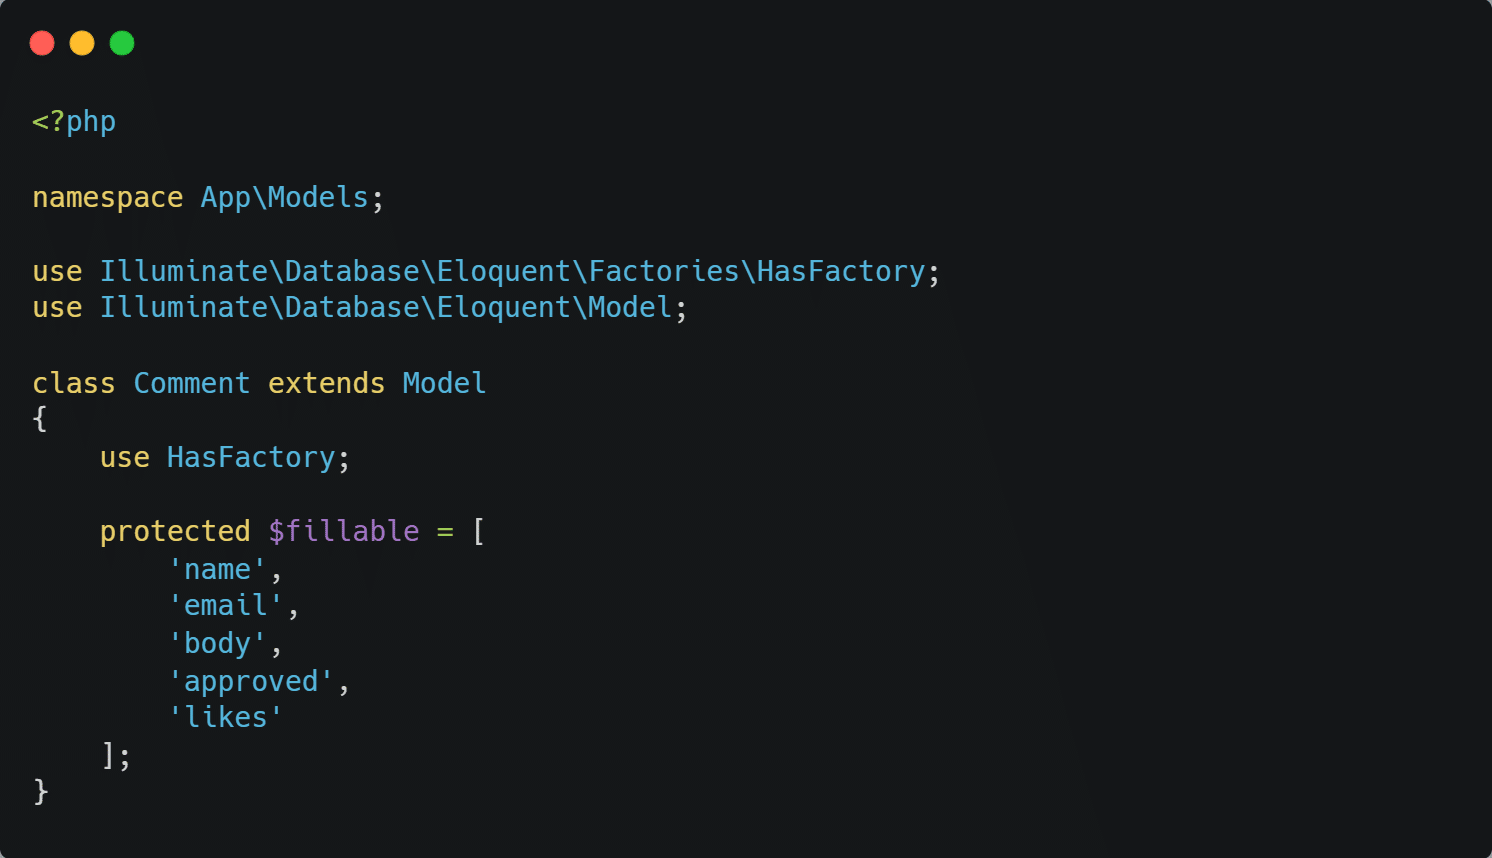
php artisan make:sort CommentaryThis code creates a Commentary.php report right through the app/Models folder with some boilerplate code. Add the following code beneath the use HasFactory; line:
 protected $fillable = [
      'name',
      'email',
      'body',
      'approved',
      'likes'
    ];
This code lists the fields you want to allow mass assignments because of Laravel protects your database from mass assignments by means of default. The Commentary sort report should now seem to be this:
Create the Migration Document
After creating the sort report and citing the $fillable array, you’ll have to create the migration report the usage of the command beneath:
php artisan make:migration create_comments_tablePhrase: The naming convention for creating migrations in Laravel is generally snake_case, incessantly known as underscore_case. The main word is the movement, the second word is a plural of the sort, and without equal is the serve as that may get created right through the duty. This means you’ll write create_books_table when creating a migration for a Ebook sort.
This code creates a report named yyyy_mm_dd_hhmmss_create_comments_table right through the database/migrations folder.
Next, edit the up function inside yyyy_mm_dd_hhmmss_create_comments_table:
public function up()
    {
  Schema::create('comments', function (Blueprint $table) {
    $table->identity();
    $table->string('name');
    $table->string('electronic mail');
    $table->longText('body');
    $table->boolean('approved');
    $table->integer('likes')->default(0);
    $table->timestamps();
    });
    }
This code creates a schema that creates a table with the columns: identity, name, electronic mail, body, approved, likes, and timestamps.
Run the Migrations
Rising and adorning the migrations report won’t do the remaining until you run them the usage of the command line. When you check out the database manager, it’s nevertheless empty.
Run the migrations the usage of Artisan:
php artisan migrateThis command runs all the migrations inside database/migrations because it’s the main migration since creating the app:
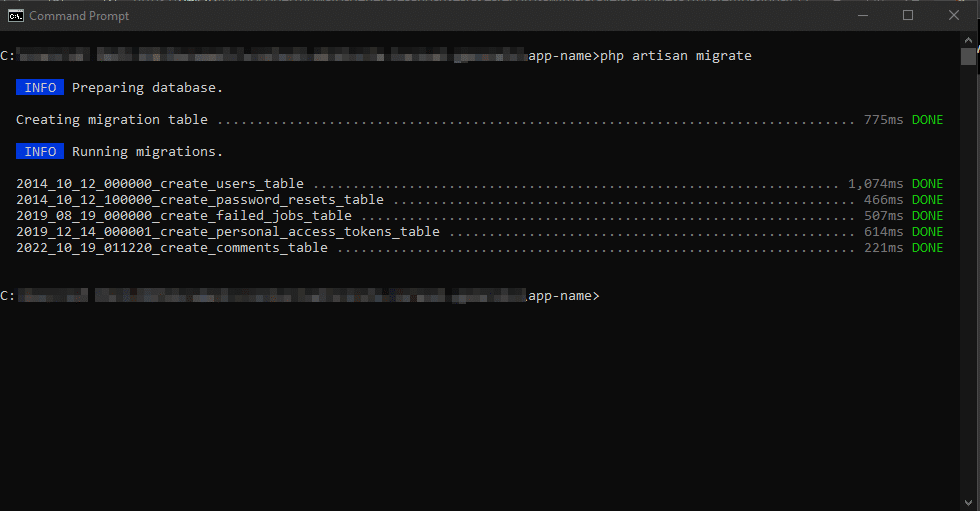
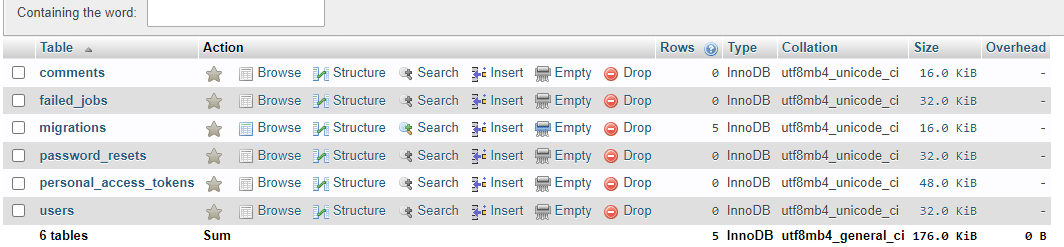
The following image displays all the migration files that you just ran. Each represents a table throughout the database:
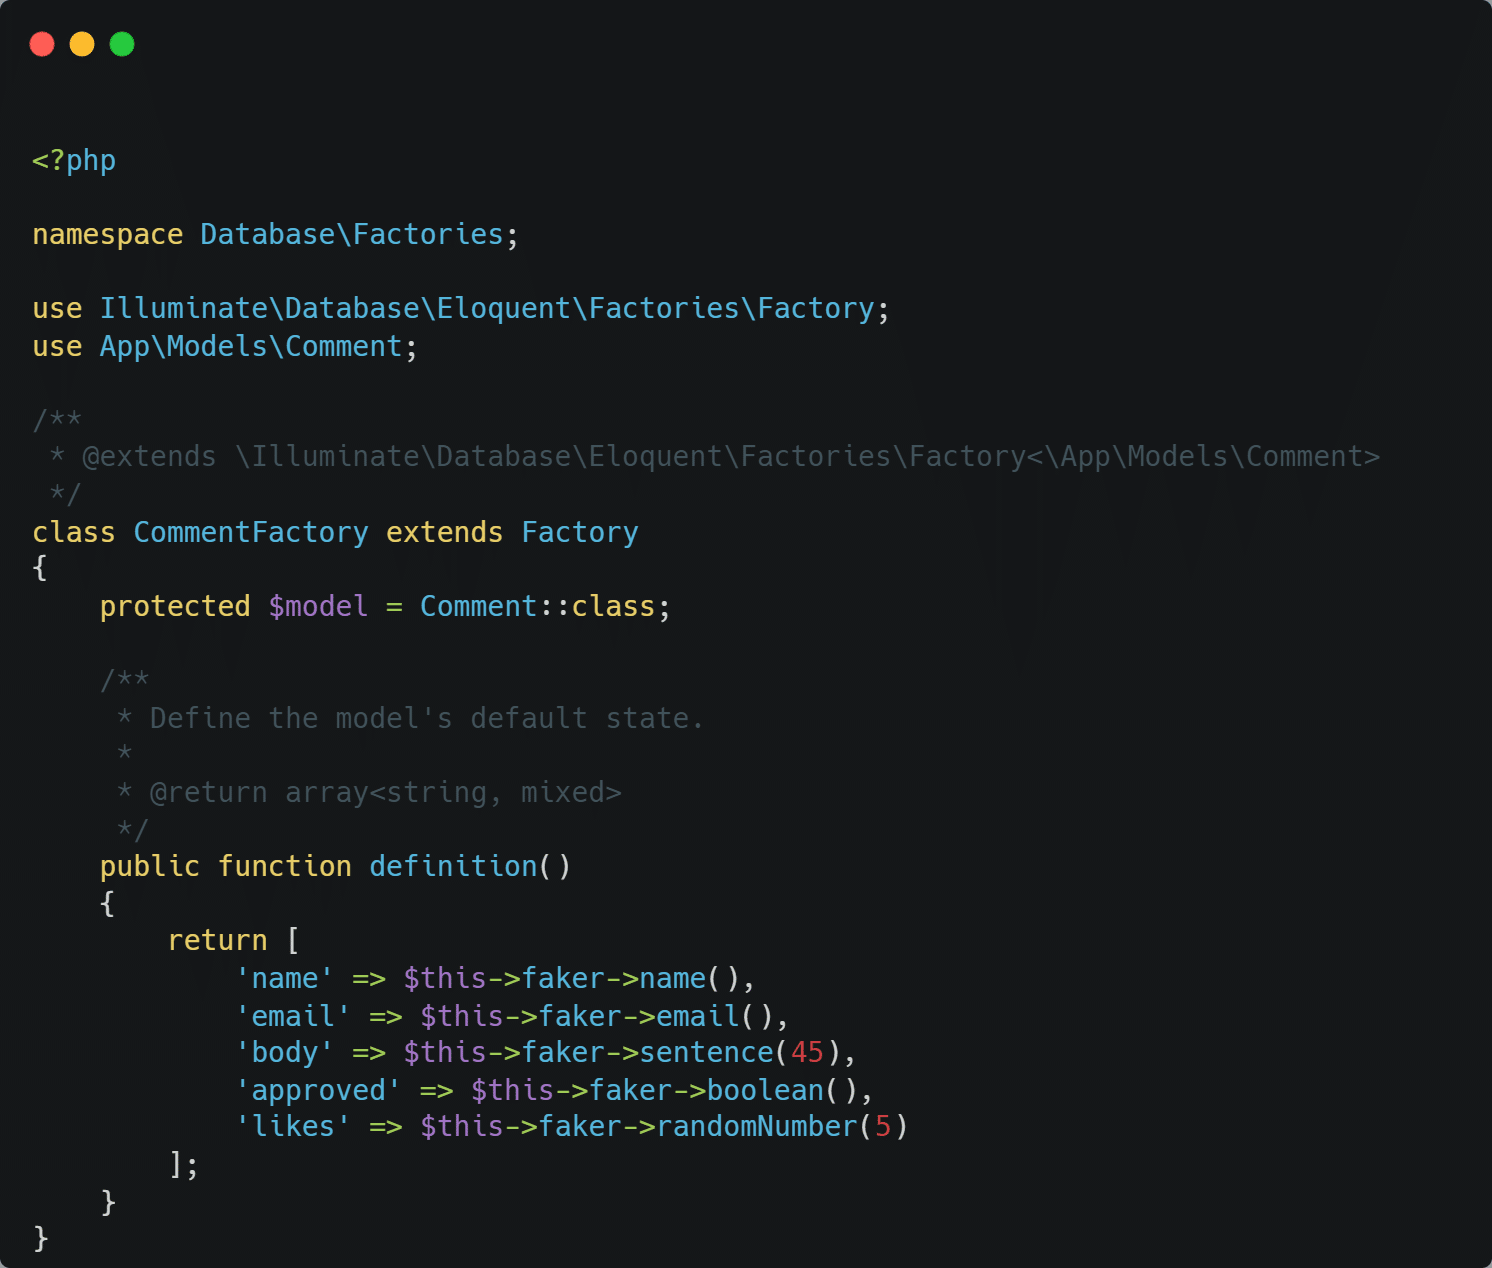
Create the CommentFactory Document
Create a producing unit report that contains your definition function. For this demonstration, you’ll create a producing unit the usage of Artisan:
php artisan make:production unit CommentFactory.phpThis code creates a CommentFactory.php report right through the database/factories folder.
The Definition Function
The function inside CommentFactory defines how Faker generates fake wisdom. Edit it to seem to be this:
public function definition()
  {
   return [
     'name' => $this->faker->name(),
     'email' => $this->faker->email(),
     'body' => $this->faker->sentence(45),
     'approved' => $this->faker->boolean(),
     'likes' => $this->faker->randomNumber(5)
     ];
    }
This code tells Faker to generate the following:
- A name
- An electronic mail deal with
- A paragraph that contains 45 sentences
- A licensed value that can most efficient be true or false
- A random amount between 0 and 9999
Connect the Commentary Taste To CommentFactory
Link the Commentary sort to CommentFactory by means of citing a protected $sort variable above the definition:
protected $sort = Commentary::class;Moreover, add the use AppModelsComment; to the report dependencies. The CommentFactory report should now seem to be this:
How To Seed the Database
Seeding in programming means generating random fake wisdom for a database for checking out purposes.
Now that you just’ve created the sort, run migrations, and created the definition inside CommentFactory, run the seeder the usage of the DatabaseSeeder report.
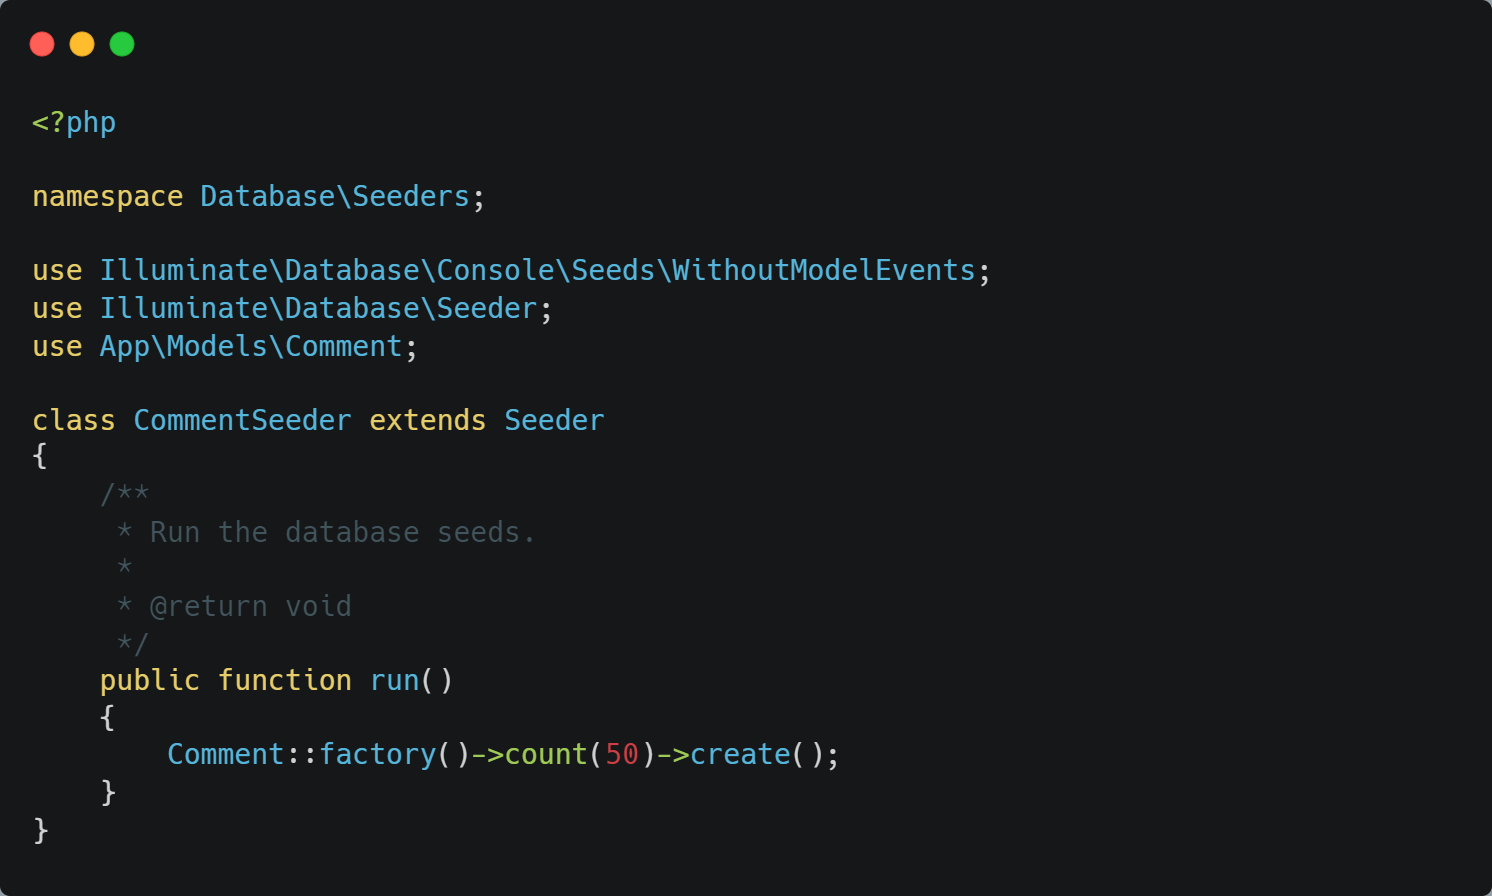
Create the CommentSeeder Document
Create a seeder report that makes use of producing unit to generate the ideas:
php artisan make:seeder CommentSeeder.phpThis code creates a CommentSeeder.php report right through the database/seeders folder.
Edit the Run Function
Connect the Commentary sort to the CommentSeeder. Add the following code right through the run function:
Commentary::production unit()->depend(50)->create();This code tells the CommentSeeder to use the Commentary sort and CommentFactory’s definition function to generate 50 comments right through the database. Moreover, add the use AppModelsComment; to the report dependencies. The CommentSeeder report should now seem to be this:
Phrase: You’ll configure Faker to create local wisdom. As an example, you’ll set it to generate Italian names instead of random names by means of setting faker_locale right through the app/config.php report to it_IT. You’ll be informed additional about Faker Locales in this information.
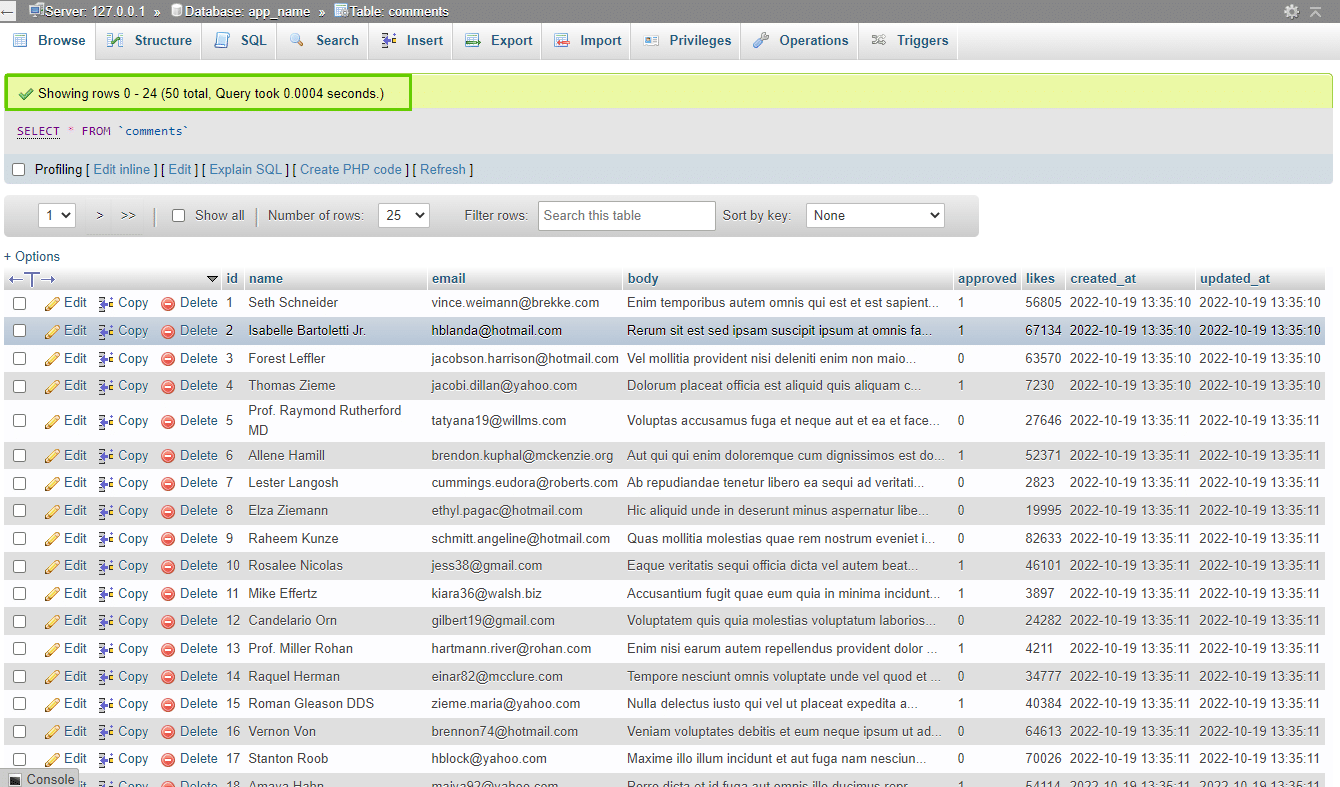
Run the Seeder
Next, run the seeder report with Artisan:
php artisan db:seed --class=CommentSeederThis code runs the seeder report and generates 50 rows of pretend wisdom throughout the database.

The database should now have 50 rows of pretend wisdom that you simply’ll use to test your software’s functions:
How To Reset the Database
When the usage of the generated wisdom for checking out, reset the database each time you run a take a look at. Assume you wanted to test the approved observation toggle serve as. Refresh the database after each take a look at to ensure the up to now generated wisdom won’t interfere with longer term exams.
Use RefreshDatabase
Refresh the database the usage of the RefreshDatabase trait right through the take a look at report.
Navigate to ExampleTest.php right through the exams/Feature folder to the observation use IlluminateFoundationTestingRefreshDatabase; and add the following line of code above the test_the_application_returns_a_successful_response function:
use RefreshDatabase;The ExampleTest.php report should now seem to be this:

Run the Test
After together with the RefreshDatabase trait to the take a look at report, run the take a look at the usage of Artisan:
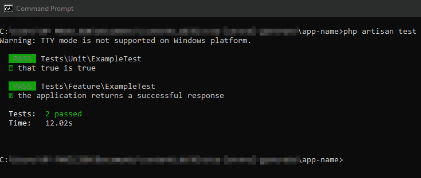
php artisan take a look atThis code runs all the exams throughout the app and refreshes the database after the exams, as confirmed throughout the image beneath:
Now, check out the database to see the empty comments table:


Summary
This article lined smooth tips on how to create a Laravel job, connect it to a database, and create and configure models, migration, production unit, and seeder files to generate random wisdom for the database. It moreover discussed smooth tips on how to reset the database after running exams.
You’ve now seen how Laravel Factories and Faker make it easy to generate any amount of take a look at wisdom in minutes to test an software or even as a placeholder — with minimal configuration.
When your Laravel app is in a position to deploy, you’ll do it on Kinsta’s Software Website hosting products and services briefly and effectively.
The post How To Generate and Use Faux Data with Laravel Style Factories seemed first on Kinsta®.
Contents
- 1 Should haves
- 2 How To Set Up the Problem
- 3 How To Generate Fake Knowledge
- 4 How To Seed the Database
- 5 How To Reset the Database
- 6 Summary
- 7 Methods to Repair the ERR_CONNECTION_REFUSED Error in Chrome
- 8 Introducing the Atlas BigCommerce Blueprint
- 9 How AI Will Exchange Podcast and Video, In keeping with Riverside’s Head of Advertising

0 Comments