
Are you having a look to be able to upload dynamic content material subject material for your WordPress web site?
Together with dynamic content material subject material for your web site means that you can provide visitors with customized experiences, ideas, and other interactive elements. That way dynamic content material subject material can help increase individual engagement and conversions.
In this article, we will show you how you can merely add dynamic content material subject material in WordPress.

Why Add Dynamic Content material subject material in WordPress?
Dynamic text refers to content material subject material that changes on a web site depending on more than a few components, at the side of individual behavior, time, location, identify, and further.
Putting in place dynamic text allows consumers on your WordPress site to look different messages in line with more than a few components.
For instance, you’ll use dynamic text to turn the identify of the one that’s just lately logged in for your web site.

Appearing personalised content material can keep visitors engaged on your internet web site for longer categories, which is able to reduce the leap charge and toughen your web site’s search engine marketing ratings.
It will in all probability even help convert consumers into consumers or subscribers by the use of showing that your web site cares about its visitors, which creates a just right impact and builds trust.
Plus, dynamic content material subject material can increase product sales and signups on your web site. For instance, you’ll show the prevailing date dynamically for a countdown sale or discount offer, and it’s going to robotically change on a daily basis. It’s going to create some way of urgency and lead to further conversions.
That being mentioned, let’s take a look at how you can add dynamic content material subject material in WordPress. You’ll have the ability to use the short links below to jump to the method you want to make use of:
Means 1: Create a Dynamic Landing Internet web page Using SeedProd
If you want to create a landing internet web page with dynamic content material subject material, then the program is for you.
SeedProd is the perfect WordPress web page builder to be had in the marketplace this is serving to you create horny landing pages and problems without the usage of any code.
It moreover comes with a dynamic text serve as that lets you add dynamic content material subject material for your headings and text.

First, it is important to arrange and switch at the SeedProd plugin. For added details, it’s imaginable you’ll want to see our amateur’s data on the way to set up a WordPress plugin.
Remember: SeedProd moreover has a unfastened model, however it doesn’t have the dynamic text serve as. So, for this educational, we’re the usage of the SeedProd Skilled plugin.
Upon activation, head over to the SeedProd » Settings internet web page to enter the plugin license key.
You’ll have the ability to to find this information underneath your account at the SeedProd site.

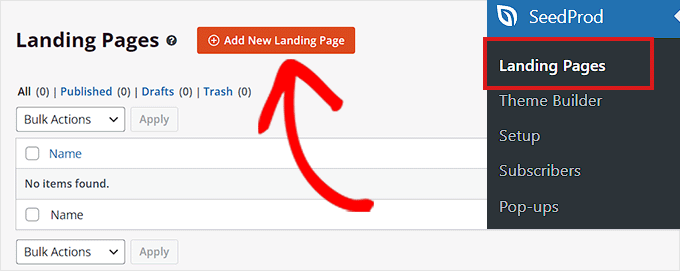
Next, you want to visit SeedProd » Landing Pages from the WordPress admin sidebar.
Once you may well be there, click on on on the ‘Add New Landing Internet web page’ button.
This may increasingly from time to time direct you to the ‘Choose a New Internet web page Template’ show, where you’ll choose any of the pre-made templates to your landing internet web page.
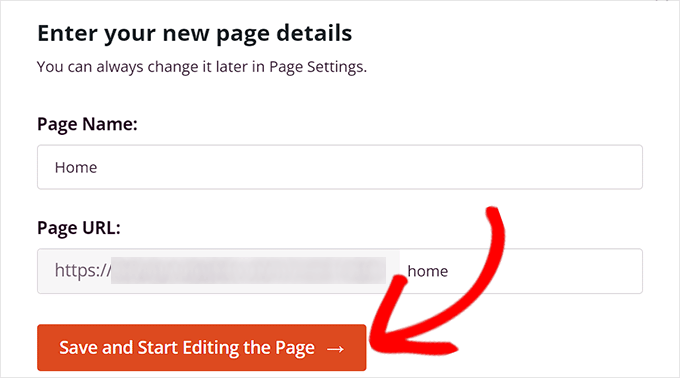
Upon template selection, you will be asked to enter a internet web page identify and choose a URL.
After entering this information, merely click on on on the ‘Save and Get began Improving the Internet web page’ button to continue.
This may increasingly from time to time free up SeedProd’s drag-and-drop internet web page builder, where you’ll now get began editing your internet web page. For added detailed instructions, it’s imaginable you’ll want to see our data on the way to create a touchdown web page in WordPress.
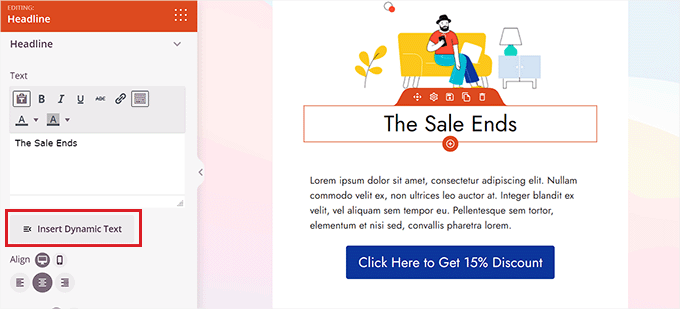
Next, simply drag and drop the Heading or Text block from the left sidebar onto the landing internet web page. Then, click on on on the block to open up its settings throughout the left sidebar.
Upon getting completed that, you want to click on at the ‘Insert Dynamic Text’ button.
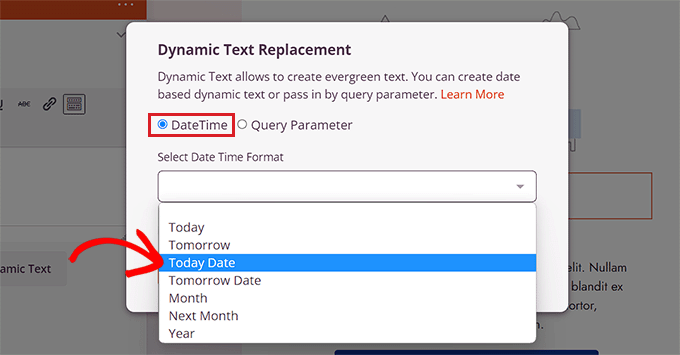
This may increasingly from time to time open up a ‘Dynamic Text Choice’ prompt on the show.
From proper right here, you’ll have to choose the ‘DateTime’ selection if you want to organize a time or date dynamically. This will also be helpful if you want to display the time limit for a sale or discount offer on your web site.
After that, simply choose a date format from the dropdown menu and click on at the ‘Insert’ button.
Must you don’t see your most popular format throughout the dropdown menu, you then’ll click on on on the ‘Be informed Further’ link on the most efficient to look other formats.
If you want to add a location, identify, country, a couple of language improve, internet web page identify, e-mail maintain, postal code, or other dynamic content material subject material, then you want to choose the ‘Query Parameter’ selection.
After that, add the dynamic text factor underneath the ‘Parameter Name’ selection.
For instance, in the event you occur to add dynamic text for names throughout the ‘Parameter Name’ selection, then everyone who’s logged into your internet web site may well be confirmed their identify like ‘Hello there John’ instead of ‘Hello there There’ on the internet web page.
Or in the event you occur to add dynamic text for an e-mail maintain, then consumers may well be confirmed their e-mail maintain on your landing internet web page each time they log in.
Similarly, if you want to display the web site of each individual dynamically, you then’ll enter ‘location’ for the reason that parameter identify.
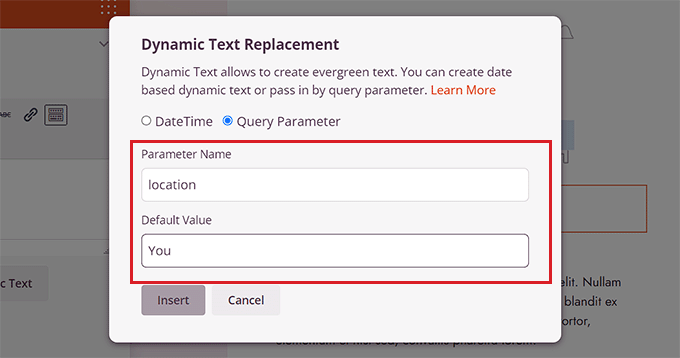
Next, add the default value that the dynamic text will revert to if the web site isn’t available throughout the URL parameter.
For instance, if a buyer opens up your internet web site and their location isn’t available throughout the URL, then the dynamic text would in all probability say ‘Stores With regards to You’ instead of ‘Stores With regards to Florida’.
After that, simply click on at the ‘Insert’ button to be able to upload the dynamic text.
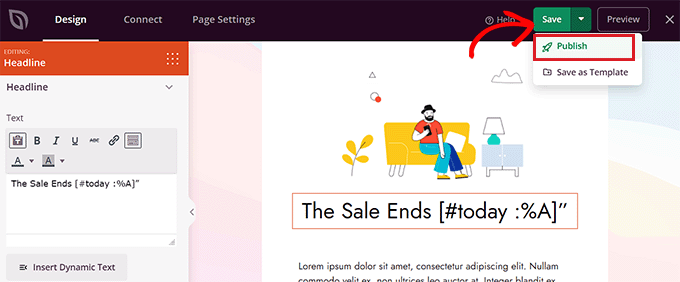
Upon getting completed that, click on at the ‘Save’ button on the most efficient to store your settings. After all, click on at the ‘Post’ button to make your landing internet web page live.
Now visit your web site to check out the dynamic content material subject material in movement.
That’s what it looked like on our demo web site.

Means 2: Add Dynamic Content material subject material Using OptinMonster
If you want to add dynamic content material subject material for your selling campaigns, at the side of popups or floating bars, then the program is for you.
OptinMonster is the most productive lead era and conversion optimization device to be had in the marketplace. It lets you show customized campaigns to consumers without the usage of any code.
It moreover comes with a dynamic text replace serve as that lets you add dynamic content material subject material for your campaigns the usage of good tags.
First, it is important to sign up for an OptinMonster account for the reason that paid device lets you add dynamic content material subject material.
Simply visit the OptinMonster web site and click on at the ‘Get OptinMonster Now’ button to organize an account.
Next, you want to arrange and switch at the unfastened OptinMonster plugin on your WordPress web site. For added detailed instructions, please see our tutorial on the way to set up a WordPress plugin.
Upon activation, you will see the OptinMonster setup wizard throughout the WordPress admin panel.
From proper right here, click on at the ‘Connect Your Present Account’ button to glue your WordPress internet web site for your OptinMonster account.

After that, a brand spanking new window will open up on the show.
Simply click on at the ‘Connect to WordPress’ button to move ahead.

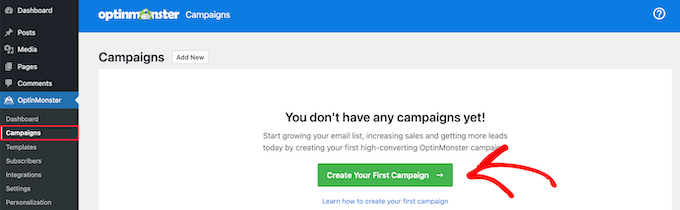
Upon getting attached your OptinMonster account with WordPress, head over to the OptinMonster » Campaigns internet web page from the WordPress admin sidebar.
Next, you want to click on on on the ‘Create Your First Advertising and marketing marketing campaign’ button to start a advertising and marketing marketing campaign.
This may increasingly from time to time take you to the ‘Templates’ internet web page, where OptinMonster provides different advertising and marketing marketing campaign types that you just’ll use to show reasonably a large number of kinds of content material subject material or targeted messages for your consumers.
The ones include popups, floating bars, gamified campaigns, inline campaigns, slide-in popups, and further.
For instance, if you want to show dynamic content material subject material inside a WordPress put up or internet web page, you then’ll choose the Inline advertising and marketing marketing campaign type.
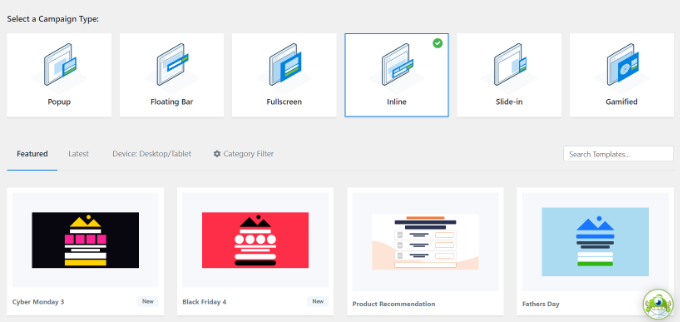
After selecting a advertising and marketing marketing campaign type, you’ll choose any of the pre-made templates for that specific advertising and marketing marketing campaign.
You’re going to then be asked to enter a name for it and click on at the ‘Get began Development’ button.

This may increasingly from time to time take you to OptinMonster’s advertising and marketing marketing campaign builder interface. This is a drag-and-drop device where you’ll design your advertising and marketing marketing campaign with a live preview.
From proper right here, drag and drop the Text or Heading block from the sidebar on the left into the promoting marketing campaign. After that, merely choose some text throughout the block to open up the text editor on the most efficient of it.
Next, you’ll have to click on at the ‘Good Tags’ icon on the correct corner of the text editor to open up a dropdown menu with a listing of good tags
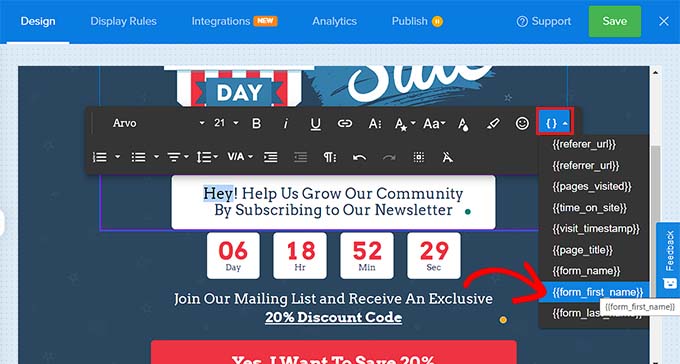
From proper right here, you’ll choose any of the practical tags to be able to upload dynamic content material subject material for your advertising and marketing marketing campaign.
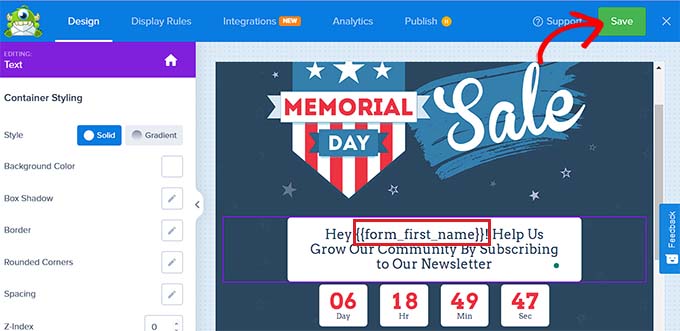
For instance, you’ll use the {{form_first_name}} good tag to be able to upload the identify of the individual on the most efficient to make the promoting marketing campaign actually really feel further customized.
Now, the entire logged-in consumers on your internet web site will see their names throughout the advertising and marketing marketing campaign.
There are other good tags that show the promoting marketing campaign identify, e-mail maintain, postal code, country, province, twelve months, month, date, coupon code, internet web page URL, and further.
For instance, the usage of the practical tag for global places will display the country identify of each one that has logged in and is just lately viewing your advertising and marketing marketing campaign.
Similarly, the usage of a date good tag will help you display the time limit for a sale without manually updating it each time.
Upon getting decided on your good tag(s), merely click on at the ‘Save’ button on the most efficient to store your settings.
After all, switch to the ‘Post’ tab from the perfect and click on on on the ‘Post’ button to make your advertising and marketing marketing campaign live.
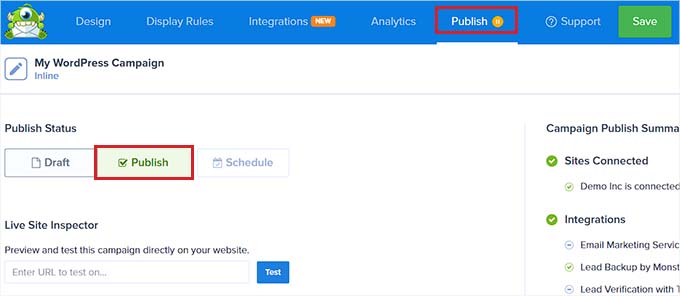
Now, you’ll visit your web site to check out the promoting marketing campaign with dynamic content material subject material.
That’s what it looked like on our demo web site.

We hope this text helped you learn to add dynamic content material subject material in WordPress. You may also want to see our tutorial on the way to use dynamic box populations in WordPress to auto-fill paperwork and our absolute best alternatives for the perfect e mail advertising products and services for small companies.
Must you most well-liked this text, then please subscribe to our YouTube Channel for WordPress video tutorials. You’ll have the ability to moreover to find us on Twitter and Fb.
The put up How you can Upload Dynamic Content material in WordPress (Amateur’s Information) first appeared on WPBeginner.

0 Comments