
Do you need to make a custom designed Airtable form for your WordPress website?
Airtable is a data keep an eye on tool that allows you to create your individual custom designed data-driven apps. Mainly, you’ll gain knowledge with a type on your website online and use it to make spreadsheets, contact lists, booking calendars, and additional.
In this article, we will show you how you can create a custom designed Airtable form in WordPress.

Why Create a Custom designed Airtable Form in WordPress?
Airtable is a data keep an eye on tool that allows you to create custom designed data-driven apps. That means, you’ll upper visualize the guidelines accumulated on your website online using WordPress bureaucracy.
For instance, you’ll use your WordPress contact form knowledge in Airtable as a CRM (Buyer Dating Control) tool to keep watch over leads and contacts captured by way of your WordPress bureaucracy.
You’ll be capable of moreover store knowledge from person surveys on Airtable.
Listed below are a few other use cases for using Airtable in WordPress:
- Get ready tasks by way of venture, assign duties, and use Kanban views to visualize venture construction.
- Create a content material subject matter calendar for content material subject matter pieces, follow e-newsletter dates, and assign writers and edits to building up your weblog site visitors.
- Care for a database of inventory items to track quantities for your on-line retailer.
Mainly, you’ll use knowledge accumulated from your WordPress contact bureaucracy in Airtable to create custom designed apps, workflows, and gear for your enterprise.
That being said, let’s take a look at how you can merely create a custom designed Airtable form in WordPress.
Learn to Create a Custom designed Airtable Form in WordPress
To create our custom designed Airtable form in WordPress, we will first make a marginally form using WPForms.
It’s the best possible WordPress shape builder plugin available on the market and allows you to create any longer or much less form merely using a simple drag-and-drop interface.
After that, we will connect our form to Airtable by way of using a supplier known as Zapier.
Zapier works as a bridge to connect two different apps without any code. You’ll be capable of use it with dozens of online apps, at the side of WPForms and Airtable.
In a position? Let’s get started.
Create Your Form in WPForms
First, you need to place in and switch at the WPForms plugin. For added details, see our step-by-step knowledge on how one can set up a WordPress plugin.
Phrase: You’ll need the Skilled style or higher to get right to use the Zapier addon for WPForms.
Upon activation, you need to talk over with the WPForms » Settings internet web page.
Underneath the ‘Fundamental’ tab, enter the license key from your account on the WPForms website online and hit ‘Check Key.’

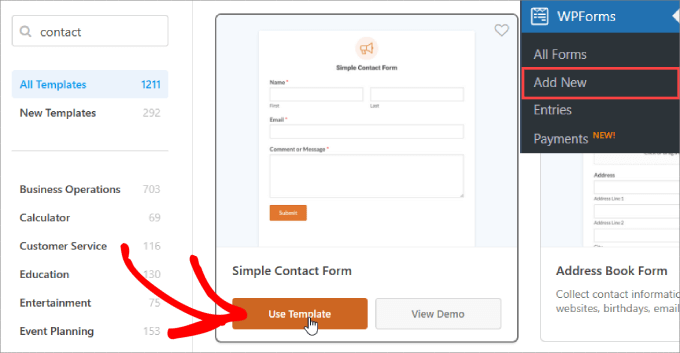
Next, you need to seek advice from the WPForms » Add New internet web page to your WordPress dashboard. This will increasingly more unlock the WPForms builder interface, where you’ll make a choice from over 1200 pre-built templates.
You’ll want to give your form a name so that you’ll merely refer once more to it.

For the sake of this educational, we will be using the ‘Simple Contact Form.’
Pass ahead and click on on on ‘Use Template.’
From proper right here, you’ll be taken to the drag-and-drop editor, where you’ll merely customize the form.
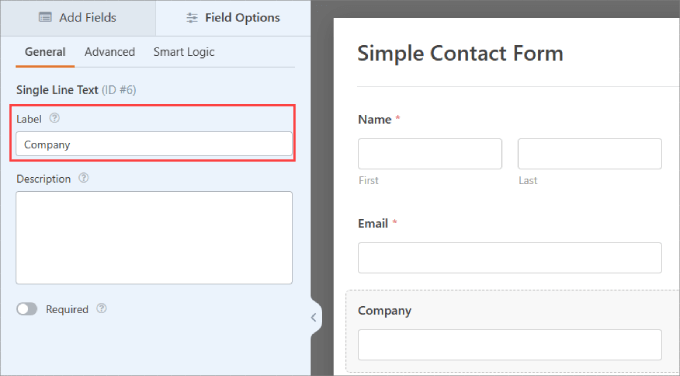
Let’s say we’re making a marginally form to assemble leads from B2B possibilities. In this case, we will want to add ‘Company’ and ‘Phone Amount’ to our contact form.
To be able to upload the Company, you need in an effort to upload a ‘Single Line Text’ products, then click on on on the phase and rename the sphere to ‘Company.’
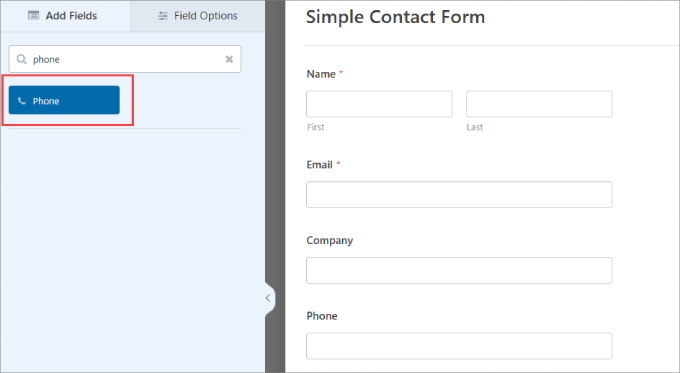
If you want to have possibilities to provide their phone amount, merely drag the sphere chance ‘Phone’ onto the editor.
Be happy in an effort to upload any other fields that fit your needs. For added details, you’ll see our knowledge on how one can create a touch shape in WordPress.
Whilst you’ve organize your form, you need in an effort to upload it to your WordPress site.
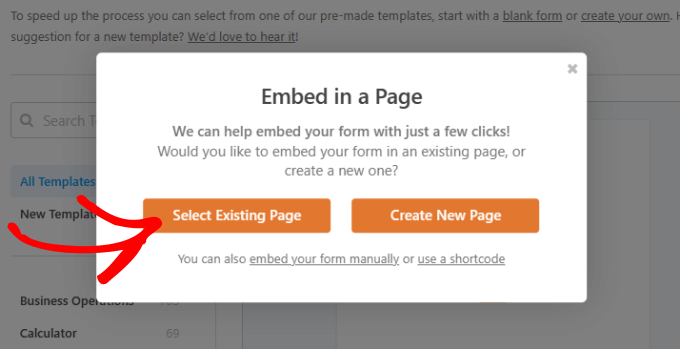
Simply hit the ‘Embed’ button up top.
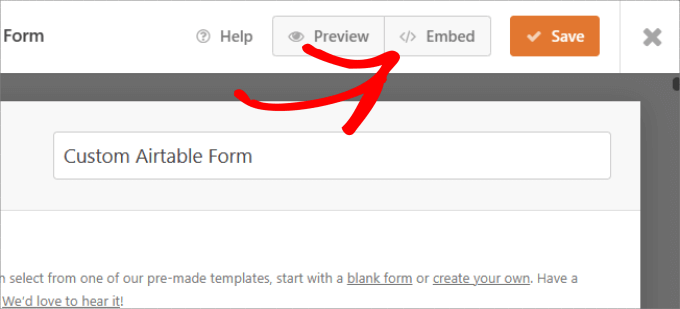
You’ll be ready to make a choice to embed the contact form on an present internet web page or a brand spanking new internet web page.
In this case, we will select ‘Choose Present Internet web page.’
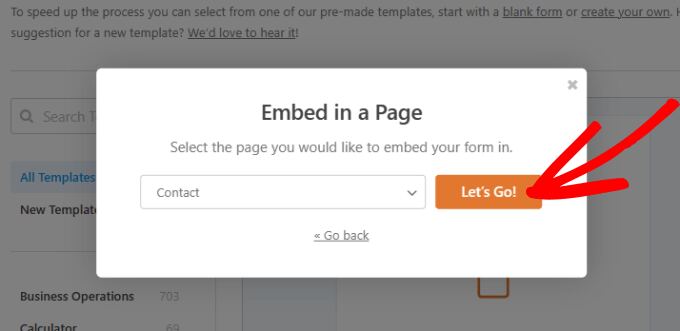
Make a choice any internet web page you’d like and select the ‘Let’s Pass!’ button.
This will increasingly more take you to the WordPress editor of that internet web page.
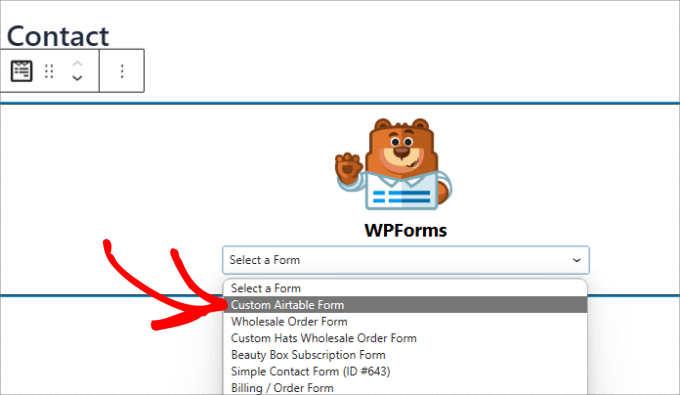
All you should do is hit the ‘+’ button throughout the top left corner.
Then, to seek out and select the WForms widget in an effort to upload it to your internet web page.

From proper right here, you’ll make a choice the contact form you’ve merely created.
That may mechanically embed the form into your internet web page.
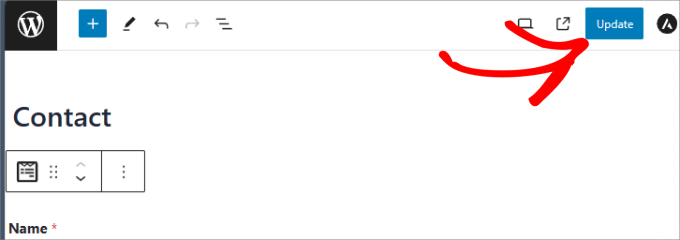
Next up, remember to hit the ‘Change’ button up top.
Now, your form must be added to your WordPress internet web page.
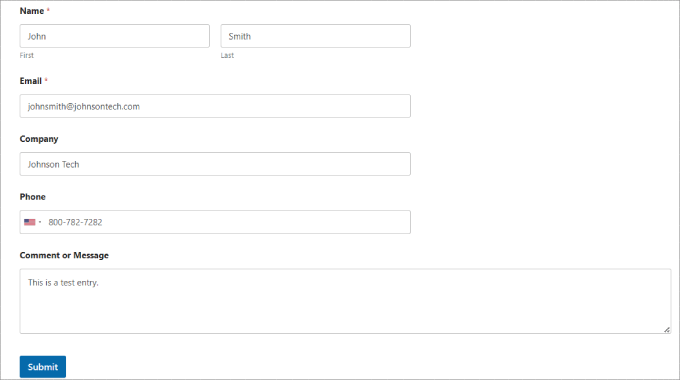
Once you have added your form to your website online, go ahead and create a check out get admission to. This it is going to be used to organize and check the connection between WPForms and Airtable.
Proper right here’s our check out get admission to, with name, e mail, phone, company name, and a message:
Flip at the Zapier Addon for WPForms
We can be using Zapier to build a bridge between WPForms and Airtable. To take a look at this, you need to place in and switch at the WPForms Zapier Addon.
On your WordPress dashboard, go to the WPForms » Addons internet web page and to seek out the Zapier addon. Then, go ahead and arrange and activate it.

Now, you need to talk over with the WPForms » Settings.
On the ‘Integrations’ internet web page, simply click on on on the Zapier logo proper right here, and also you’re going to get your Zapier API key. You wish to have this to connect Zapier to your WPForms account.
Reproduction the API key somewhere secure or keep this tab open, as you’re going to wish it throughout the later step.

Set Up a Base and Table in Airtable
Next, we need to create a base in Airtable to store all of the information that we gain from our contact form.
If you’re new to Airtable, then there’s a possibility you want to not know how to organize a base and table.
First off, the ground is the top-level database used to organize and store information. A table in Airtable is similar to a sheet in a spreadsheet.
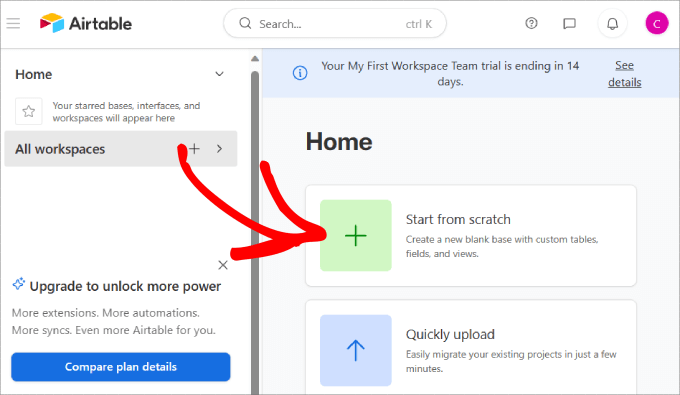
Whilst you’ve created an account on Airtable, go ahead and click on at the ‘Get began from scratch’ chance in your home dashboard.
You probably have an present spreadsheet that you need to migrate over to Airtable, then merely click on at the ‘In brief upload’ chance.
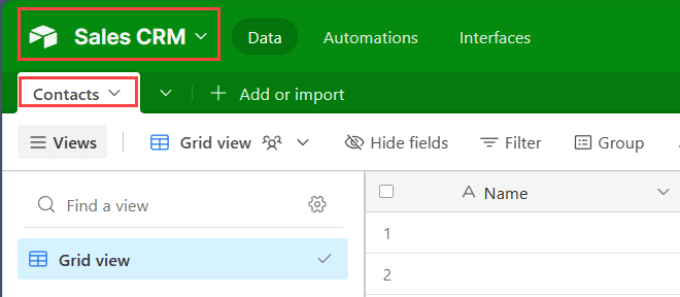
Pass ahead and name your base and table.
We’ve made up our minds to name our base ‘Product sales CRM’ and the table ‘Contacts.’
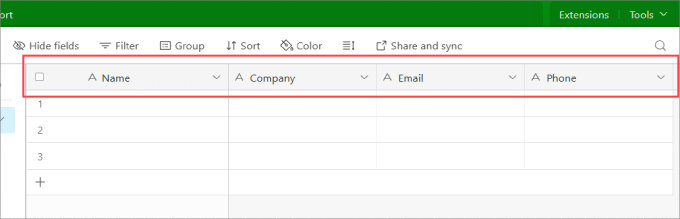
Then, business the top column labels to check the form fields you’ve merely created in WPForms.
In this case, we added a label for Determine, Company, E-mail, and Phone.
Keep this tab open, as we will refer once more to it later to check whether or not or no longer our WordPress automation works.
Create a Private Get right to use Token
Now, you need to organize Airtable to connect with WPForms by the use of Zapier. To take a look at this, you need a personal get right to use token to connect Airtable with Zapier.
Simply navigate to Airtable and click on at the ‘Account’ button underneath your profile logo.
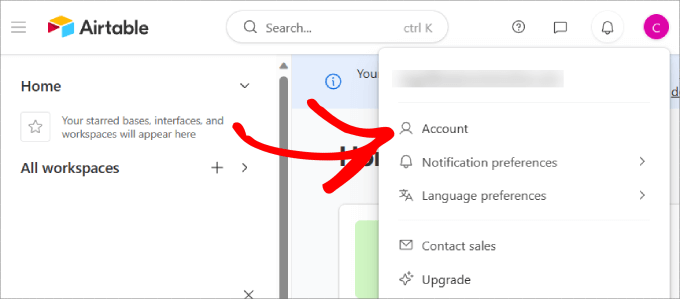
A personal get right to use token permits you to create multiple tokens that provide get right to use to the guidelines held to your Airtable databases.
Inside the ‘Evaluation’ tab, go ahead and click on at the ‘Pass to developer hub’ button.
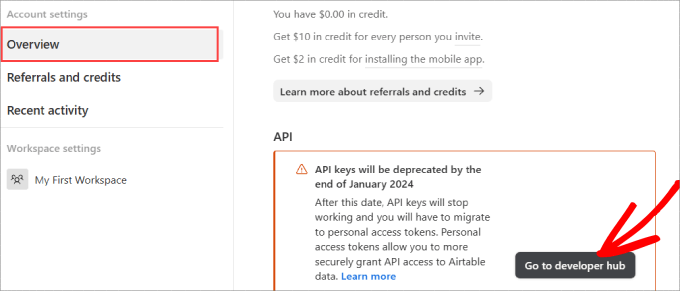
You’ll be taken to the developer hub, where you’ll create tokens to connect with your Airtable knowledge.
Underneath the ‘Private get right to use tokens’ tab, click on at the ‘Create token’ button.
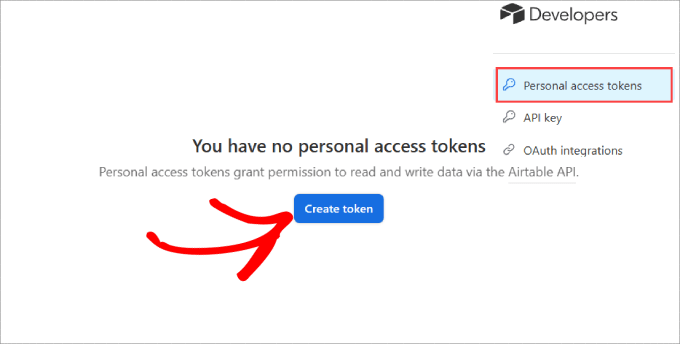
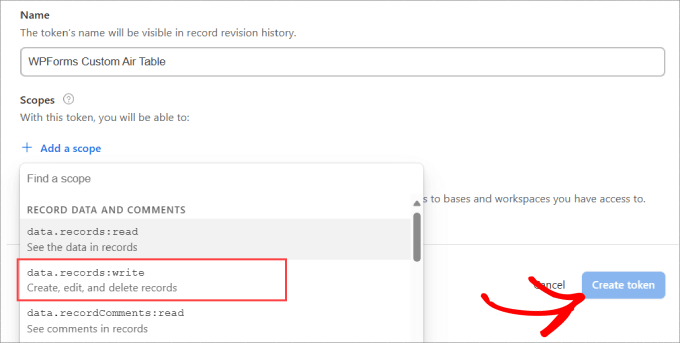
From proper right here, you’re going to be required to fill in vital information. First, you need to name the token so that you can merely seek advice from it later if you want to edit the permissions.
Underneath ‘Scopes,’ you’ll have to select what shoppers can do when given get right to use to this token. In this case, we will select the selection that says, ‘knowledge.information:write,’ so that shoppers can create, edit, and delete information.
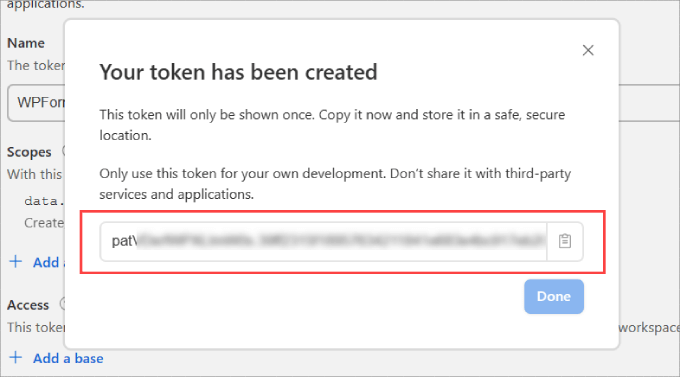
Once that is achieved, merely click on on on the ‘Create token’ button.
A popup will appear telling you that your token has been created. Merely replica it and keep it somewhere secure.
We can be together with this token to Zapier so that we can connect our Airtable database to WordPress.
Make Your Zap to Send Knowledge From Your Internet website online Form to Airtable
Next, go to the Zapier site. Proper right here, you need to create a free account or test in to your present account.
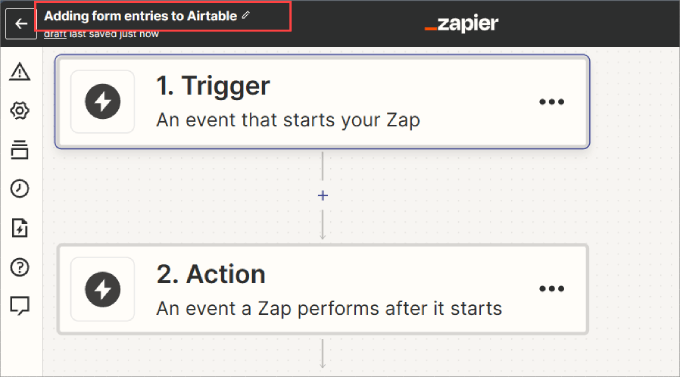
On your Zapier dashboard, click on at the ‘Create a Zap’ button on the top-left to start out the configuration wizard.

Phrase: In Zapier, a ‘zap’ is a process with a purpose and an movement. Our purpose it is going to be any individual filling throughout the form, and our movement it is going to be to create a file in Airtable.
At the top of the show, you need to offer your zap a name, and then you’ll organize the purpose.
Scroll down and click on on on the ‘Motive’ box.
Next, you’ll need to to seek out and select the WPForms app to start out the purpose.
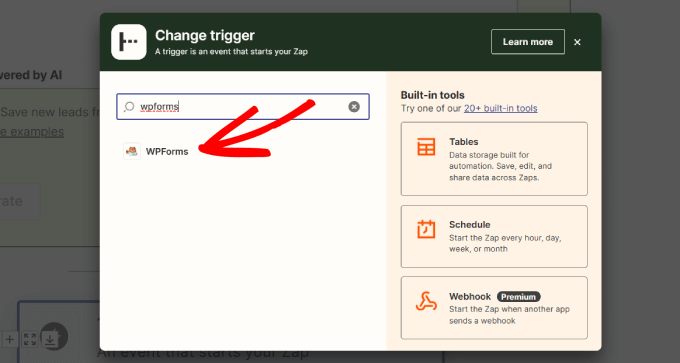
Inside the ‘Make a choice App & Fit’ box, type ‘WPForms’ into the search bar.
After that, simply click on on on the WPForms icon that comes up.

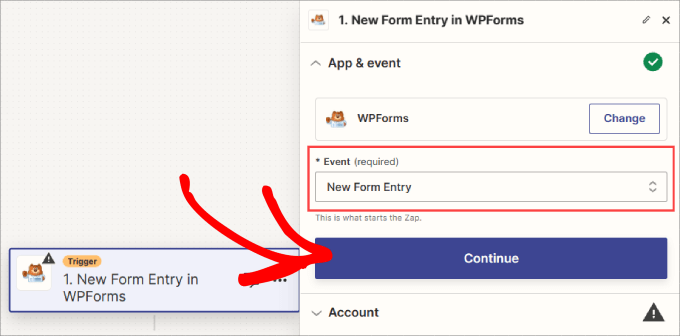
A sidebar window will appear at the right kind of your show. Underneath Fit, make a choice ‘New Form Get right of entry to’ for the reason that purpose to start out up the movement.
Then, simply hit the ‘Continue’ button.
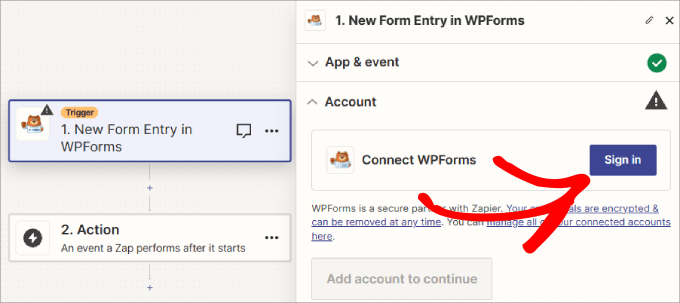
Next, you will need to click on at the ‘Sign In’ button to log in to your WPForms account.
This allows Zapier to clutch all of the new form get admission to knowledge and insert it into your Airtable.
A pop-up window will appear.
It is important to enter the API key that you just generated earlier, plus the URL (area title) of your website online.
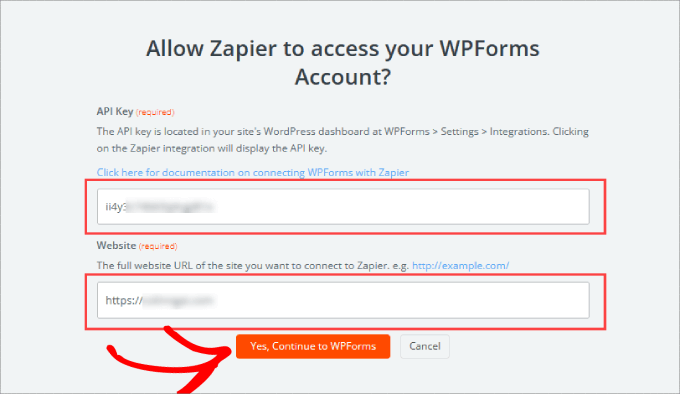
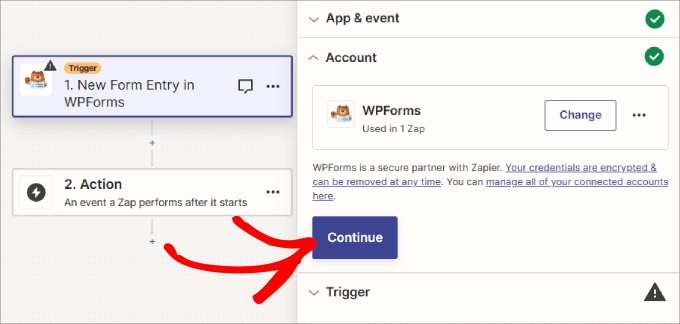
Whilst you’ve achieved that, click on on on the ‘Continue’ button to move on.
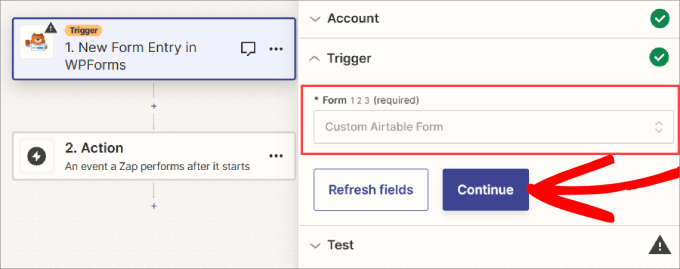
Next, you’re going to be asked to select the form you created earlier from the dropdown tick list.
Whilst you’ve determined at the contact form, go ahead and select ‘Continue.’
The ‘Refresh fields’ button permits you to reload the guidelines to duplicate the newest form entries.
Next, click on on on the ‘Test purpose’ button.
Zapier will to seek out your most recent get admission to, which is in a position to check whether or not or no longer the purpose is ready up appropriately.
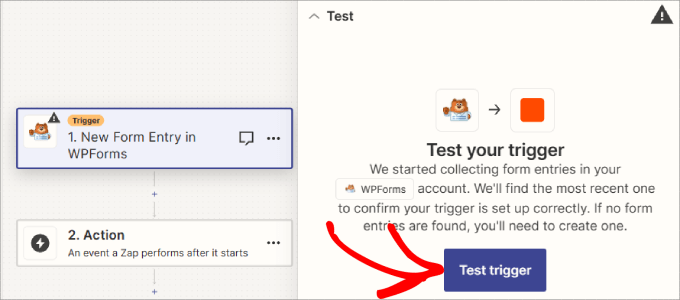
You’ll have to then see a message telling you that Zapier found out a check out get admission to.
The guidelines from your form get admission to it is going to be confirmed on the show:

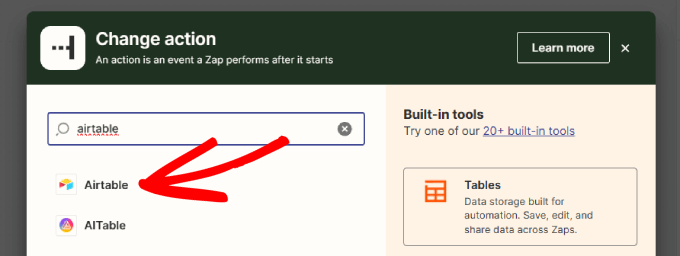
Click on at the ‘Continue with determined on file’ button to carry on. You might be in truth throughout the Movement part of the Zap, where you need to select your 2nd app.
Simply type ‘Airtable’ into the dropdown to hunt out the app. Then click on on on the Airtable widget.
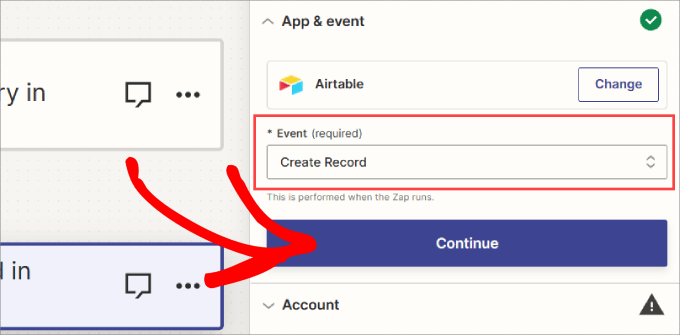
Once Airtable is connected to your zap, you’re going to look the dropdown for choosing an movement fit.
The movement fit is solely what you need to happen when any individual completes the form on your website. You wish to have to select ‘Create Record’ proper right here.
Then, hit the ‘Continue’ button.
Now, Zapier will urged you to test in to Airtable.
Simply click on at the ‘Sign In’ button and then log in.
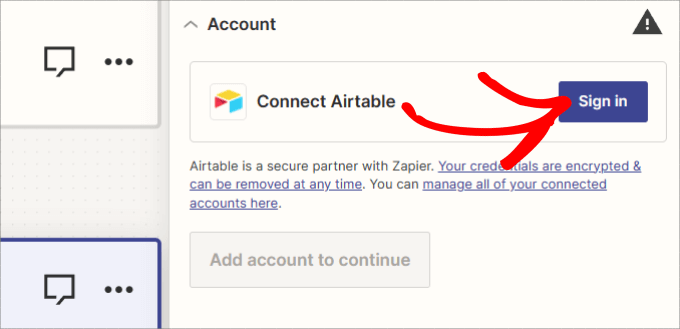
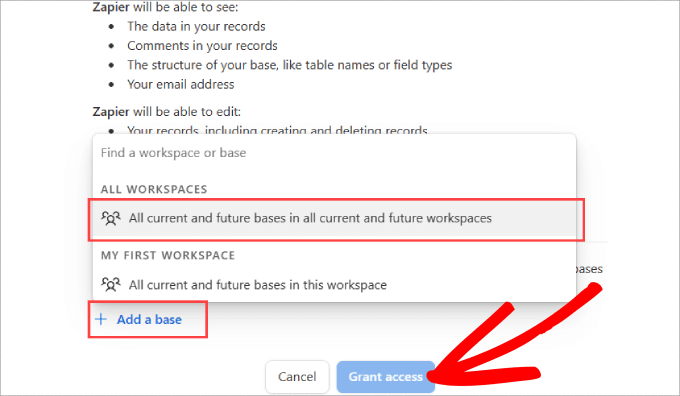
A brand spanking new window will appear telling you that Zapier is calling for Airtable get right to use. Essentially, this allows Zapier to mechanically send your form get admission to knowledge into the created fields to your Airtable.
All you need to do is click on at the ‘+ Add a base’ link. Then, make a choice which workspaces you need to offer Zapier get right to use to. In case you don’t have a need, then merely click on at the selection that says, ‘All provide and long run bases in all provide and long run workspaces.’
Then, once determined on, go ahead and click on on on the ‘Grant get right to use’ button.
Now, you’re going to look a ‘Continue’ button.
Merely click on in this to carry on making your zap.

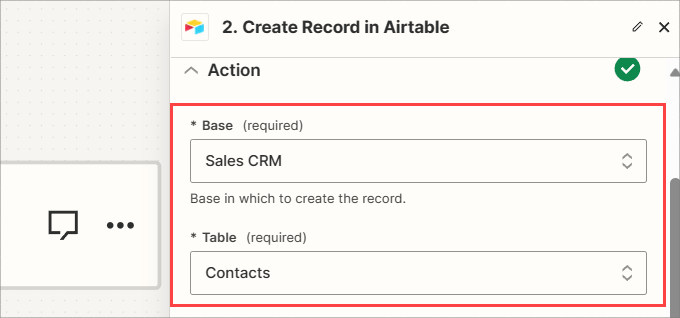
Underneath the Movement tab, you’ll need to first add your ‘Base’ and ‘Table’ from the given dropdown menus.
We’re going to make use of our Product sales CRM as the ground and add our new contacts to the Contacts table.
Moreover, you need to tell Zapier which fields from your WPForms form must correspond to the columns to your Airtable table.
For the entire suitable fields, simply select the right kind field using your check out knowledge. It’ll must look something like this:
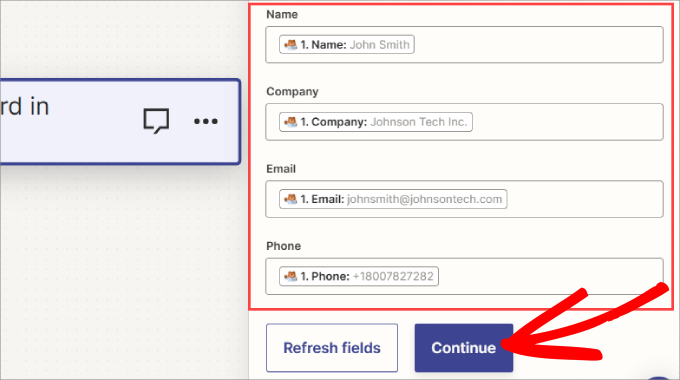
Then, click on at the ‘Continue’ button to stick going.
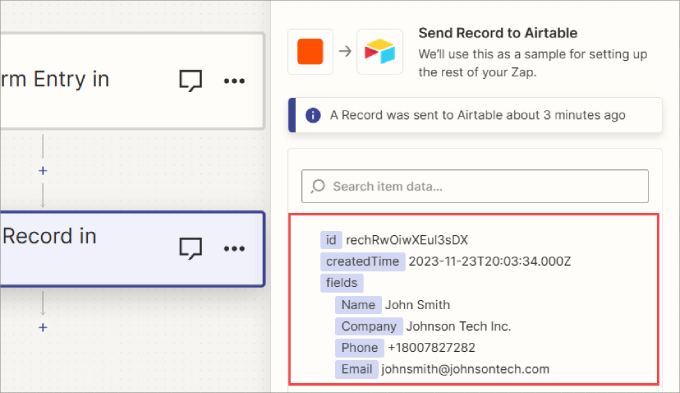
Zapier will now urged you to send a check out file to Airtable using your check out knowledge.
You’ll see a preview of the guidelines. Simply click on on on ‘Test step.’
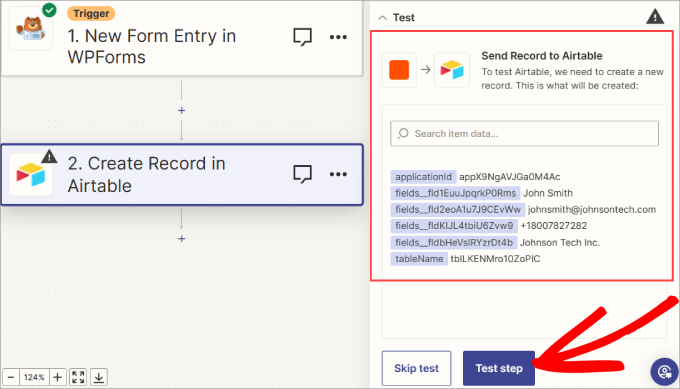
This will increasingly more send the check out knowledge to your decided on table in Airtable, rising a brand spanking new file.
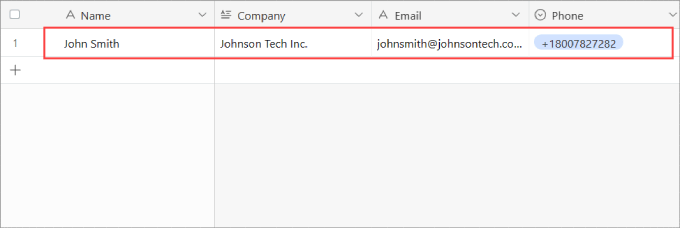
Pass ahead and evaluate the preview file to check the guidelines is correct.
It’s conceivable you’ll want to double-check that the file has been appropriately added to Airtable.
It’s a good idea to check that the guidelines went through to your Airtable base and that the guidelines used to be as soon as entered appropriately into the proper fields.
Now, head once more over to Zapier.
You simply need to click on at the ‘Publish’ button to finish rising your zap.
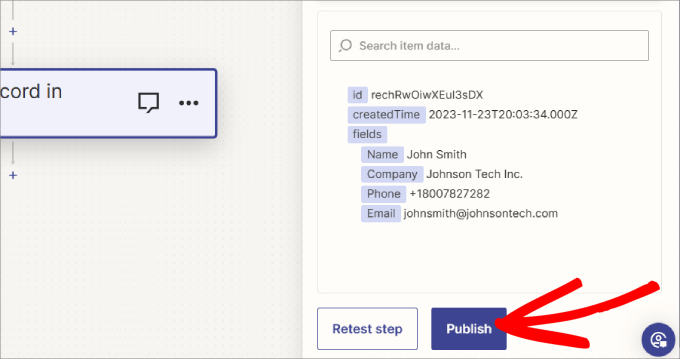
Give it a few seconds for the Zap to put up.
At the top of your show, you’ll have to see an ‘On’ button, indicating the Zap is are living.
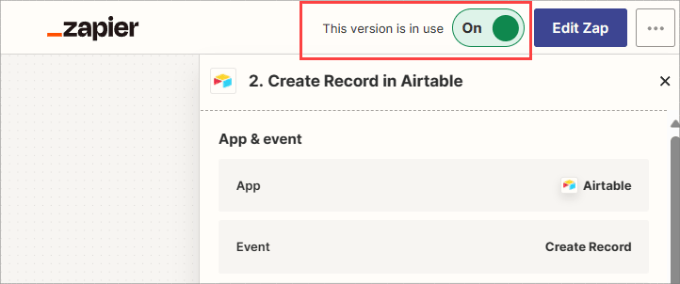
Moreover, if you happen to ever need to edit the Zap, very similar to changing which table or fields to send your form get admission to to, you’ll always to seek out your Zap on the area dashboard of Zapier.
Merely click on on on the establish of the Zap to edit it.
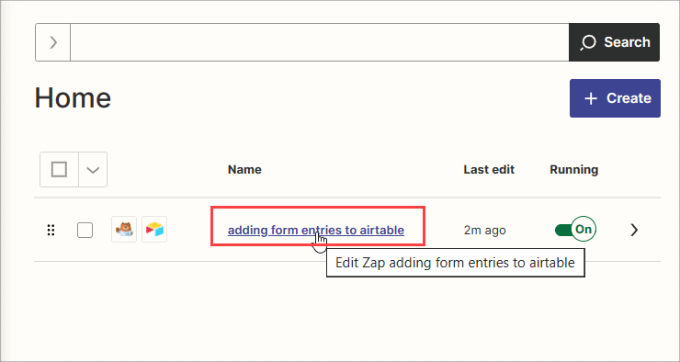
Your zap is now operating. All form entries through your connected form it is going to be added to the Airtable table that you just determined on.
Bonus: Learn to Send SMS Messages to Your Leads
In case you found out this integration helpful, then it’s conceivable you’ll want to moreover send SMS notifications to people who have completed your contact form.
This is a smart way of preserving them up to the moment with the status of their request.
For example, let’s say you are going to have possibilities who seek advice from your touchdown web page and then entire your form, indicating passion to your services and products and merchandise. While the form knowledge is entered into an Airtable, you’re going to wish each different connection that mechanically sends SMS messages to your leads in order that they know what to expect from you.
The most suitable choice is to use Brevo, which is an e-mail advertising provider that also permits you to send SMS messages to your leads.
With this device, it’s conceivable so that you can to import your contacts and then send text message campaigns. For more information, merely follow our instructional on how one can ship SMS messages on your WordPress customers.
We hope this article helped you learn how to create a custom designed Airtable form in WordPress. You may also want to check out our guides to the best possible industry telephone services and products and how one can get SMS textual content messages out of your WordPress paperwork.
In case you liked this article, then please subscribe to our YouTube Channel for WordPress video tutorials. You’ll be capable of moreover to seek out us on Twitter and Fb.
The put up Learn how to Create a Customized Airtable Shape in WordPress (Simple Method) first appeared on WPBeginner.
Contents
- 0.0.1 Why Create a Custom designed Airtable Form in WordPress?
- 0.0.2 Learn to Create a Custom designed Airtable Form in WordPress
- 0.0.3 Create Your Form in WPForms
- 0.0.4 Flip at the Zapier Addon for WPForms
- 0.0.5 Set Up a Base and Table in Airtable
- 0.0.6 Create a Private Get right to use Token
- 0.0.7 Make Your Zap to Send Knowledge From Your Internet website online Form to Airtable
- 0.0.8 Bonus: Learn to Send SMS Messages to Your Leads
- 0.1 Related posts:
- 1 The right way to Upload a Quick Product Description in WooCommerce
- 2 9 Best WordPress Table Plugins (2023)
- 3 What is TikTok’s Attribution Supervisor & How Can Advertisers Use It?

0 Comments