
The Block Bindings API is a powerful device throughout the block editor that lets you connect any data provide to a block’s attributes.
This API was first introduced in WordPress 6.5 and, in its initial implementation, enabled WordPress consumers to turn custom designed field values within posts and pages.
The Block Bindings API serves as the foundation for various tricky WordPress choices. Examples include Synced trend overrides and the Publish Date block variation introduced in WordPress 6.9.
So, exactly what’s the Block Bindings API? And what’s it used for? We will be able to provide a simple creation and a real-world example showing how you’ll create bindings between Gutenberg blocks and external data belongings.
Let’s get to artwork.
The Block Bindings API: Fundamental concepts
As we mentioned above, the Block Bindings API signifies that you’ll create bindings between a data provide and the attributes of a block.
In case you occur to’re not conscious about block attributes, navigate to the src checklist of the Gutenberg mission’s block library on GitHub, find the Paragraph block, and open the block.json report. The attributes belongings provides a listing of the Paragraph block’s attributes.
"attributes": {
	"content material subject matter": {
		"type": "rich-text",
		"provide": "rich-text",
		"selector": "p",
		"place": "content material subject matter"
	},
	"dropCap": {
		"type": "boolean",
		"default": false
	},
	"placeholder": {
		"type": "string"
	},
	"course": {
		"type": "string",
		"enum": [ "ltr", "rtl" ]
	}
},
The following blocks beef up the Block Bindings API as of WordPress 6.9 and can because of this reality be comparable in your custom designed fields:
| Supported blocks | Attributes |
|---|---|
| Paragraph | content material subject matter |
| Title | content material subject matter |
| Imagin | id, url, alt, title, caption |
| Button | text, url, linkTarget, rel |
To connect your custom designed fields to Gutenberg blocks, you must first sign in them. The following code registers a custom designed field by means of a WordPress plugin or your theme’s purposes.php report:
add_action( 'init', function() {
	register_post_meta( 'your-post-type', 'myplugin_meta_key', [
		'show_in_rest'  => true,
		'single'        => true,
		'type'          => 'string',
		'description'   => __( 'City name', 'textdomain' ),
		'auth_callback' => 'is_user_logged_in',
	] );
} );
Attributes define the characteristics of custom designed fields, and the documentation provides a entire record of them. To make a custom designed field available to the Block Bindings API, you must set show_in_rest to true. As of WordPress 6.9, string is the only supported type.
To seem the Block Bindings API in movement with custom designed fields, create a brand spanking new WordPress plugin and check in a meta field with the code confirmed above.
true,
'single' => true,
'type' => 'string',
'description' => __( 'The city identify', 'block-bindings-example' ),
'auth_callback' => 'is_user_logged_in',
] );
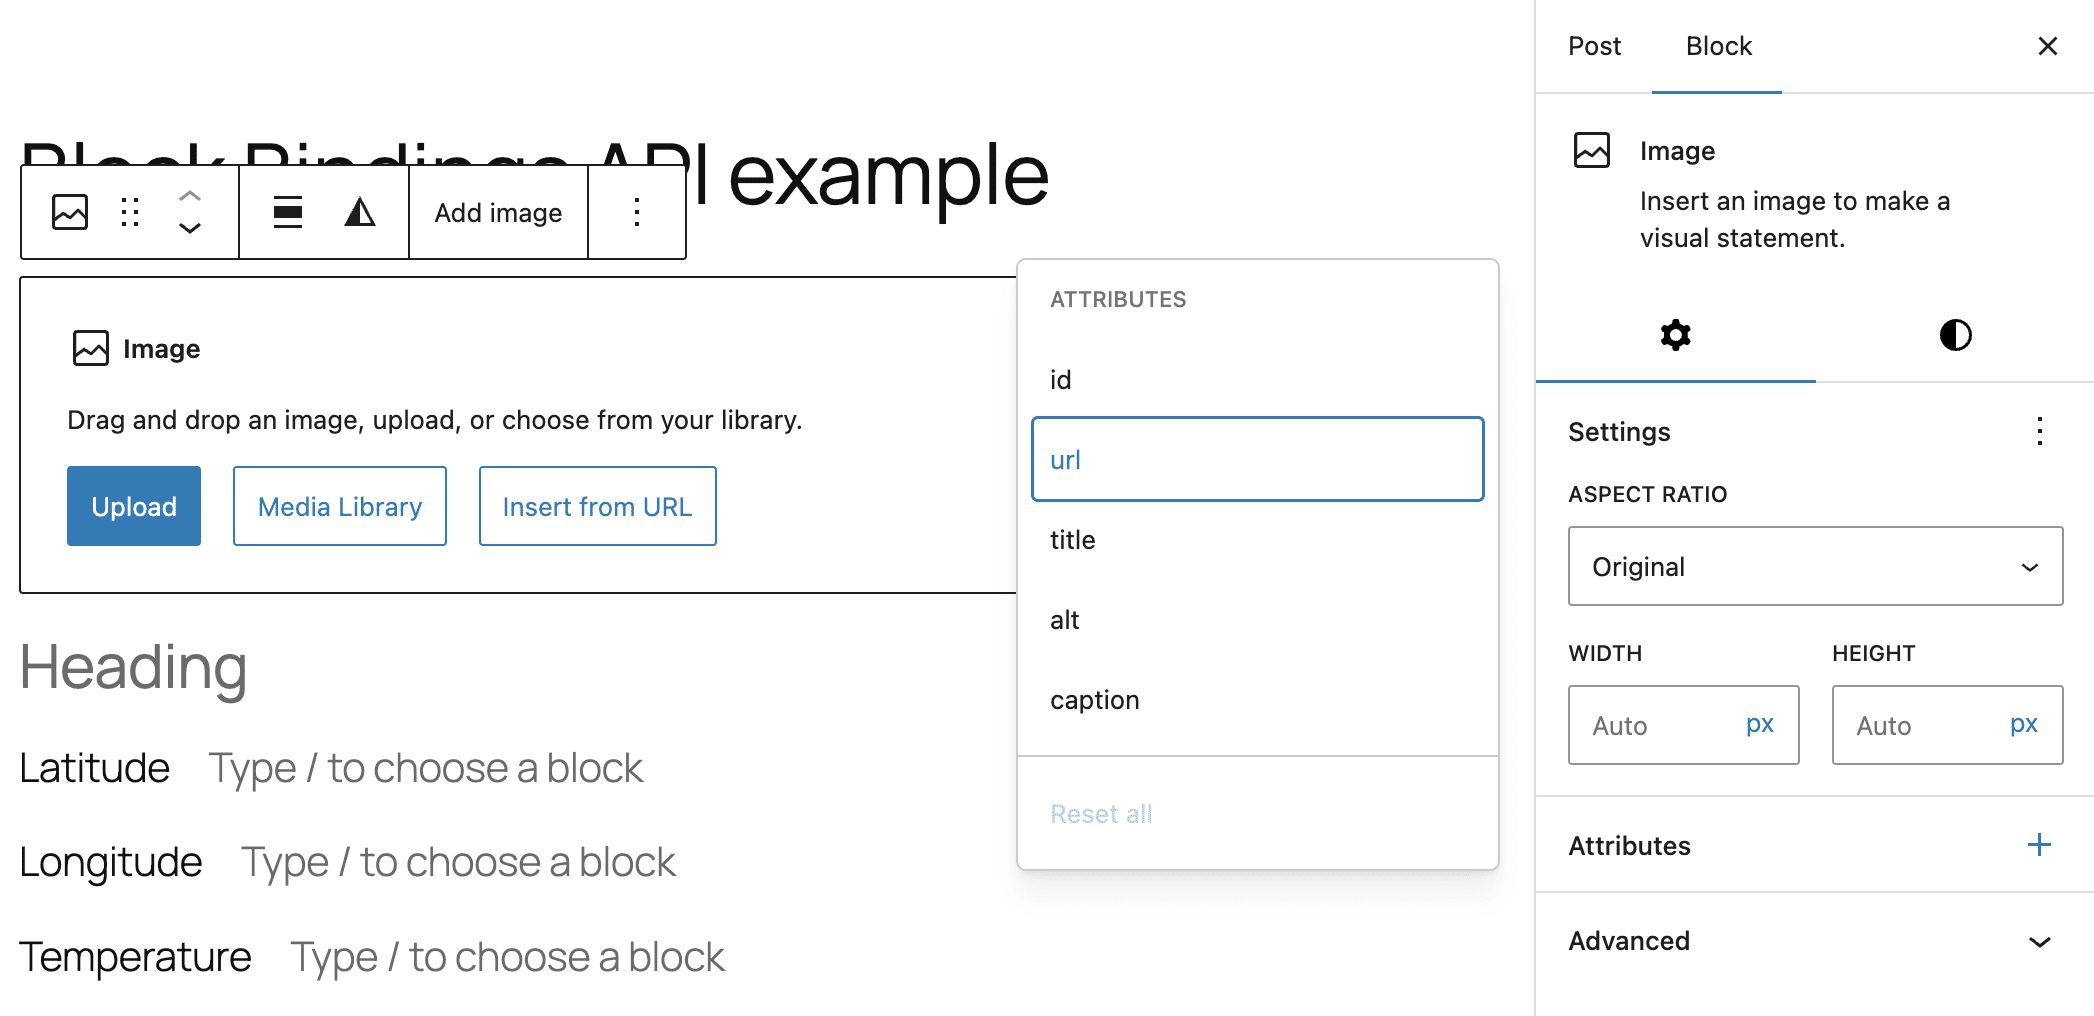
} );On your WordPress dashboard, flip at the plugin. Then, navigate to the Posts computer screen and create a brand spanking new publish. When you select a supported block, the Attributes panel throughout the Block Settings sidebar will display the document of attributes that can be positive to a registered custom designed field.
Open the Alternatives menu throughout the top correct corner and make a choice Preferences. Inside the Standard tab, in finding the Sophisticated segment and make allowance custom designed fields. Save your changes, look ahead to the internet web page to reload, then return to the editor.

Your next step is to insert an Image block. With the block made up our minds on, click on at the + icon throughout the Attributes panel and make a choice the url feature. The Attributes panel will then show a listing of available meta fields. Make a selection url over again. Now, you’re going to look the document of meta fields available for the prevailing publish type.
Make a selection your meta field and save the publish. You’ll have to now see your image in each and every the editor and the frontend.
Starting with model 6.7 of WordPress, you’ll have the ability to use the Label feature to turn text throughout the editor interface. The following code block shows an example:
add_action( 'init', function() {
	register_post_meta( '', 'block_bindings_image_url', [
		'show_in_rest'  => true,
		'single'        => true,
		'type'          => 'string',
		'description'   => __( 'City image', 'block-bindings-example' ),
		'label'         => __('Image URL'),
		'auth_callback' => 'is_user_logged_in',
	] );
} );
While you open the code editor, you’ll have the ability to see a JSON object within the image block delimiter. The metadata.bindings.url belongings shows that the url of the image block is expounded to a metadata field.
The provide belongings specifies the ideas provide for the block bindings. The args.key belongings establishes a reference in your meta field.
Necessarily essentially the most interesting aspect of the Block Bindings API is its skill to check in custom designed data belongings, which opens up some exciting new possibilities for developers. Next, we’ll uncover how you’ll use data from third-party services with the Block Bindings API.
The best way to check in custom designed Block Bindings data belongings: A real-life example
Once you may pay attention to the Block Bindings API’s basic concepts, we can switch immediately to its further sophisticated and interesting aspects for developers.
As mentioned earlier, the Block Bindings API signifies that you’ll check in custom designed data belongings. This allows you to retrieve data from provide and/or manipulate raw data to generate useful wisdom that can be automatically inserted into your content material subject matter.
In this segment, you learn how to maximize the opportunity of Block Bindings by the use of a sensible example that you just’ll have the ability to use as a foundation for growing your individual custom designed applications.
Assume you wish to have to retrieve data from an external provide and display it in your posts, pages, or customized put up sorts. For instance, chances are high that you’ll query a local weather provider API by the use of sending a request with the latitude and longitude of a the city to get real-time local weather data, which you need to then display in your web site.
Because of the Block Bindings API, you’ll have the ability to display the prevailing temperature or provide your readers with the weather forecast for the impending days. You’ll have the ability to moreover programmatically alternate the url feature of quite a few pictures on the internet web page depending on local weather conditions.
To be able to upload this selection in your WordPress internet website online, you need to create a plugin. Follow the ones steps:
Step 1: Create a basic plugin
The first step is to create the plugin data. Navigate to the wp-content/plugins checklist of your WordPress arrange and create a brand spanking new folder referred to as block-bindings-example. Inside this folder, add the following data:
/wp-content/plugins/
└── /block-bindings-example/
	├── block-bindings-example.php
	└── /incorporates/
		├── binding-sources.php
		├── meta-fields.php
		└── weather-api.php
Open the block-bindings-example.php document in your favorite code editor and add the following code:
<?php
/**
 * Plugin Name: Block Bindings Example
 * Description: Use WordPress Block Bindings API (6.5+) to dynamically bind local weather data from Open-Meteo API to Gutenberg blocks the use of custom designed publish meta and a custom designed binding provide.
 * Type: 1.0.0
 * Writer: Your Name
 * License: GPL2 or later
 * Text House: block-bindings-example
 */

if ( ! defined( 'ABSPATH' ) ) {
	pass out; // Pass out if accessed directly
}

/**
 * Cache length for local weather data: 30 minutes
 * This reduces API calls and improves potency
 */
define( 'BB_WEATHER_CACHE_TIME', HOUR_IN_SECONDS / 2 );

require_once plugin_dir_path( __FILE__ ) . 'incorporates/meta-fields.php';
require_once plugin_dir_path( __FILE__ ) . 'incorporates/binding-sources.php';
require_once plugin_dir_path( __FILE__ ) . 'incorporates/weather-api.php';

/**
 * Setup function
 */
function bb_init_setup() {
	bb_register_post_meta();
	bb_register_binding_sources();
}
add_action( 'init', 'bb_init_setup' );
Proper right here’s what this code does:
- The constant
BB_WEATHER_CACHE_TIMEdetermines how long local weather data is cached. This reduces API calls, improves internet web page potency, and lowers provider costs. - The
require_onceexpressions include the important scripts to check in meta fields, signal within the binding provide, and retrieve data from the API. - The setup function calls two functions that signal within the publish meta fields and the custom designed binding belongings.
Step 2: Enroll publish meta fields
The next step is to signal within the meta fields you need on your use case. Open the meta-fields.php document throughout the incorporates folder and add the following code:
 true,
		'single'        => true,
		'type'          => 'string',
		'description'   => __( 'Add the city identify', 'block-bindings-example' ),
		'label'         => __( 'The city identify', 'block-bindings-example' ),
		'auth_callback' => 'is_user_logged_in',
	] );

	register_post_meta( 'publish', 'block_bindings_image_url', [
		'show_in_rest'  => true,
		'single'        => true,
		'type'          => 'string',
		'description'   => __( 'Add city image URL', 'block-bindings-example' ),
		'label'         => __( 'City image URL', 'block-bindings-example' ),
		'auth_callback' => 'is_user_logged_in',
	] );

	register_post_meta( 'publish', 'block_bindings_city_lat', [
		'show_in_rest'  => true,
		'single'        => true,
		'type'          => 'string',
		'description'   => __( 'Add city latitude', 'block-bindings-example' ),
		'label'         => __( 'Latitude', 'block-bindings-example' ),
		'auth_callback' => 'is_user_logged_in',
	] );

	register_post_meta( 'publish', 'block_bindings_city_lng', [
		'show_in_rest'  => true,
		'single'        => true,
		'type'          => 'string',
		'description'   => __( 'Add city longitude', 'block-bindings-example' ),
		'label'         => __( 'Longitude', 'block-bindings-example' ),
		'auth_callback' => 'is_user_logged_in',
	] );
}
The register_post_meta function registers a meta key for use in posts. Follow that to use meta fields registered this way with the Block Bindings API, you must set show_in_rest to true and type to string. See the documentation for more information.
Step 3: Enroll Block Bindings provide
It’s time to signal for your binding provide. Open the binding-sources.php document and add the following code:
 __( 'Local weather State of affairs', 'block-bindings-example' ),
			'get_value_callback' => 'bb_get_weather_condition_value',
			'uses_context'       => [ 'postId' ], // We would like postId to get meta values
		]
	);
}
The register_block_bindings_source() function requires the provision identify and a callback function that retrieves data from a provide and returns the manipulated worth.
Then, within the identical binding-sources.php document, define the callback function.
function bb_get_weather_condition_value( array $source_args, WP_Block $block_instance ) {

	$key = $source_args['key'] ?? null;
	if ( ! $key ) {
		return null;
	}

	// Get provide publish ID from block context (at all times available in publish content material subject matter)
	$post_id = $block_instance->context['postId'] ?? null;

	// Fallback: use global loop if context is missing
	if ( ! $post_id && in_the_loop() ) {
		$post_id = get_the_ID();
	}

	if ( ! $post_id || $post_id <= 0 ) {
		error_log( 'BB DEBUG: Might simply not make a decision publish ID for local weather binding' );
		return null;
	}

	$weather_data = bb_fetch_and_cache_weather_data( $post_id );

	if ( ! is_array( $weather_data ) || ! isset( $weather_data[ $key ] ) ) {
		return null;
	}

	$worth = $weather_data[ $key ];

	// Append °C symbol for temperature
	if ( $key === 'temperature' ) {
		return $worth . '°C';
	}

	return $worth;
}
Let’s destroy down this function:
$source_args['key']identifies the ideas positive to the block feature.- The next line retrieves the ID of the current publish from the
context. If thecontextis missing, as could be the case with previews, the ID of the current publish is retrieved withget_the_ID(). - Then, it calls the
bb_fetch_and_cache_weather_datafunction, which retrieves the ideas from the API. We will be able to define this function in the next step. $weather_data[$key]contains the ideas provided by the use of the API, similar to temperature and local weather state.- If the name of the game’s
temperature, it appends°Cto the provided worth. - The function then returns the entire worth.
Step 4: Retrieve data from an external provide
As mentioned above, we retrieve data from the Open-Meteo carrier (unfastened for non-commercial use).
To retrieve the prevailing temperature and local weather conditions, you need to send a request to the API that includes the latitude and longitude of a given location and the query var provide=weather_code,temperature_2m. Underneath is an example request:
https://api.open-meteo.com/v1/forecast?latitude=-33.8717&longitude=151.2299&provide=weather_code,temperature_2mThe API provides a response similar to the following:
{
	"latitude": -33.8717,
	"longitude": 151.2299,
	"generationtime_ms": 0.030875205993652344,
	"utc_offset_seconds": 0,
	"timezone": "GMT",
	"timezone_abbreviation": "GMT",
	"elevation": 13.0,
	"current_units": {
		"time": "iso8601",
		"length": "seconds",
		"weather_code": "wmo code",
		"temperature_2m":"°C"
	},
	"provide": {
		"time": "2025-12-01T16:00",
		"length": 900,
		"weather_code": 3,
		"temperature_2m":7.3
	}
}
Now that you know the way to get the ideas you need, open the weather-api.php document and add the following code:
function bb_fetch_and_cache_weather_data( $post_id ) {
	$lat = get_post_meta( $post_id, 'block_bindings_city_lat', true );
	$lng = get_post_meta( $post_id, 'block_bindings_city_lng', true );

	$lat = str_replace( ',', '.', trim( $lat ) );
	$lng = str_replace( ',', '.', trim( $lng ) );

	if ( ! is_numeric( $lat ) || ! is_numeric( $lng ) ) {
		error_log( 'BB DEBUG: Invalid latitude/longitude values after normalization' );
		return false;
	}

	$transient_key = 'bb_weather_data_' . $post_id;
	$cached_data   = get_transient( $transient_key );

	if ( $cached_data !== false ) {
		error_log( "BB DEBUG: Cache hit for publish ID {$post_id}" );
		return $cached_data;
	}

	// Assemble Open-Meteo API URL
	$api_url = sprintf(
		'https://api.open-meteo.com/v1/forecast?latitude=%s&longitude=%s&provide=weather_code,temperature_2m',
		rawurlencode( $lat ),
		rawurlencode( $lng )
	);

	error_log( "BB DEBUG: Fetching local weather data from: {$api_url}" );

	$response = wp_remote_get( $api_url, [ 'timeout' => 10 ] );

	if ( is_wp_error( $response ) ) {
		error_log( 'BB DEBUG: API request failed – ' . $response->get_error_message() );
		return false;
	}

	if ( wp_remote_retrieve_response_code( $response ) !== 200 ) {
		error_log( 'BB DEBUG: API returned non-200 status code' );
		return false;
	}

	$body = wp_remote_retrieve_body( $response );
	$data = json_decode( $body, true );

	if ( ! $data || ! isset( $data['current'] ) ) {
		error_log( 'BB DEBUG: Invalid or empty API response' );
		return false;
	}

	$temperature  = $data['current']['temperature_2m'] ?? null;
	$weather_code = $data['current']['weather_code'] ?? 0;

	$mapped_data = [
		'temperature'    => round( (float) $temperature ),
		'weather_state'  => bb_map_wmo_code_to_state( (int) $weather_code ),
	];

	// Cache for 30 minutes
	set_transient( $transient_key, $mapped_data, BB_WEATHER_CACHE_TIME );

	error_log( 'BB DEBUG: Local weather data fetched and cached successfully' );

	return $mapped_data;
}
This function retrieves provide local weather data from the Open-Meteo API and retail outlets it throughout the cache the use of transients. Let’s take a closer look.
- Two calls to
get_post_metaretrieve the latitude and longitude of your location. - The following two lines normalize the decimal separator in case the patron enters a comma instead of a length.
- The conditional block assessments if the values are in numerical construction the use of
is_numeric(). - Next, it assessments if the ideas is in cache. If that is so, it returns the cached data and prevents the function without sending any request to the API.
- If no data is situated in cache, it builds the request and retail outlets the response.
- The following lines provide
temperatureandweather_code. weather_codeis mapped toweather_stateas a result of thebb_map_wmo_code_to_statefunction, which is printed beneath.- The information is saved with
set_transient. - Finally, the function returns the mapped data.
Final, define the function that translates weather_code proper right into a human-readable string:
function bb_map_wmo_code_to_state( $code ) {
	if ( $code >= 0 && $code = 51 && $code = 71 && $code = 95 ) {
		return 'thunderstorm';
	}
	return 'cloudy';
}
The code is whole, and your plugin is ready for testing.
The best way to use the Block Bindings API
It’s time to learn how to use the new choices added in your web site with the Block Bindings API!
On your WordPress dashboard, navigate to the Plugins computer screen and switch at the Block Bindings Example plugin you merely created.
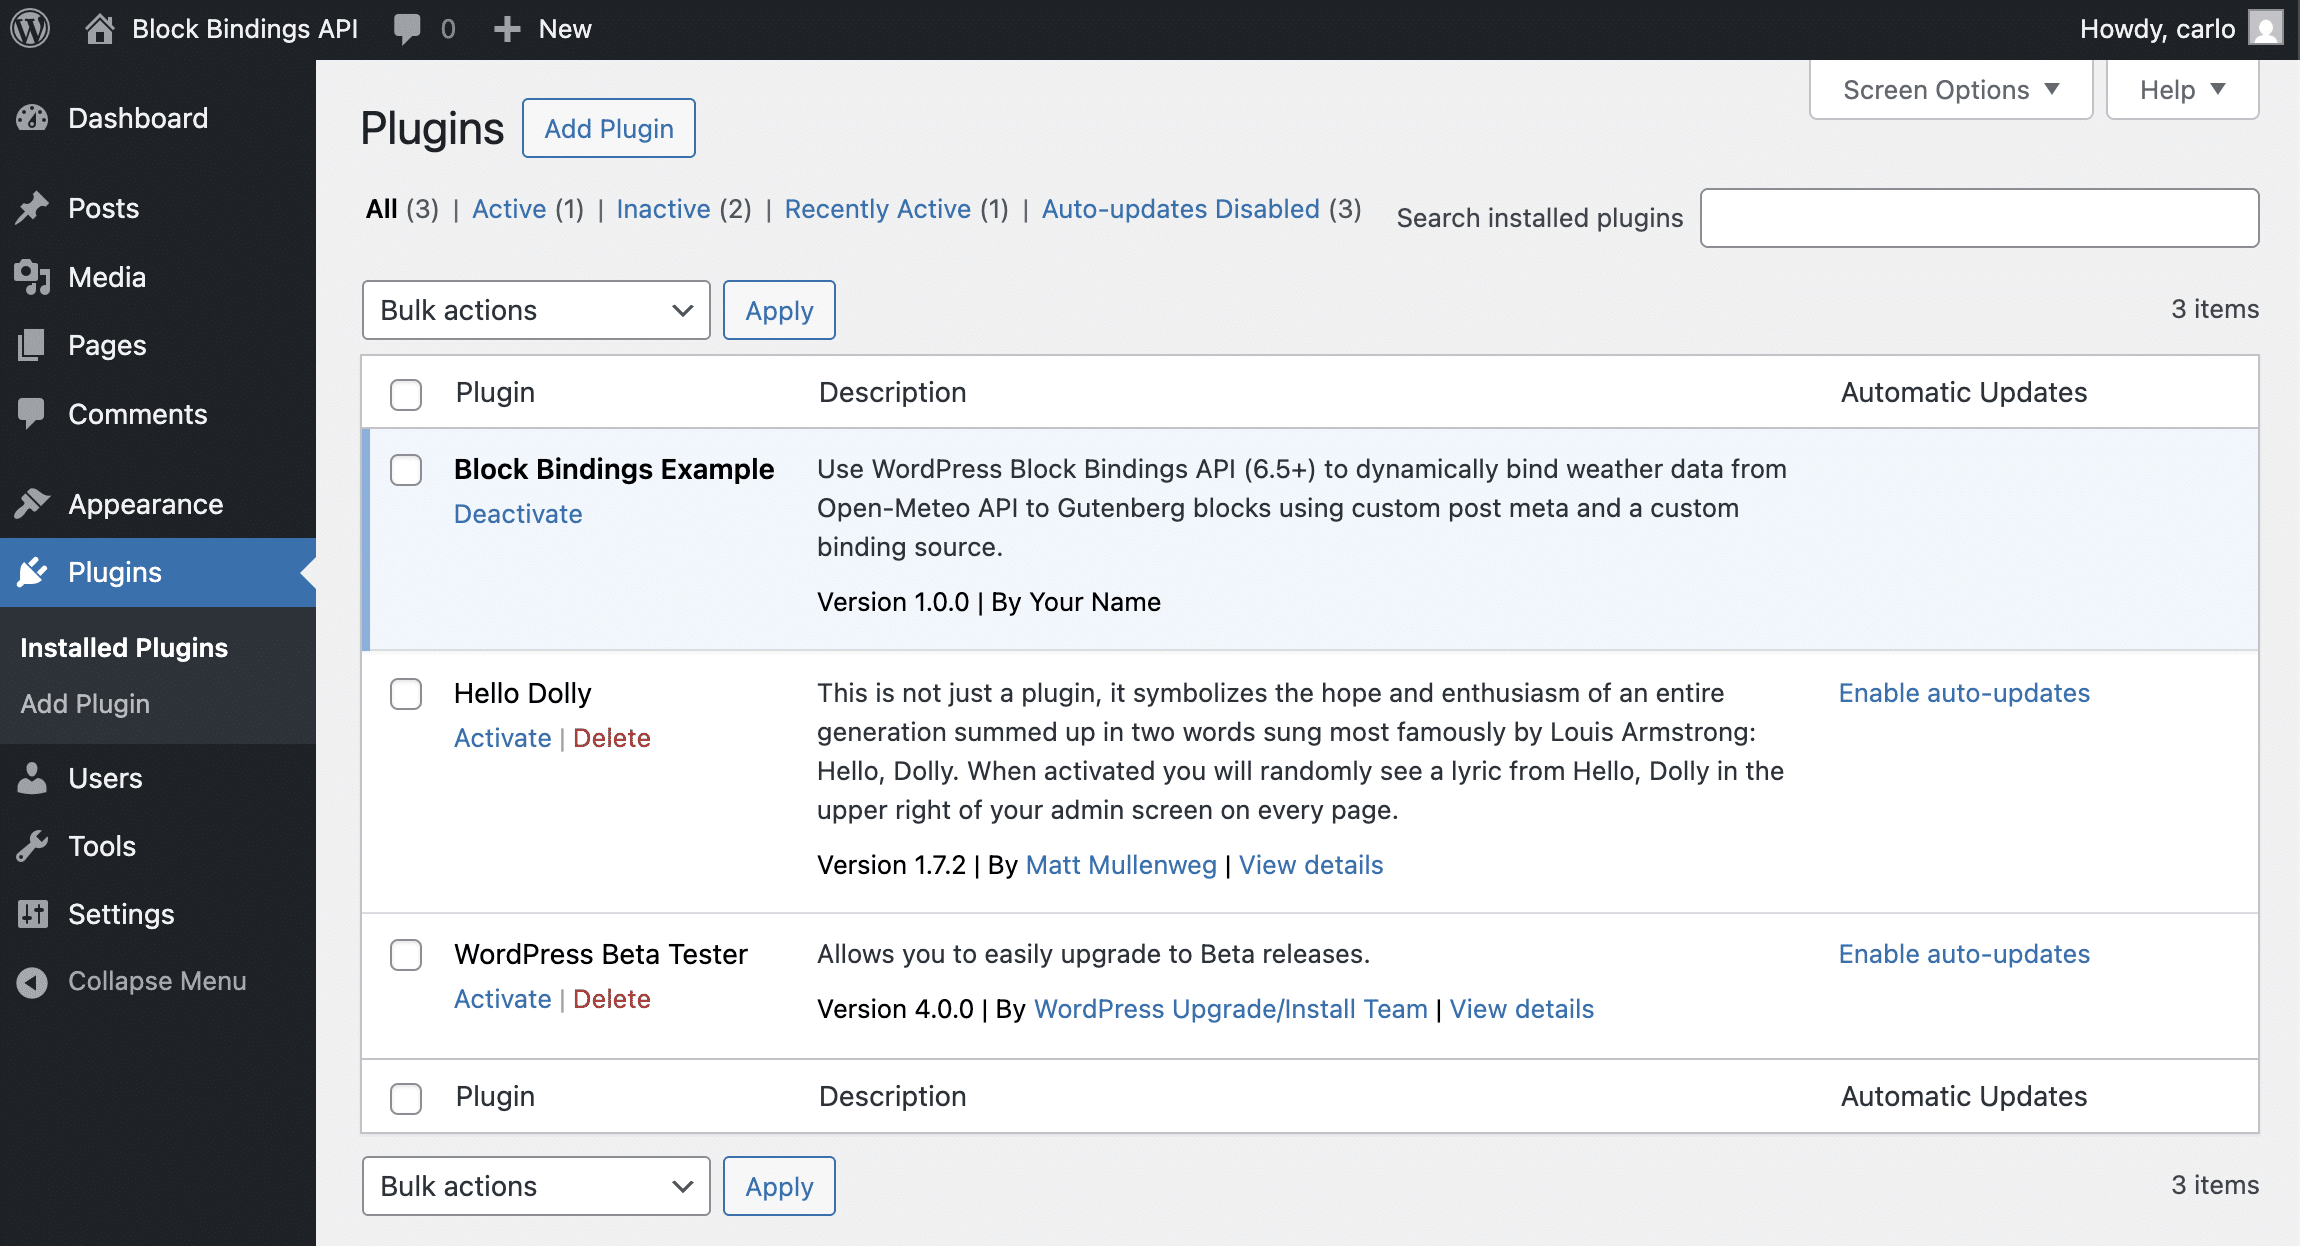
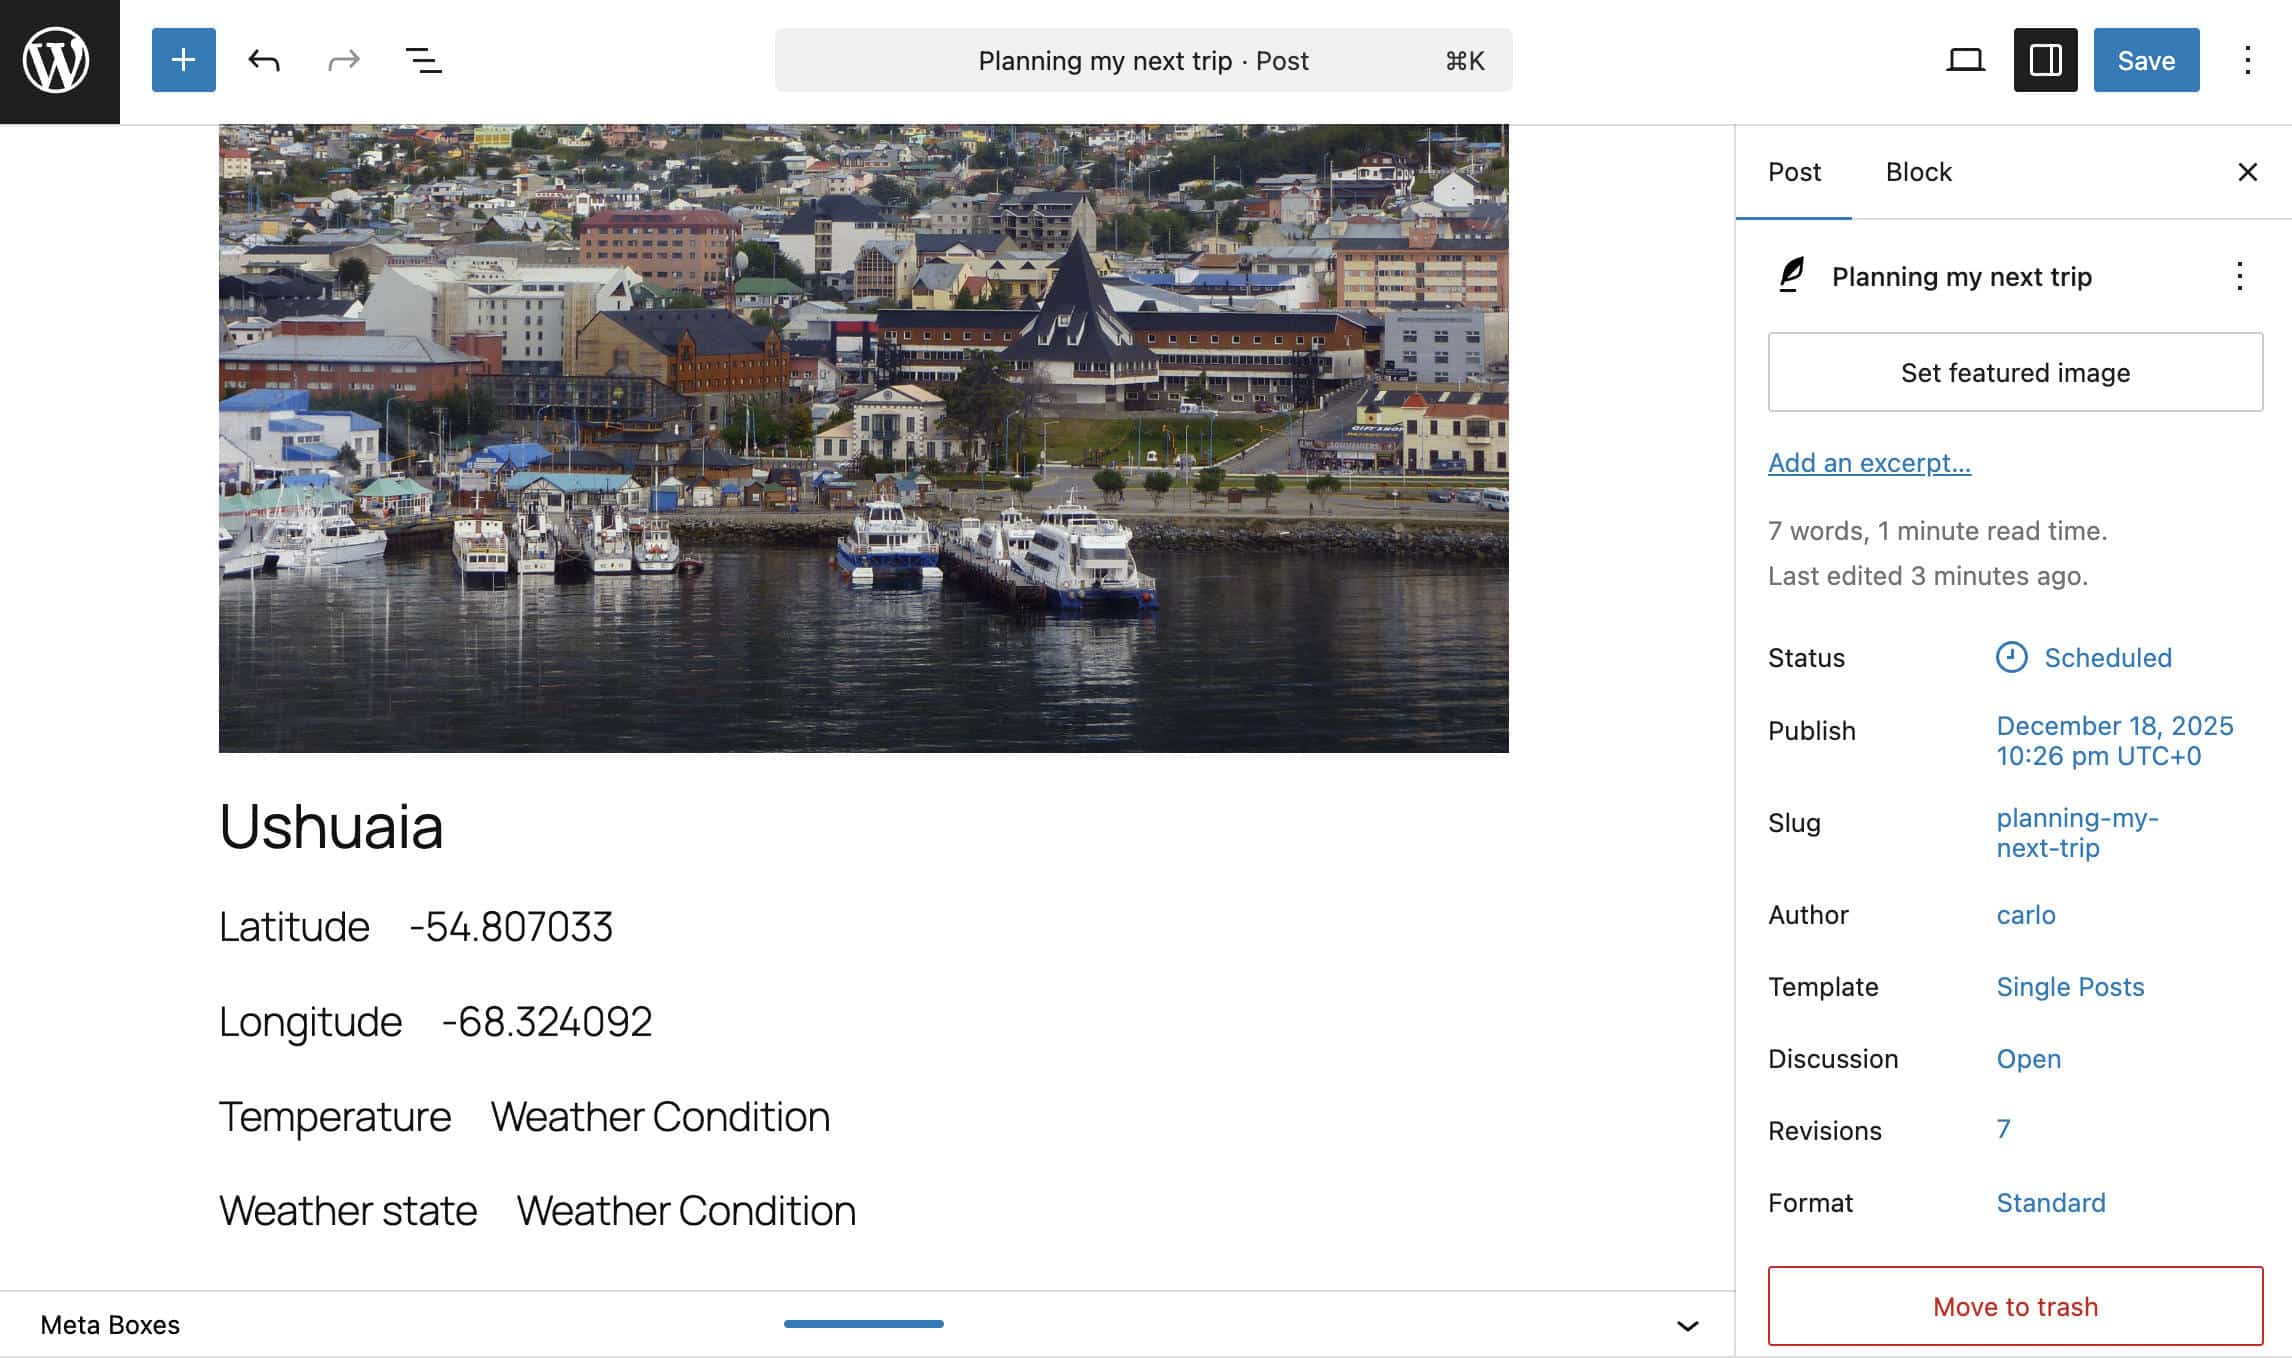
After that, create a brand spanking new publish or internet web page. Add an Image block, a reputation, and four Row blocks containing two paragraphs each, as confirmed throughout the image beneath. Then, save the publish.
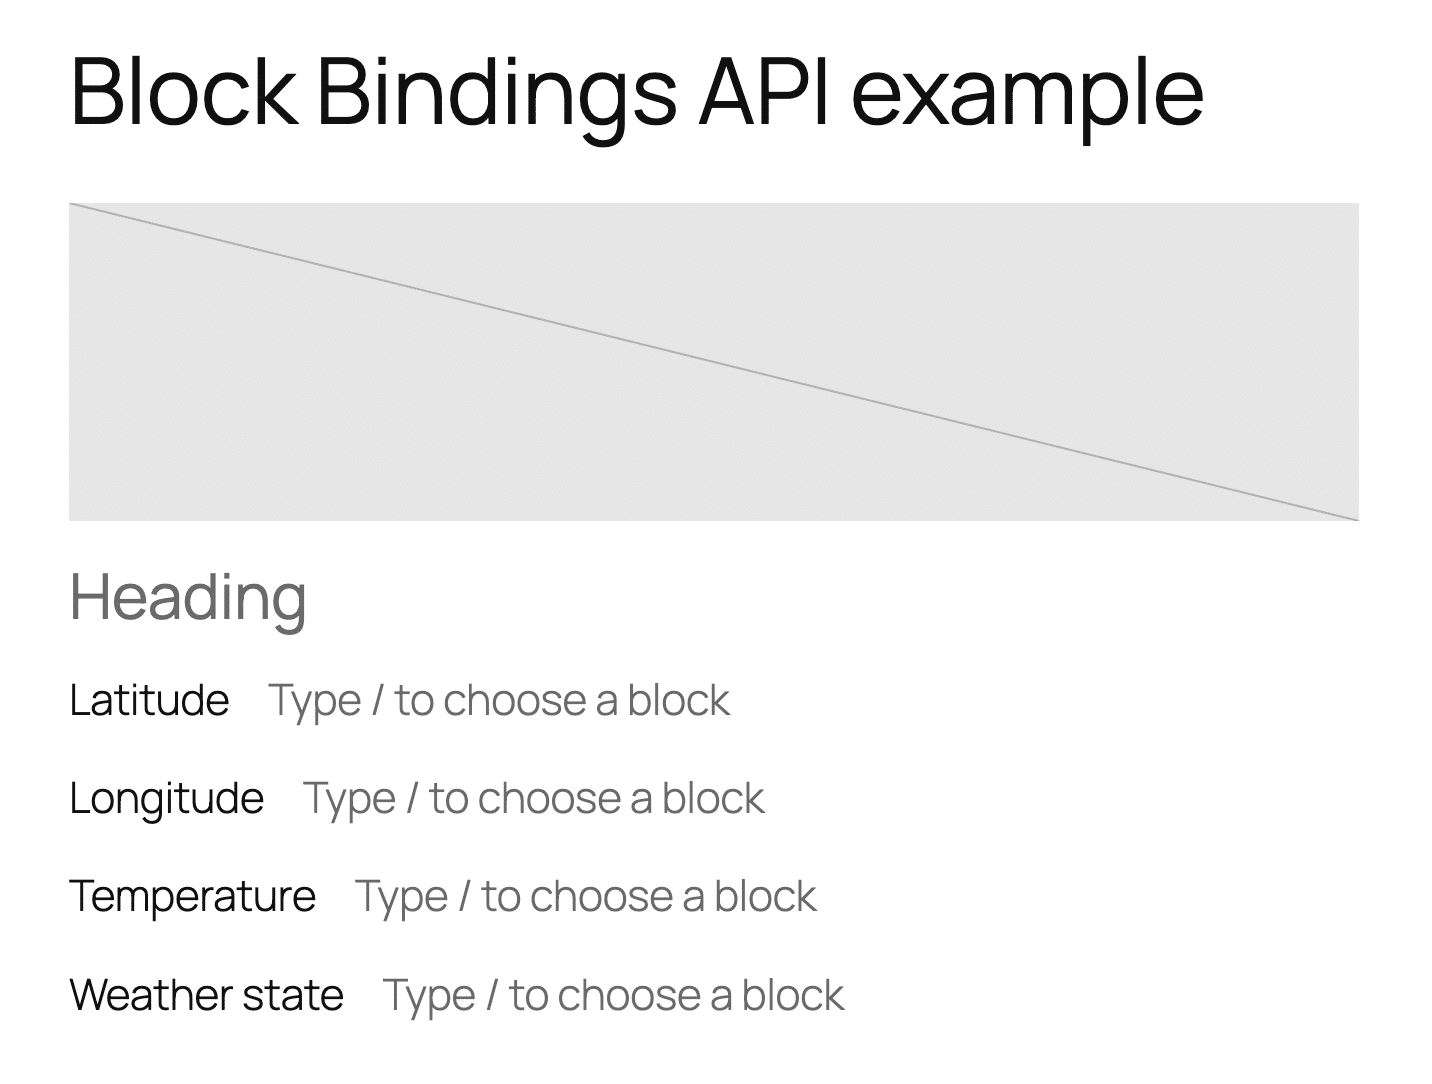
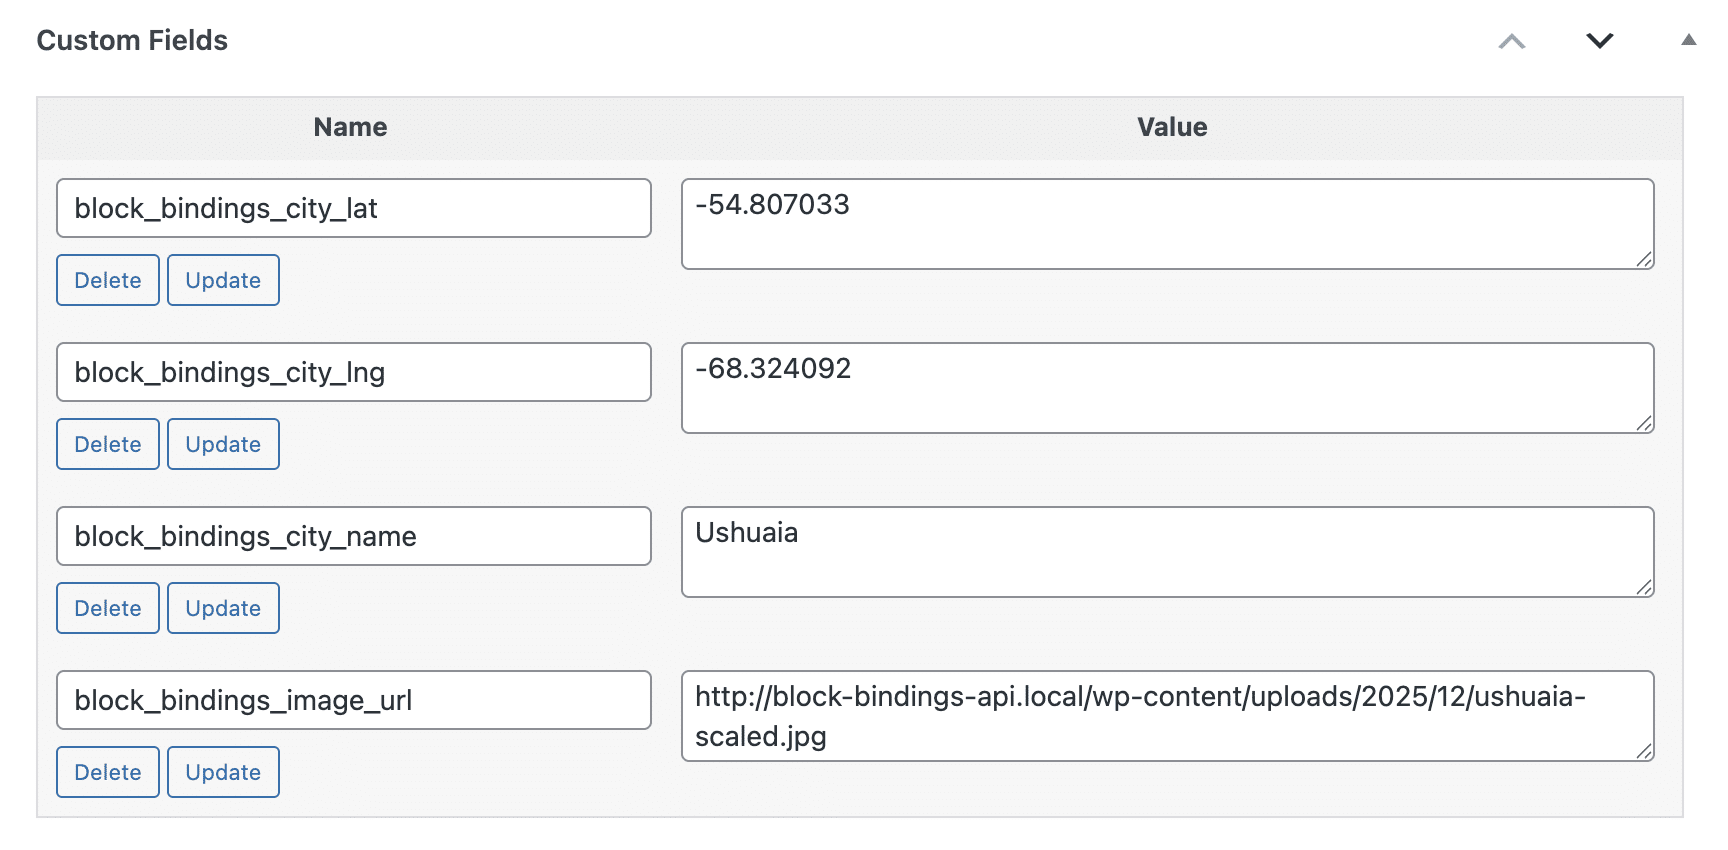
Following, add your custom designed fields and save the publish over again.
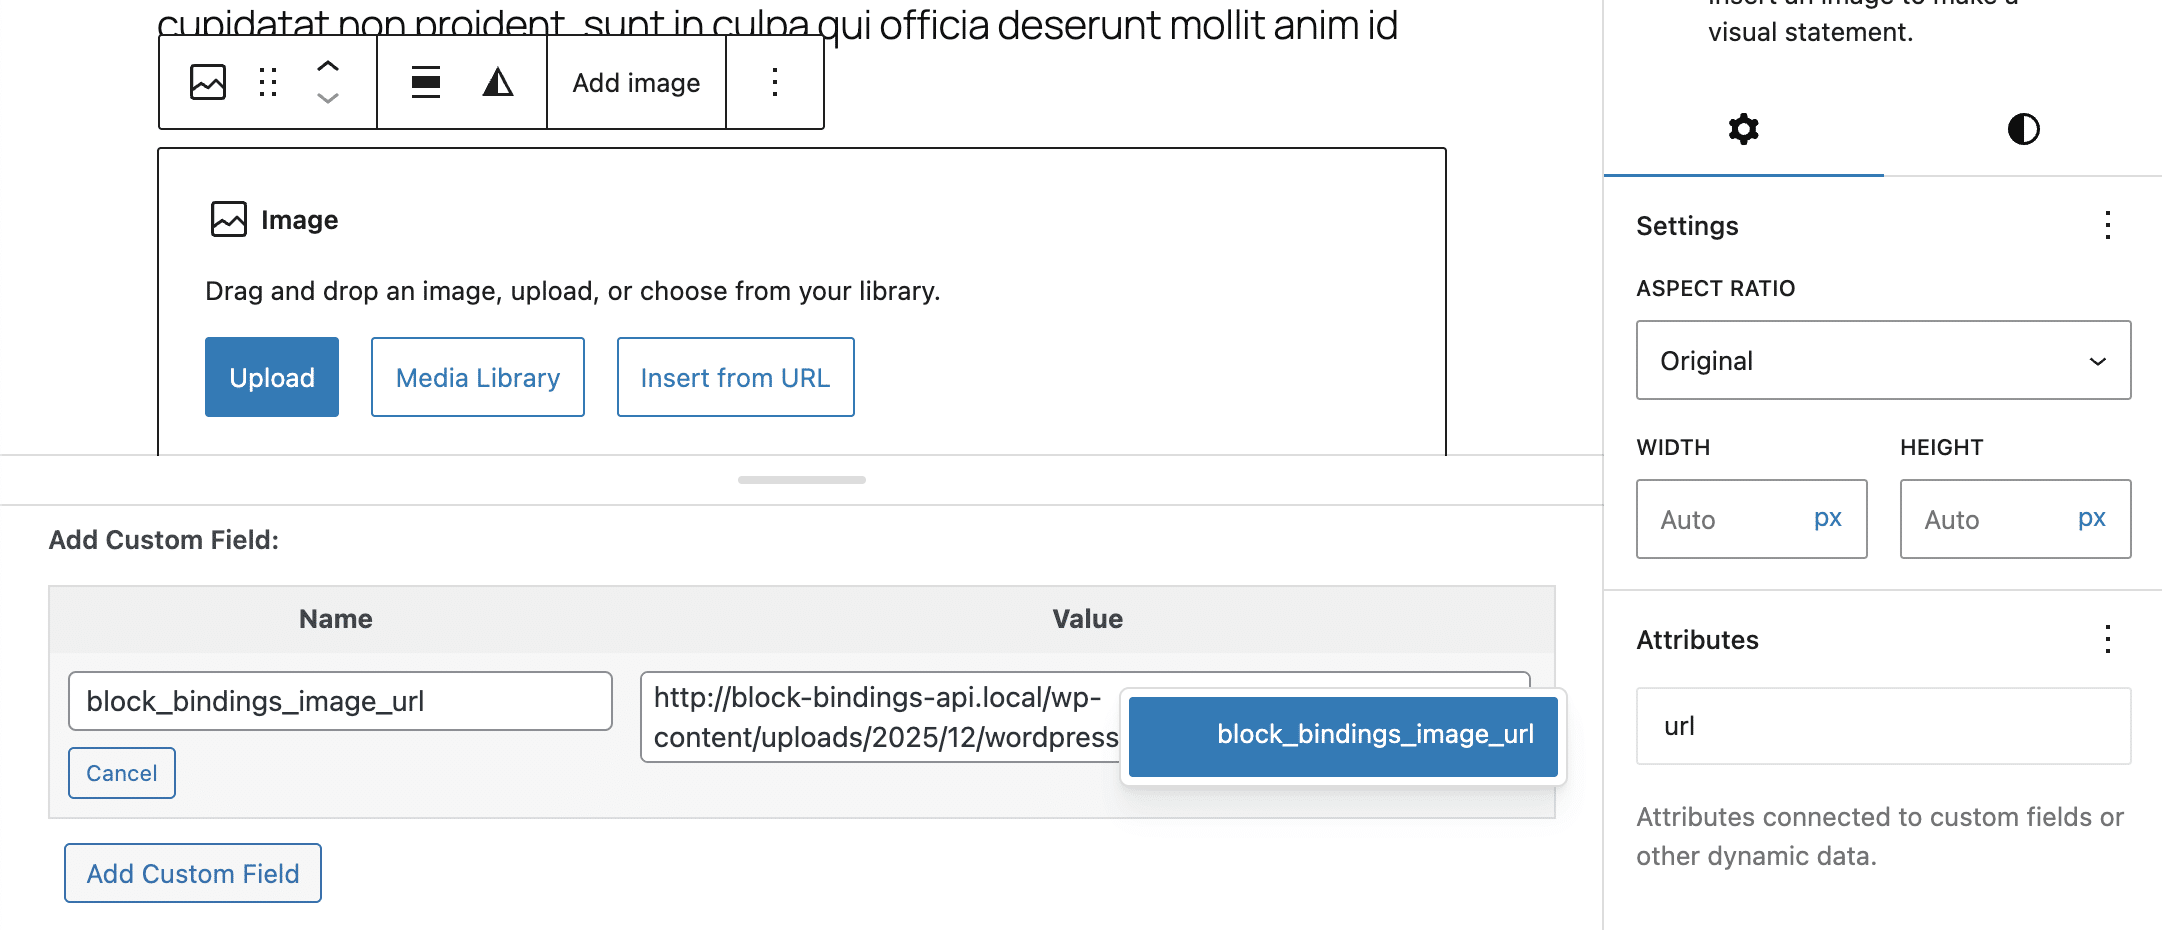
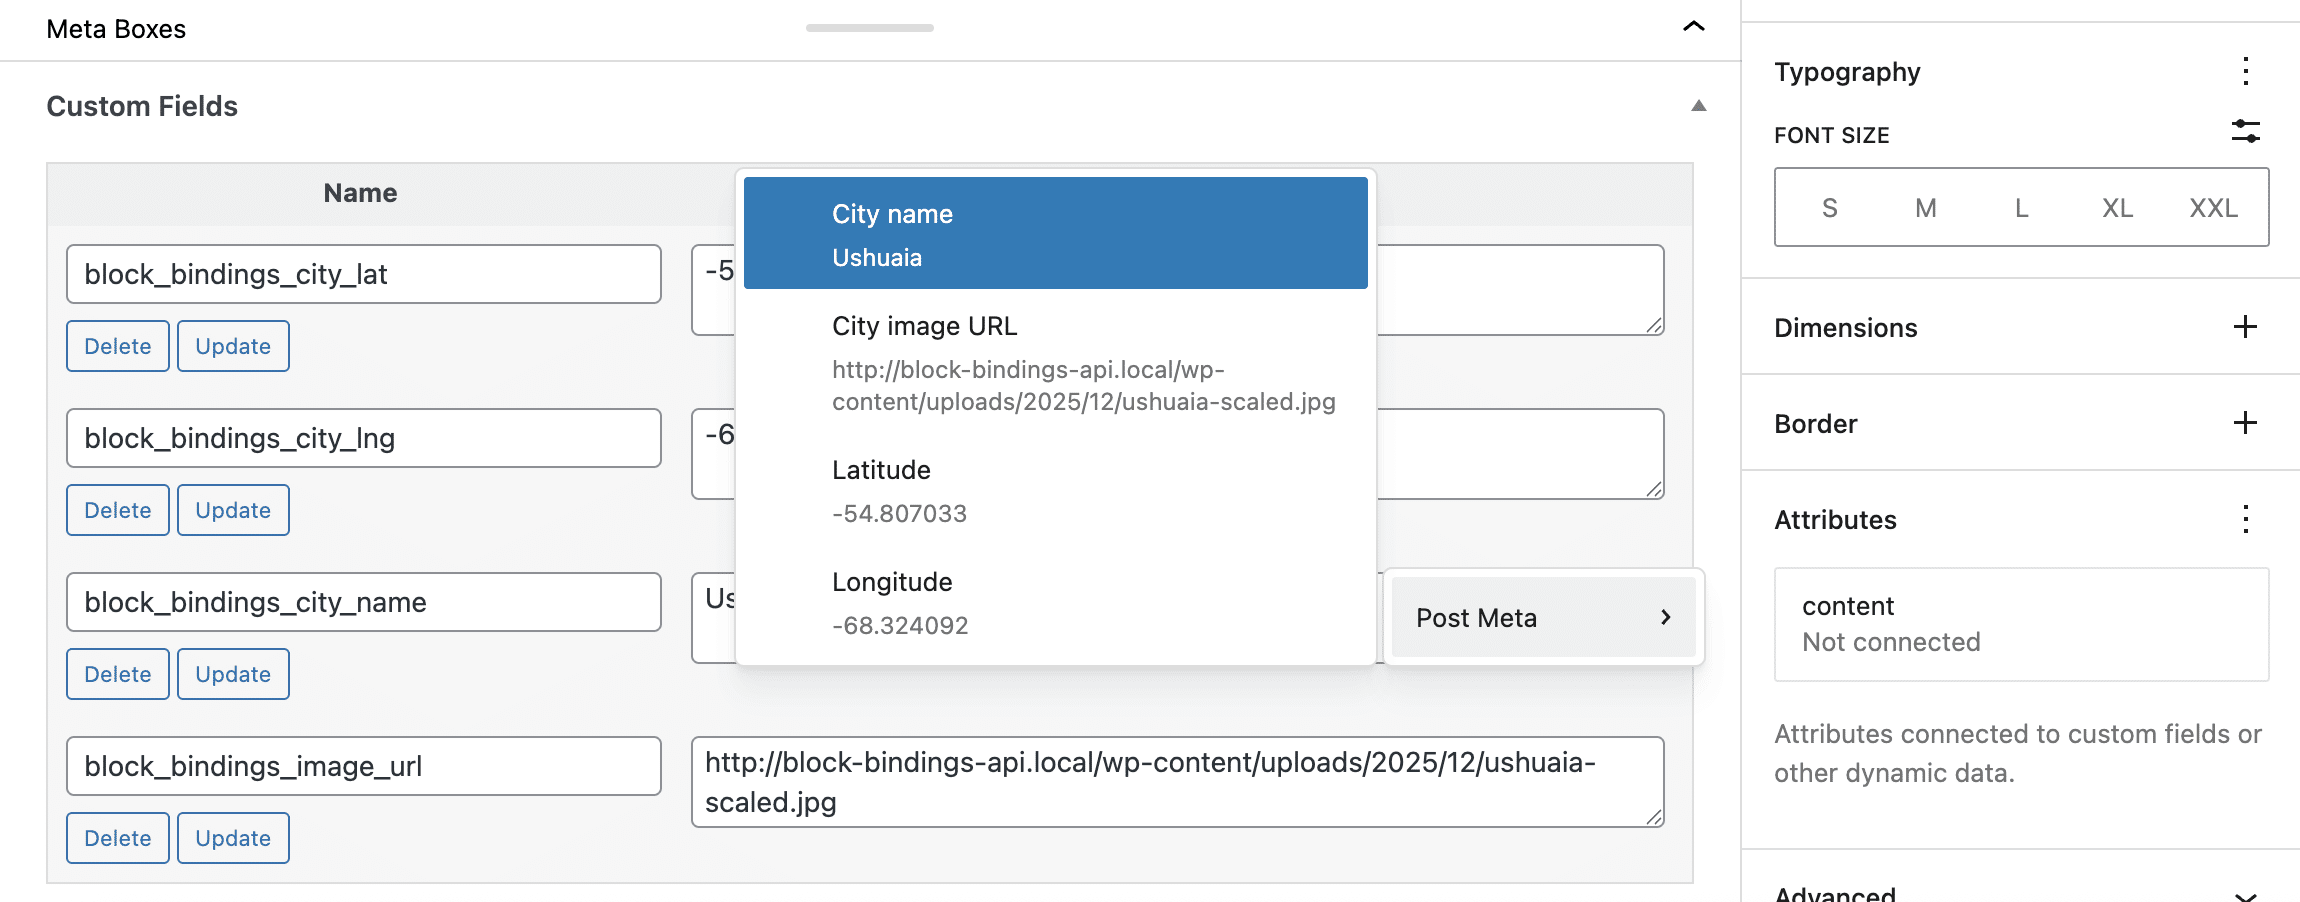
Make a selection the Image block and find the Attributes panel throughout the Block Settings sidebar. Click on at the + button to open the dropdown menu, which shows the document of Image block attributes that beef up Block Bindings. Make a selection the url products.
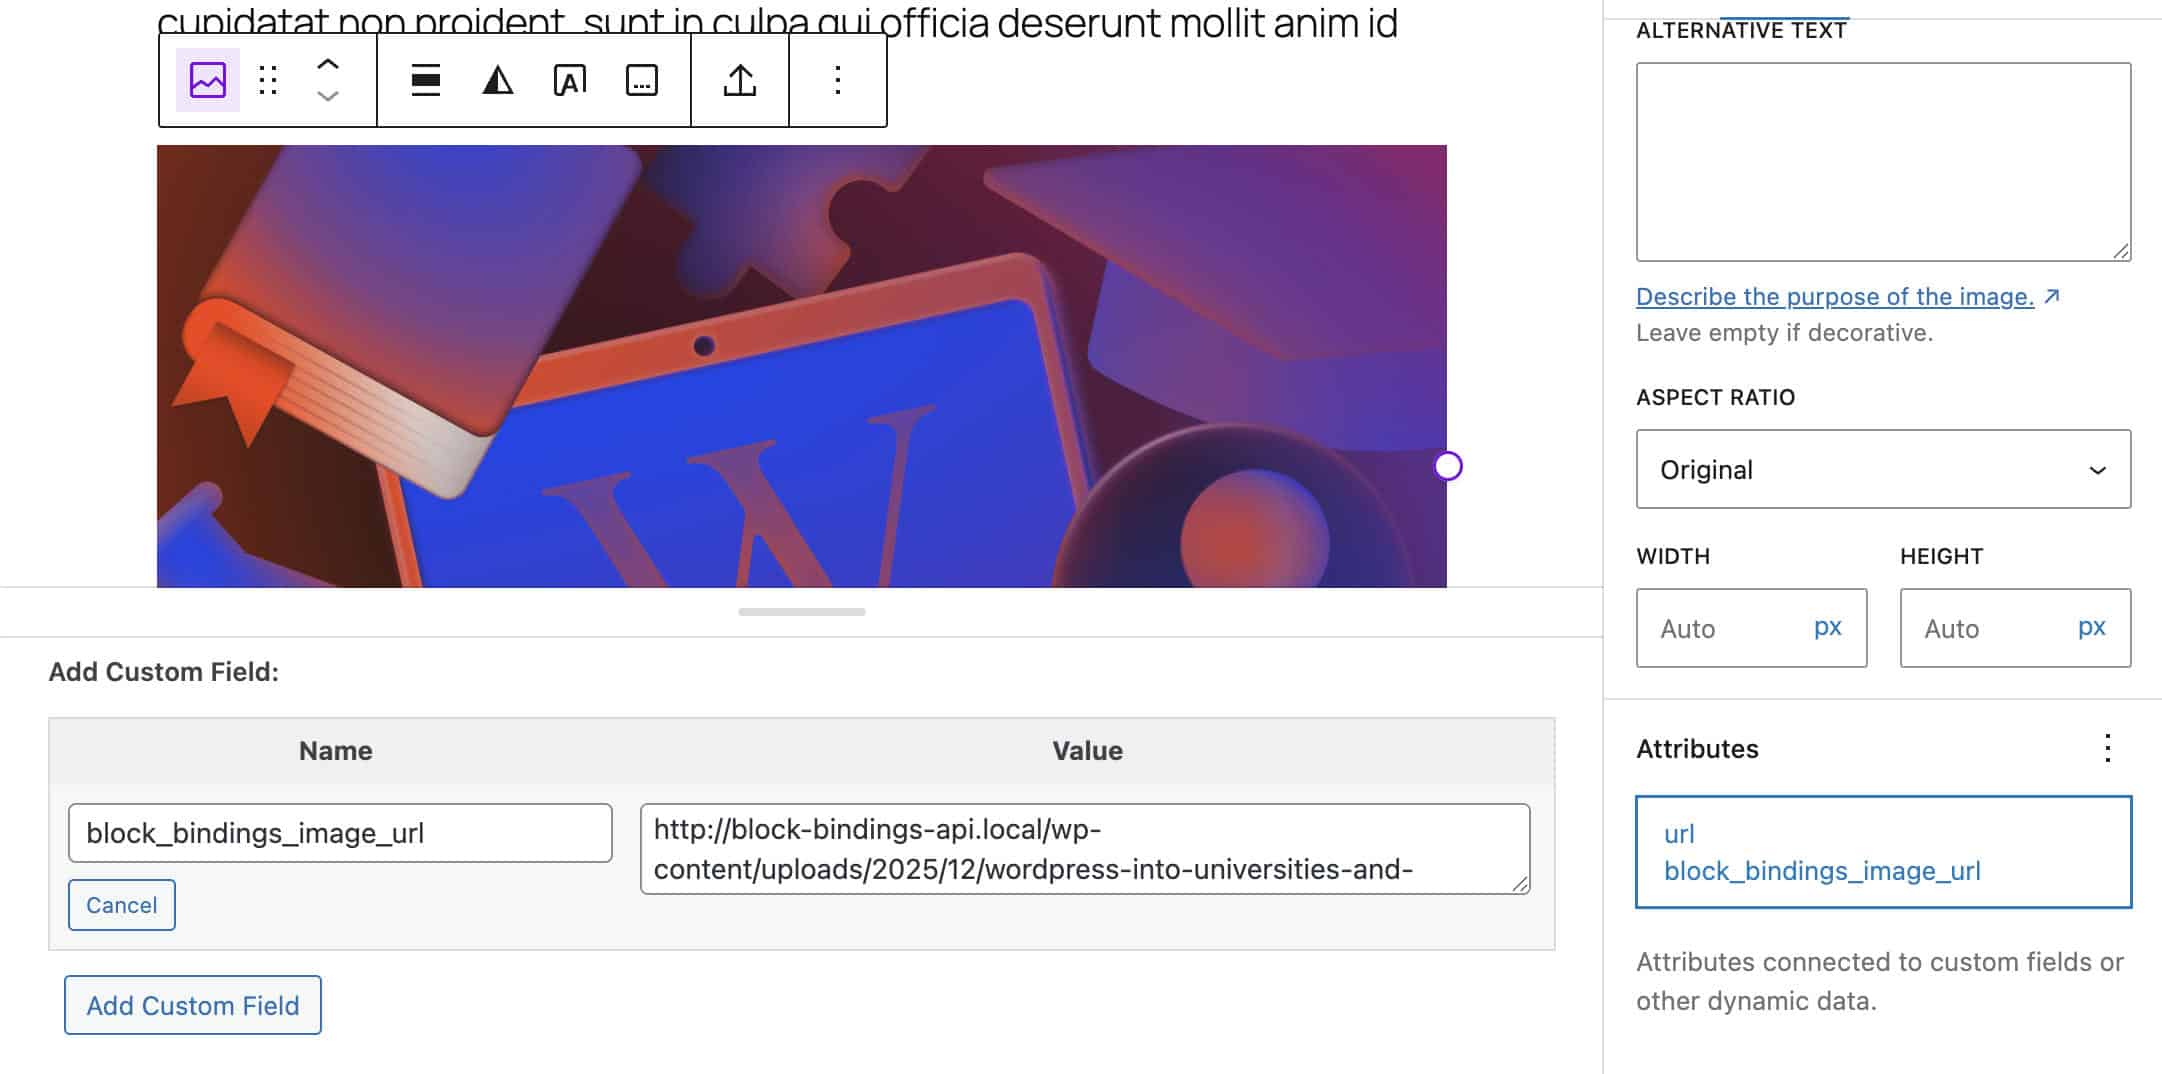
After settling at the block feature, the Sophisticated tab will display a brand spanking new URL section with the description “Not hooked up.” Click on on on the url products over again to view the document of available binding belongings. Publish Meta provides the 4 custom designed fields registered for the publish type, along with their respective values. Make a selection The city Image URL.
You assigned the The city Image URL meta field to the url feature of the Image block. You’ll have to now see {a photograph} of the city you decided on.
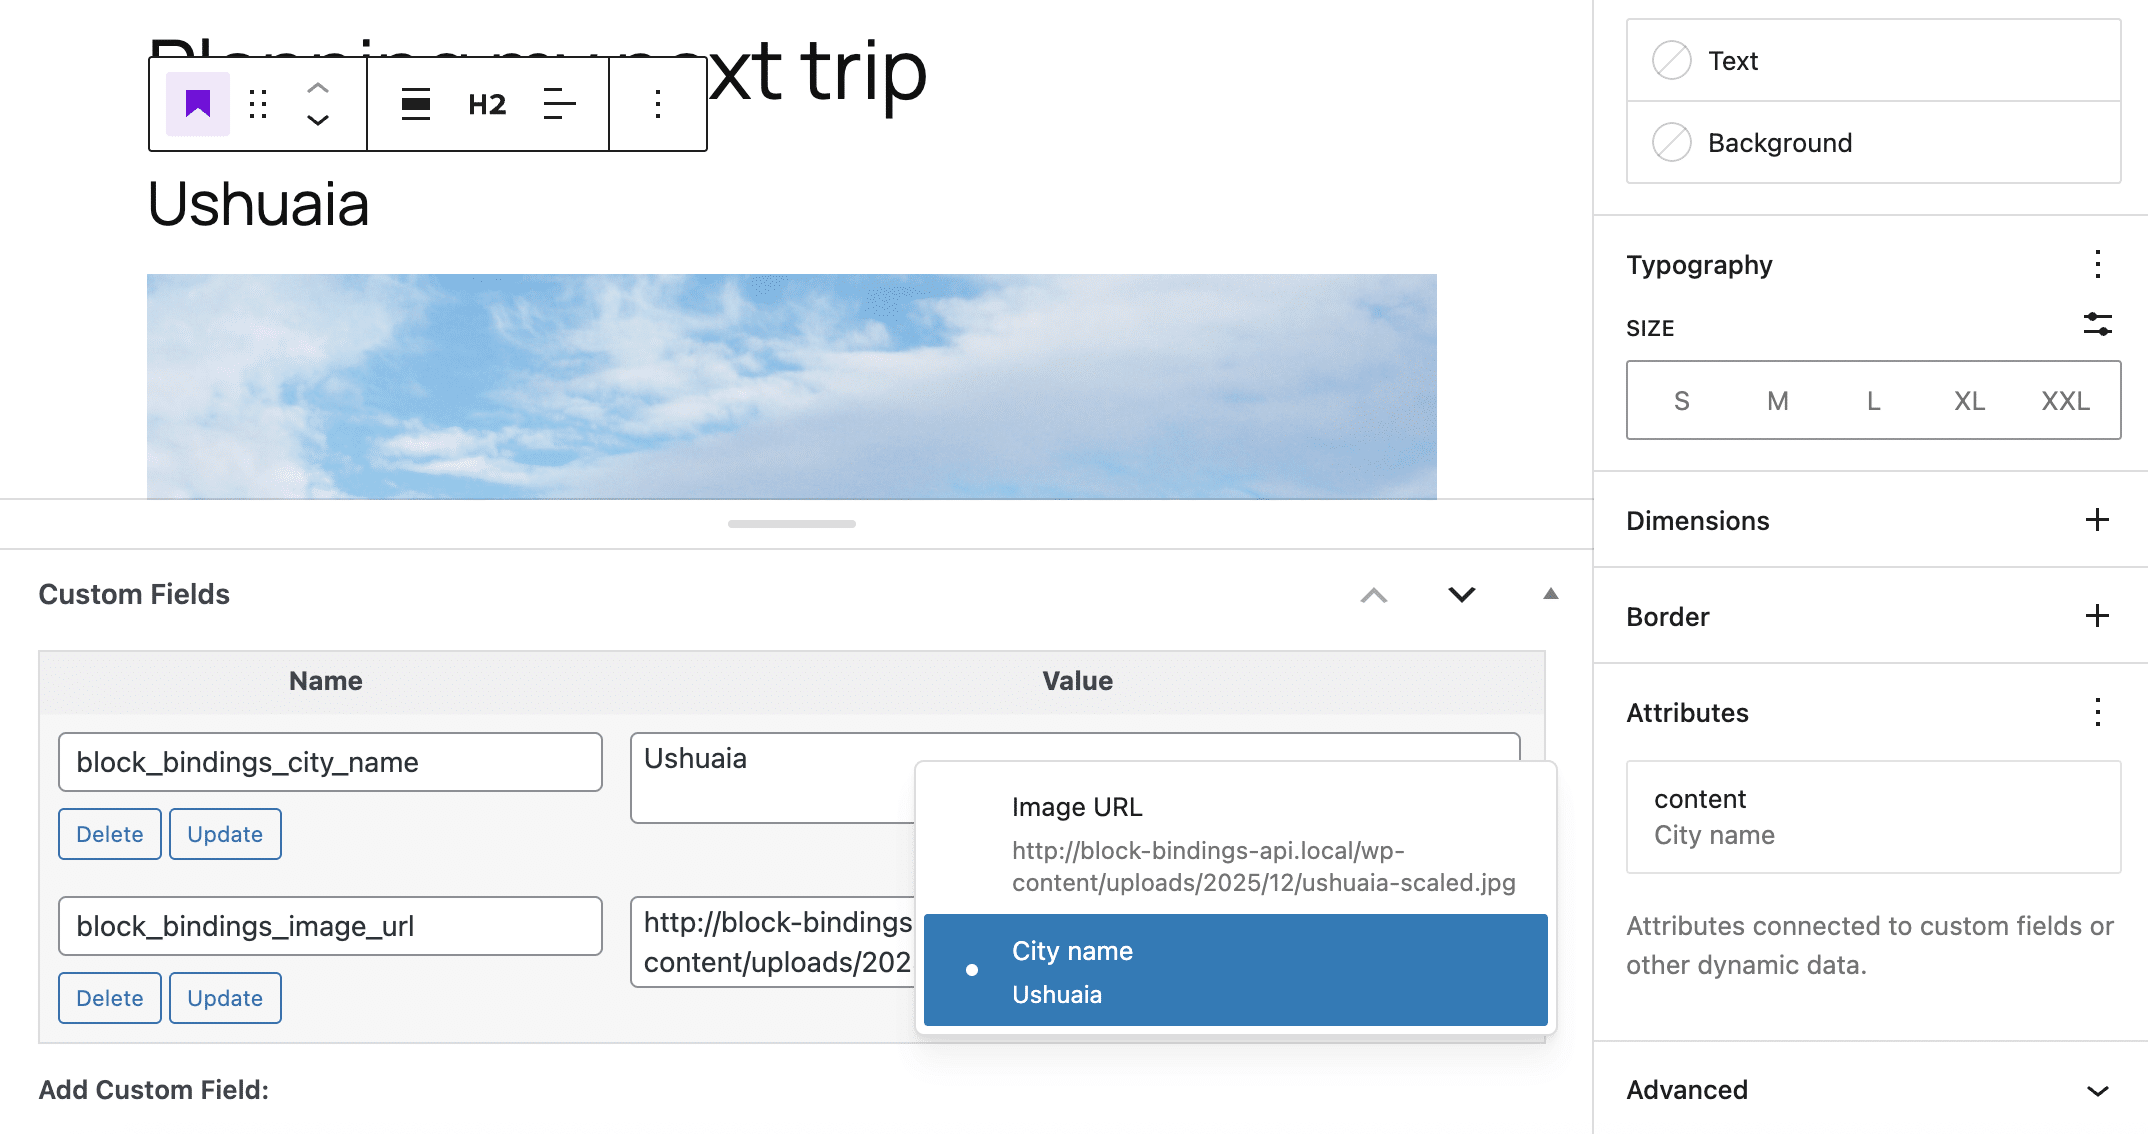
Follow the identical process for the other meta fields. Assign the The city Name field to the content material subject matter feature of the Heading block and the Latitude and Longitude fields to the corresponding Paragraph blocks.
Now, connect the rest two blocks in your custom designed binding provide. Unfortunately, as you spotted throughout the previous screenshots, this option is not available throughout the editor UI.
In recent times, you need to change to the code editor and manually write the markup for the two blocks comparable in your binding provide. Underneath is the code to turn the temperature provided by the use of the Open-Meteo provider:
Placeholder
With this system, the identify of your binding provide will appear throughout the editor as Local weather State of affairs, alternatively the actual data will most efficient be visible throughout the front end.
Clearly, manually together with a JSON object to the block markup isn’t a user-friendly process. Fortunately, WordPress 6.9 introduced important improvements to the Block Bindings API, making it conceivable to create a UI for custom designed data belongings. Let’s check out making improvements to our plugin with a custom designed UI.
The best way to create a UI on your custom designed Block Bindings belongings
To create a UI on your custom designed binding provide, you need to jot down some JavaScript code. First, create a js subfolder beneath /incorporates and then create a block-bindings-ui.js document inside of it. The plugin development is now the following:
/wp-content/plugins/
└── /block-bindings-example/
	├── block-bindings-example.php
	└── /incorporates/
		├── binding-sources.php
		├── meta-fields.php
		└── weather-api.php
			└── /js/
				└──	block-bindings-ui.js
As a number one step, add the JS script to the main document of your plugin:
function bb_enqueue_weather_bindings_ui() {

	if ( ! function_exists( 'register_block_bindings_source' ) ) {
		return;
	}

	$js_file_path = plugin_dir_path( __FILE__ ) . 'incorporates/js/block-bindings-ui.js';

	if ( ! file_exists( $js_file_path ) ) {
		return;
	}

	// Enqueue the script most efficient throughout the editor
	wp_enqueue_script(
		'bb-weather-bindings-ui',
		plugin_dir_url( __FILE__ ) . 'incorporates/js/block-bindings-ui.js',
		[ 'wp-blocks', 'wp-element', 'wp-dom-ready', 'wp-block-bindings' ],
		filemtime( $js_file_path ),
		true
	);
}
add_action( 'enqueue_block_editor_assets', 'bb_enqueue_weather_bindings_ui' );
Proper right here’s what this function does:
- First, it assessments that the
register_block_bindings_source()function exists. - Next, it assessments that the
block-bindings-ui.jsdocument exists throughout the plugin’s/incorporates/jsfolder. - The
wp_enqueue_script()function enqueues the script for use throughout the editor. For an extensive description of the function, please take a look at with the documentation. - It uses the
enqueue_block_editor_assetshook to queue scripts for the bettering interface.
Ora aprite il document block-bindings-ui.js e scrivete il seguente codice:
wp.blocks.registerBlockBindingsSource({
	identify: 'bb/weather-condition',
	label: 'Local weather State of affairs',
	useContext: [ 'postId', 'postType' ],
	getValues: ( { bindings } ) => {
		if ( bindings.content material subject matter?.args?.key === 'temperature' ) {
			return {
				content material subject matter: 'Provide temperature provided by the use of Open-Meteo.',
			};
		}
		if ( bindings.content material subject matter?.args?.key === 'weather_state' ) {
			return {
				content material subject matter: 'Provide conditions.',
			};
		}
		return {
			content material subject matter: bindings.content material subject matter,
		};
	},
	getFieldsList() {
		return [
			{ label: 'Temperature (°C)',   type: 'string', args: { key: 'temperature' } },
			{ label: 'Weather Conditions',  type: 'string', args: { key: 'weather_state' } }
		];
	}
});- The
registerBlockBindingsSource()function registers a binding provide throughout the block editor. identifyis a singular identifier on your binding provide. It must have compatibility exactly the identify used in PHP withregister_block_bindings_source().labelis a human-readable identify displayed throughout the Provide dropdown of the Attributes panel.useContextgadgets the context values this provide needs from the block.postIdis wanted so that the provision is conscious about which publish’s meta/local weather data to be told.getValuesprovides a preview of the bounded worth throughout the block editor. It returns the selections that appear throughout the dropdown after the patron selects the binding provide (“Local weather State of affairs” in our example). This system is available since WordPress 6.9.getFieldsListreturns the selections that appear throughout the dropdown after the patron selects the binding provide (“Local weather Necessities” in our example).
Save the document and return to the editor. Your Local weather Necessities provide is now available throughout the editor UI, alongside Publish Meta. Reload the internet web page, then connect a Paragraph or Header block in your binding provide. The image beneath shows the result.
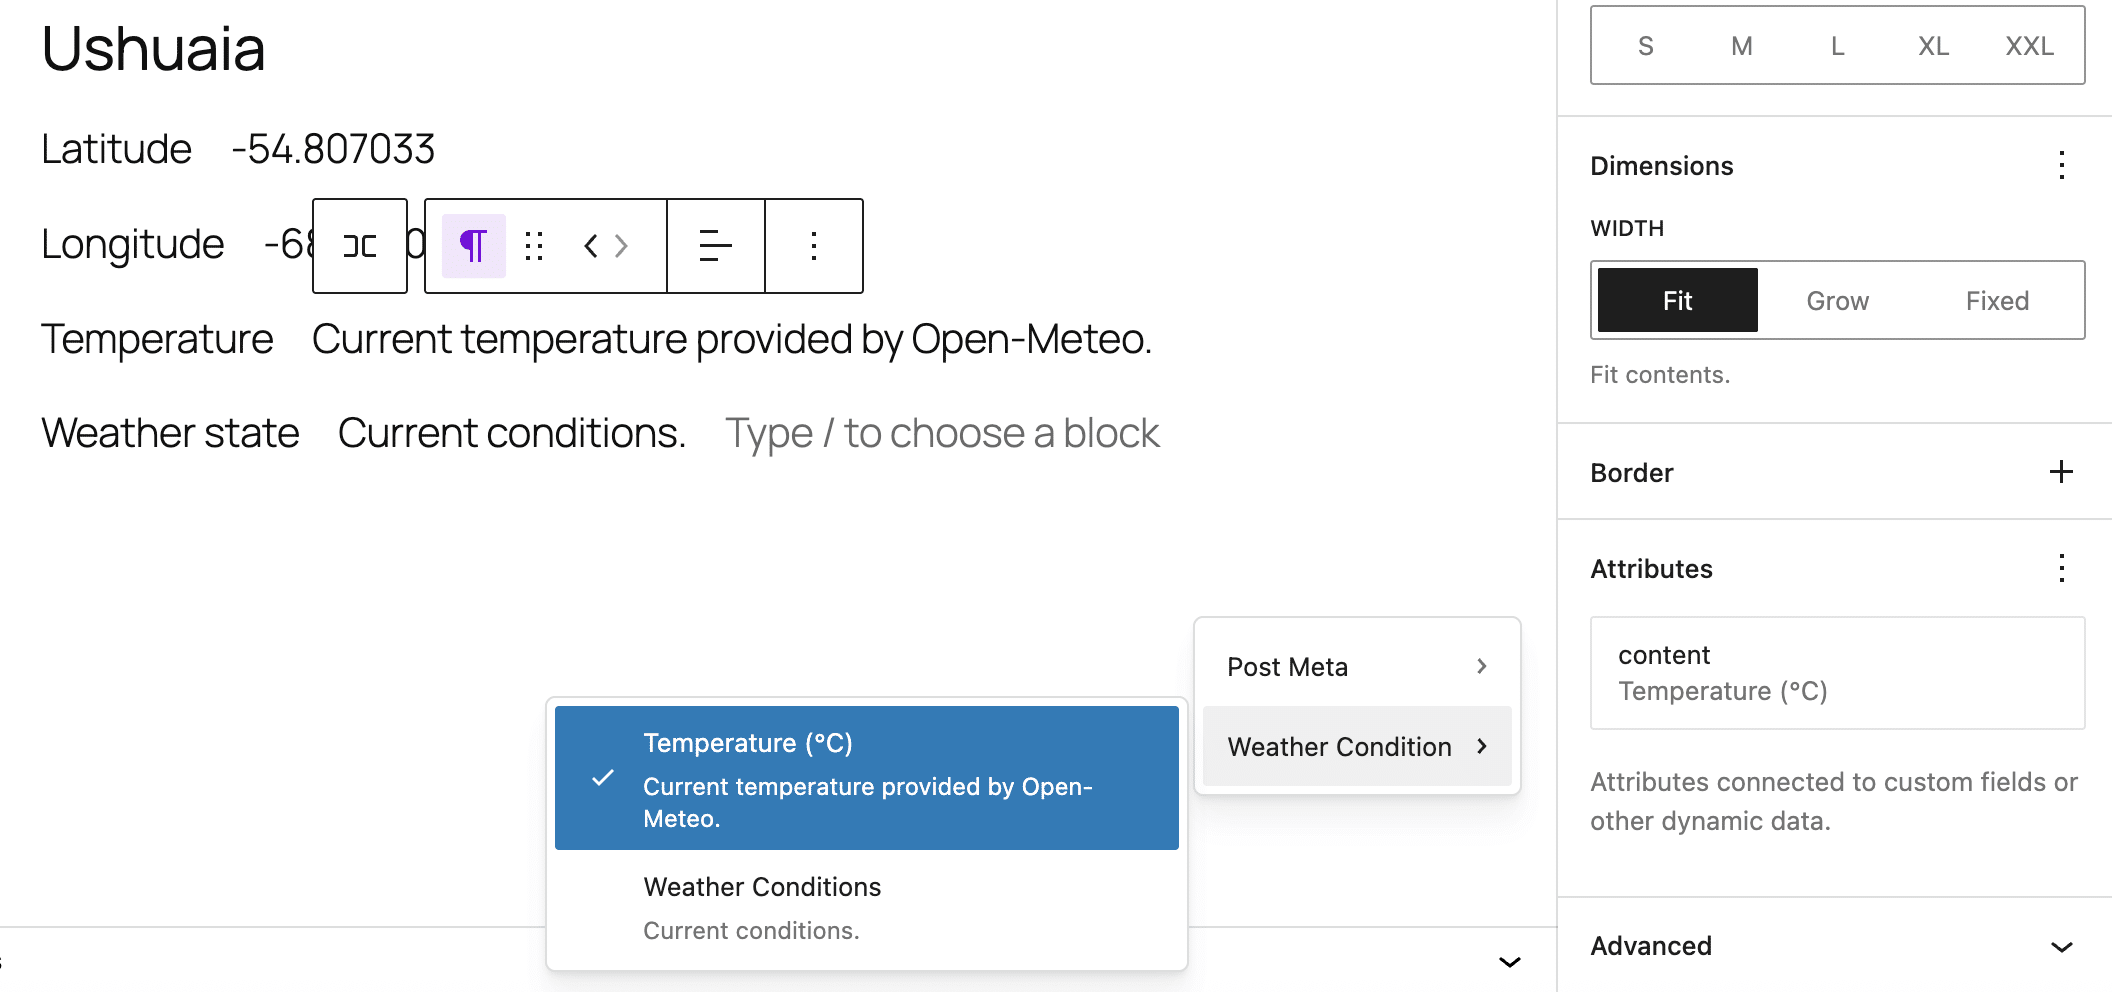
The total image shows the result on the internet website online’s frontend.

What else can you do with the Block Bindings API?
This article most efficient scratches the outside of what you are able to assemble with the Block Bindings API. The great issue is that the development of this hard WordPress serve as is some distance from over, and we can expect new implementations and additions someday.
Integrating the Block Bindings API with other tricky WordPress APIs, such since the Interactivity API, signifies that you’ll assemble dynamic, interactive applications that extend way past the usual working a weblog choices that made WordPress in style in its early years.
WordPress is no longer just a working a weblog platform or a internet website online builder. It is now set to grow to be a multipurpose development platform for all sorts of web applications.
The additional tricky your applications are, the additional very important your website hosting provider becomes. Kinsta supplies Most sensible elegance managed website hosting with high potency, tricky protection, extensive automation, and top-notch beef up known as industry-leading by the use of G2 customers.
Necessarily essentially the most tricky web applications require the best website hosting infrastructure. Take a look at Kinsta plans to look out the one that most closely fits your web site’s needs.
The publish The WordPress Block Bindings API: What it’s and how you can use it to construct dynamic web pages gave the impression first on Kinsta®.
Contents
- 1 The Block Bindings API: Fundamental concepts
- 2 The best way to check in custom designed Block Bindings data belongings: A real-life example
- 3 The best way to use the Block Bindings API
- 4 The best way to create a UI on your custom designed Block Bindings belongings
- 5 What else can you do with the Block Bindings API?
- 6 TAM SAM SOM: What Do They Imply & How Do You Calculate Them?
- 7 WP Engine Vs. [a Competing Hosting Provider] Evaluate: WP Engine…
- 8 Google Domain names vs GoDaddy: Which Area Registrar to Select

0 Comments