
Imagine spending hours creating a Google Sheet to percentage together with your body of workers, most straightforward to hunt out {{that a}} body of workers member accidentally deleted an important column, row, mobile, or, even worse — a complete sheet.
![→ Access Now: Google Sheets Templates [Free Kit]](https://wpmountain.com/wp-content/uploads/2022/06/e7cd3f82-cab9-4017-b019-ee3fc550e0b5.png)
That can be frustrating. However, it’s only preventable while you lock cells in Google Sheets.
As a result of it kind of feels, with only some clicks of a mouse, you’ll lock cells and whole sheets in Google Sheets — this means that, you and your body of workers can artwork on the an identical sheet without hindering the next specific particular person from completing their assigned tasks.
In this publish, we’ll cross over learn to lock and liberate cells in Google Sheets.
Table of Contents
- The Advantages of Locking Cells in Google Sheets
- How one can Lock Particular Cells in Google Sheets
- How one can Lock Cells and Give Enhancing Permissions to Make a selection Customers
- How one can Lock an Complete Sheet
- How one can Display a Caution however Permit Enhancing of a Locked Cellular
- How one can Free up Cells
The Benefits of Locking Cells in Google Sheets
Google Sheets we could in consumers to lock cells from enhancing, as a result of this you’ll give protection to your Sheet from any potential accidents, along side enhancing and deletion.
You’ll have the ability to moreover give protection to essential knowledge and calculations, so that you’ll recreational easy figuring out the system in your Sheet are correct and proper.
The ability to lock cells in Google Sheets comes with fairly numerous benefits.
Not most straightforward can you lock cells from enhancing, alternatively you’ll moreover keep an eye on which body of workers individuals can edit your file — proper appropriate all the way down to the very cells those body of workers individuals are allowed to keep watch over.
This is extremely helpful if a few body of workers individuals are running on the an identical Sheet in an instant. You’ll have the ability to moreover reproduction permissions from other sheets, you probably have locked cells in numerous Sheets.
Let’s take a look at the steps to lock cells in Google Sheets.
How you can Lock Specific Cells in Google Sheets
Locking specific cells in Google Sheets is a straightforward activity. Proper right here’s learn to do it:
1. Right kind-click on the mobile you want to lock.
After opening a brand spanking new Google Sheet (or a Sheet you may have already been running in), right-click on the mobile or cells you want to lock.
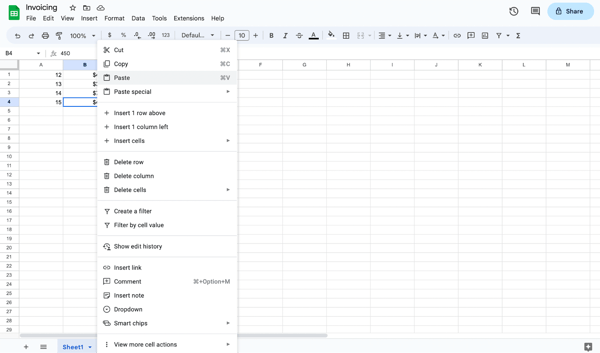
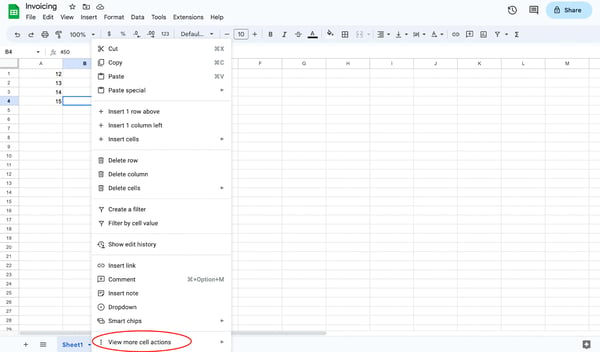
2. Hover over “View additional mobile actions.”
This option is listed at the bottom of the dropdown menu.
Depending at the position your cells are located throughout the Sheet, you could want to scroll down until you understand it. When you see it, hover over the “View additional mobile actions” to open up any other menu.
3. Select “Protect range.”
The next menu will provide you with a lot of additional mobile actions. Seek for the movement labeled “Protect range.” Select “Protect range” to begin assigning cells to a locked status.
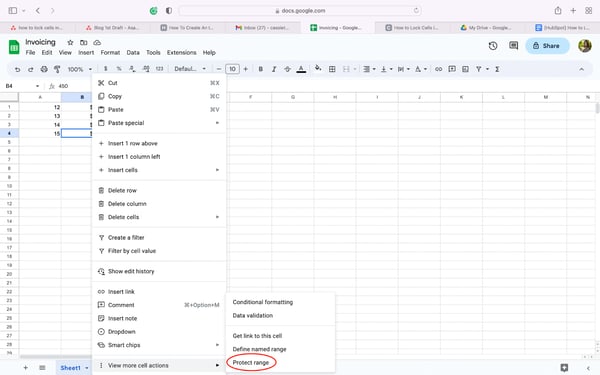
However, you’ll perform the an identical activity by the use of clicking on the Knowledge tab and choosing “Protect sheets and ranges.”
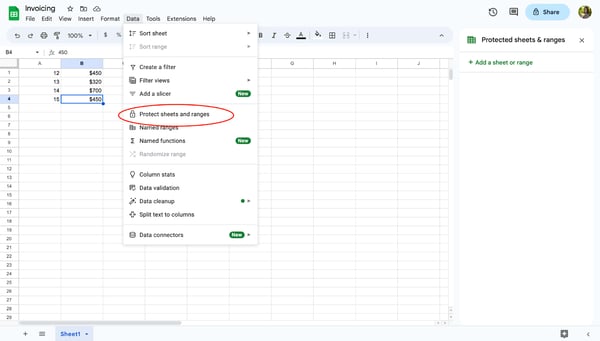
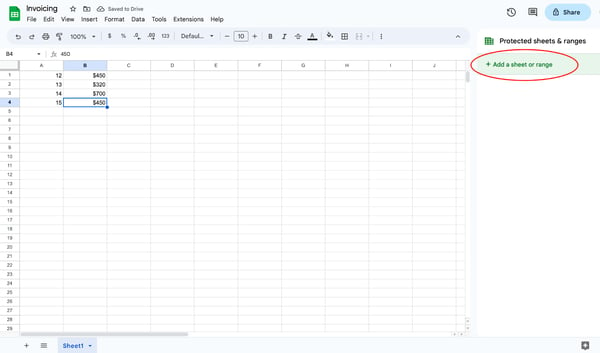
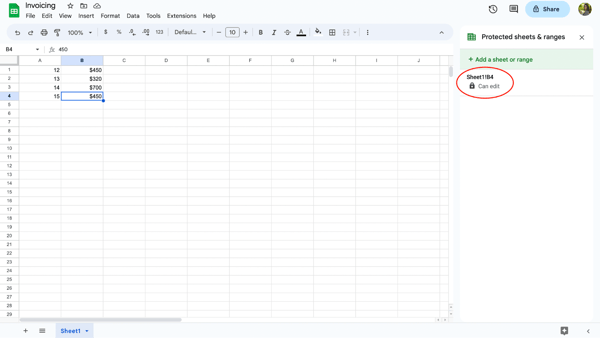
4. Select “Add a sheet or range” from the side panel.
After clicking “Protect range” from the dropdown menu or “Protect sheets and ranges” from the Knowledge tab, you’ll perceive the open side panel at the proper of your visual display unit. Click on on on “Add a sheet or range.”
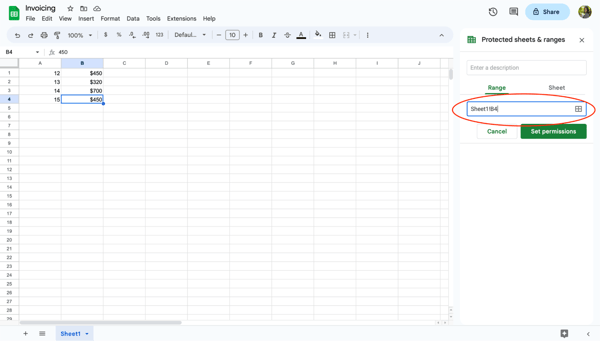
5. Select which cells to lock.
Next, decide which cells to lock from enhancing. Whilst you click on at the mobile you want to lock, that mobile’s wisdom may well be referenced throughout the range phase. If you wish to fasten a variety of cells, enter the variability into the field.
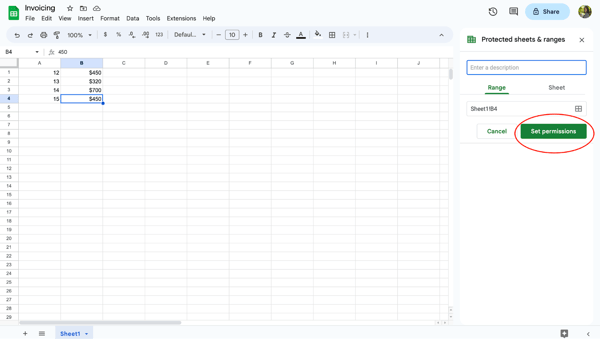
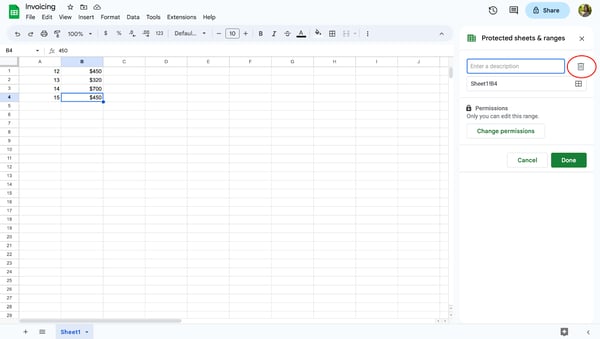
6. Select “Set permissions.”
Select “Set permissions” to choose who can edit the selected cells. Whilst you’re the only specific particular person allowed to edit the mobile, remember to select “most straightforward you.”
You’ll have the ability to moreover reproduction permissions from other sheets, you probably have locked cells in numerous Sheets.
7. Select “Carried out.”
When you’re finished locking cells from enhancing, click on on “Carried out” to avoid wasting a whole lot of your own tastes. Now, those cells are locked from enhancing until you liberate them and change the settings.

How you can Lock Cells and Give Improving Permission to Select Consumers
Whilst you and your body of workers are running in a Google Sheet, believe giving enhancing permissions to choose consumers. This will likely on occasion imply you’ll be able to assign tasks and better organize your project and keep others from accidentally deleting essential artwork.
To lock cells and offers enhancing permission to choose consumers, follow the ones steps.
1. Right kind-click the selected cells.
Select the mobile or cells you want to restrict. Then, right-click to open up the dropdown menu.
2. Hover “View additional mobile actions.”
Scroll or look to the bottom of the dropdown menu and hover over “View additional mobile actions.” This will likely on occasion open any other menu on your visual display unit.
3. Select “Protect range.”
To modify a mobile’s enhancing status, select “Protect range.” This movement will open an aspect panel menu.
4. Click on on “Add a sheet or range” from the side panel.
Throughout the side panel, click on on “Add a sheet or range.” Clicking this button will will let you enter which cells or sheets to lock.
5. Select which cells to lock.
Come to a decision which cells your body of workers member needs to perform their assigned activity. Then, enter the number of cells into the sector.
6. Select “Set permissions.”
When you’ve entered the desired cells throughout the box, you’ll want to set enhancing restrictions. To restrict get admission to to the number of cells, click on on “Set permissions.”
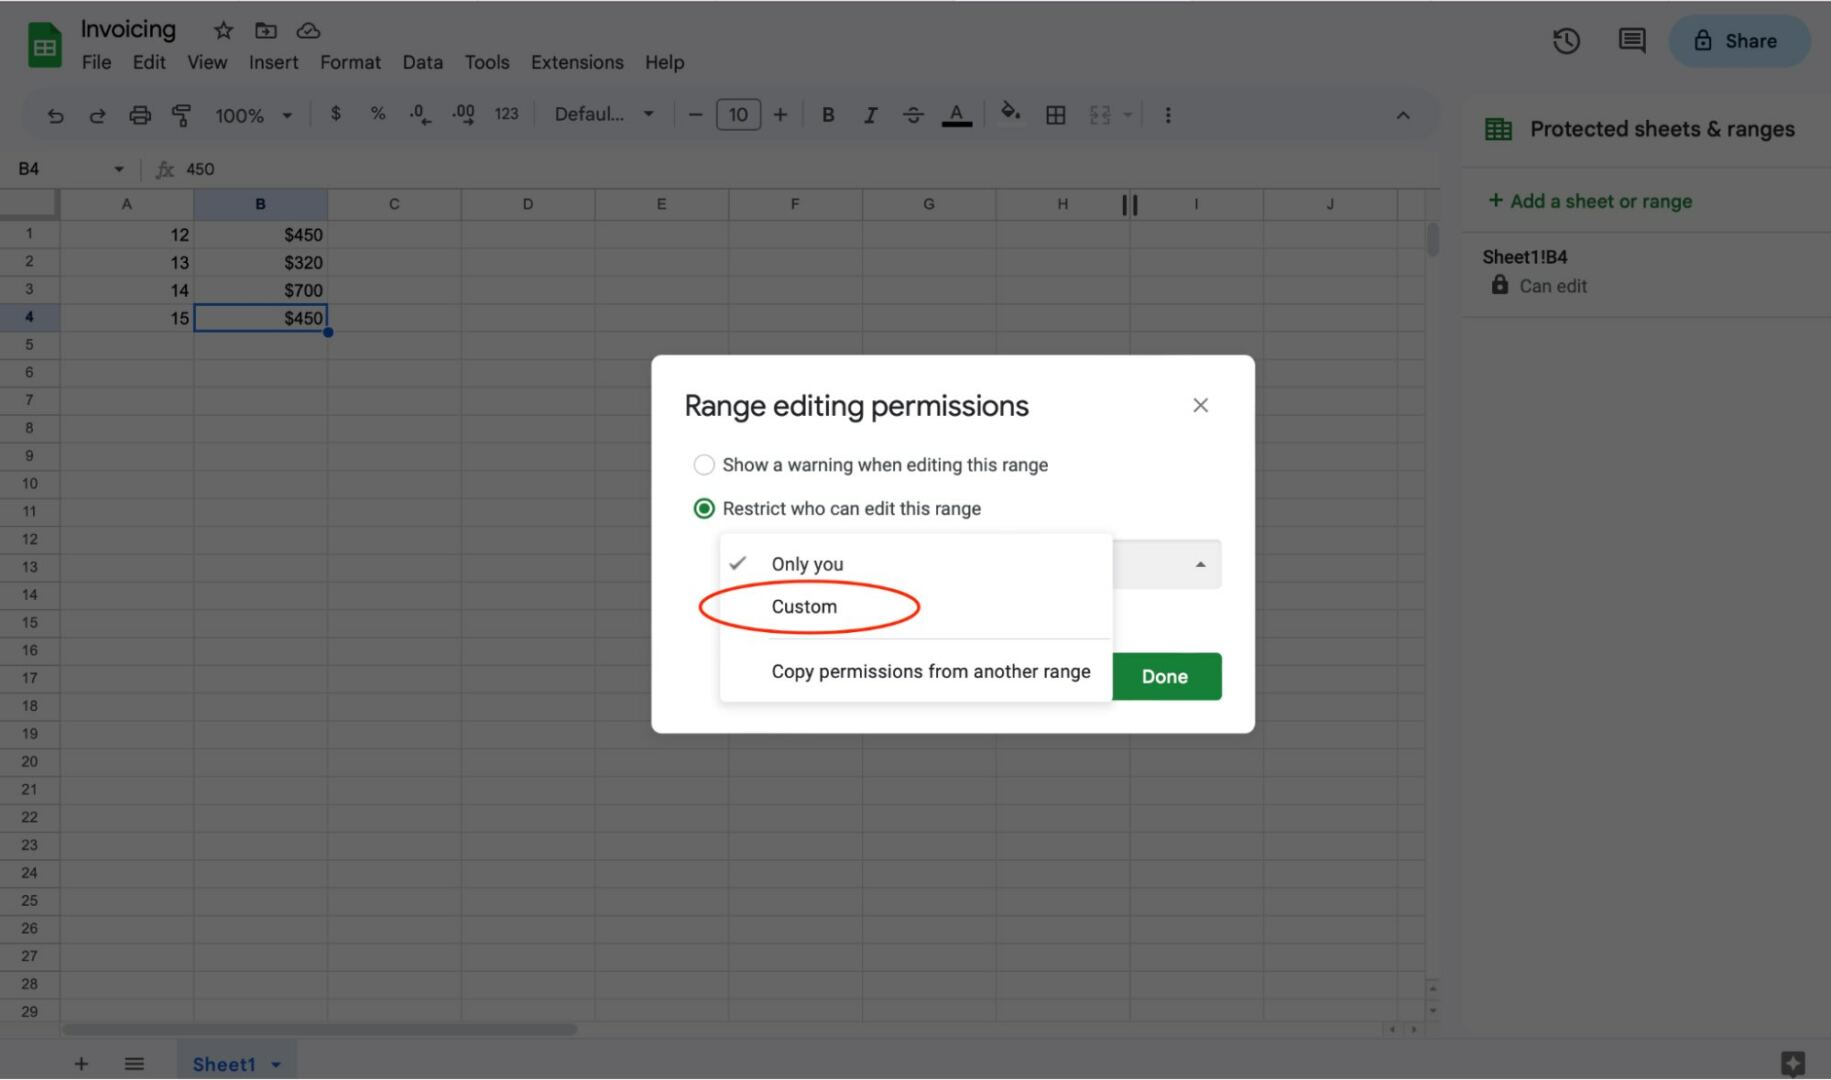
7. Select “Custom designed.”
From this visual display unit, you may have learn how to decide who has permission to edit the number of cells. To be able to upload a body of workers member or a few body of workers individuals, click on on “Custom designed.”
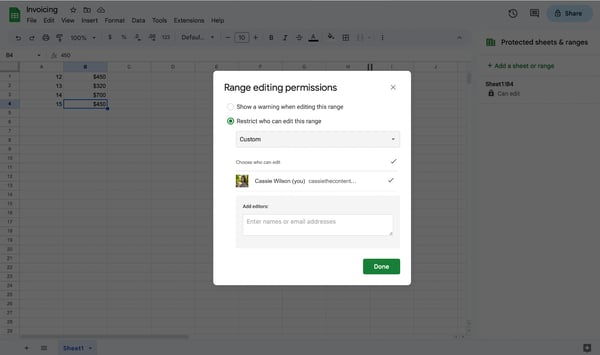
8. Assign editors to cells.
Now, you’ll decide who needs enhancing get admission to to the number of cells you may have specified. Enter the email addresses of your body of workers individuals to assign them as editors of the cells. This will likely on occasion give them enhancing get admission to to designated cells within the sheet.
Bear in mind to click on on “Carried out” to avoid wasting a whole lot of the variability enhancing permissions.
How you can Lock an Entire Sheet
There may be events you will need to lock a complete sheet from enhancing. Thankfully, it is a simple process.
To lock a complete sheet, you’ll right-click on any mobile within the report back to open the dropdown menu. You’ll take the an identical steps to lock a complete sheet as you most likely did with locking just one mobile.
Proper right here’s learn to do it:
1. Right kind-click on any mobile.
Right kind-click on any mobile in your Google Sheet to open a drop-down menu. To lock a complete sheet, it does no longer subject which mobile you utilize to try this.
2. Hover over “View additional mobile actions.”
Select the “View additional mobile actions” chance at the bottom of the dropdown menu. You don’t wish to click on on. Merely hover over it to open any other menu.
3. Select “Protect range.”
Click on on “Protect range” to open the permissions side panel. However, you’ll reach the “Secure sheets and ranges” side panel by the use of clicking on the Knowledge tab and selecting “Protect sheets and ranges.”
4. Select “Add a sheet or range” from the side panel.
Click on on “Add a sheet or range” to begin locking a complete sheet.
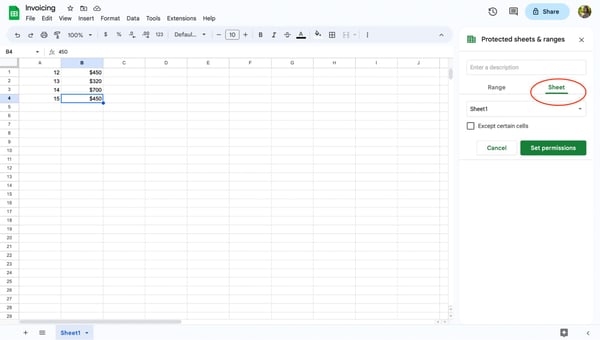
5. Click on on on “Sheet.”
Click on on on the “Sheet” button to lock a complete sheet. Once you may well be throughout the Sheet tab, make a selection which Sheet you want to lock.
ou give you the option to exclude positive cells from being locked. If you wish to have positive cells open for enhancing, click on at the box for “Aside from positive cells” and specify the variability.

6. Select “Set permissions.”
Forward of you’ll lock your Sheet, you wish to have to set enhancing permissions. Select “Set permissions” to choose who can edit the locked Sheet. If you’re the only specific particular person allowed to edit the sheet, remember to select “Highest you.”
When you’ve determined who has enhancing permissions to your Sheet, each merely you or individuals of your body of workers, bear in mind to hit “Carried out” to avoid wasting a whole lot of the permissions. Now your Sheet is locked and will’t be edited without permission.

How you can Show a Warning alternatively Allow Improving of Locked Cells
Whilst you’re running on a file at the same time as with body of workers individuals and likewise you don’t want your cells to be modified, you’ll allow consumers to acquire a warning faster than accepting their edits.
To show a warning, follow the ones steps:
1. Right kind-click on the cells you want to lock.
In your Google Sheet, right-click on the cells you want to lock. You’ll have the ability to set a warning for a complete Sheet by the use of following this process as neatly.
2. Hover over “View additional mobile actions.”
Scroll to the bottom of the menu and hover over “View additional mobile actions.”
3. Select “Protect range.”
To set an enhancing warning on positive cells or your Sheet, click on on “Protect range” to assign cells or a Sheet to a warning status.
4. Select “Add a sheet or range” from the side panel.
At the proper of your visual display unit, you’ll see an open side panel menu. Click on on “Add a sheet or range.”
5. Select which cells or sheet to set an enhancing warning.
You’ll have the ability to set an enhancing warning for a variety of cells or a complete sheet. Throughout the side panel, get to the bottom of which cells or sheets want a warning and make sure the guidelines referenced throughout the box fits your desired cells or sheet.

6. Select “Set permissions.”
Upon getting verified which cells or sheets will have to have an enhancing warning, click on on “Set permissions” to discuss with the enhancing selection visual display unit.
7. Select “Show a warning when enhancing this range.”
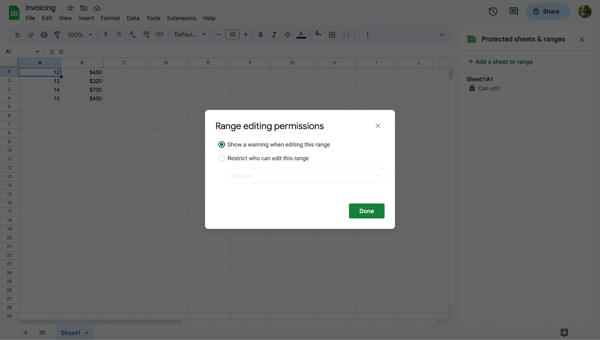
Select “Show a warning when enhancing this range,” then hit “Carried out” to avoid wasting a whole lot of your enhancing permissions.
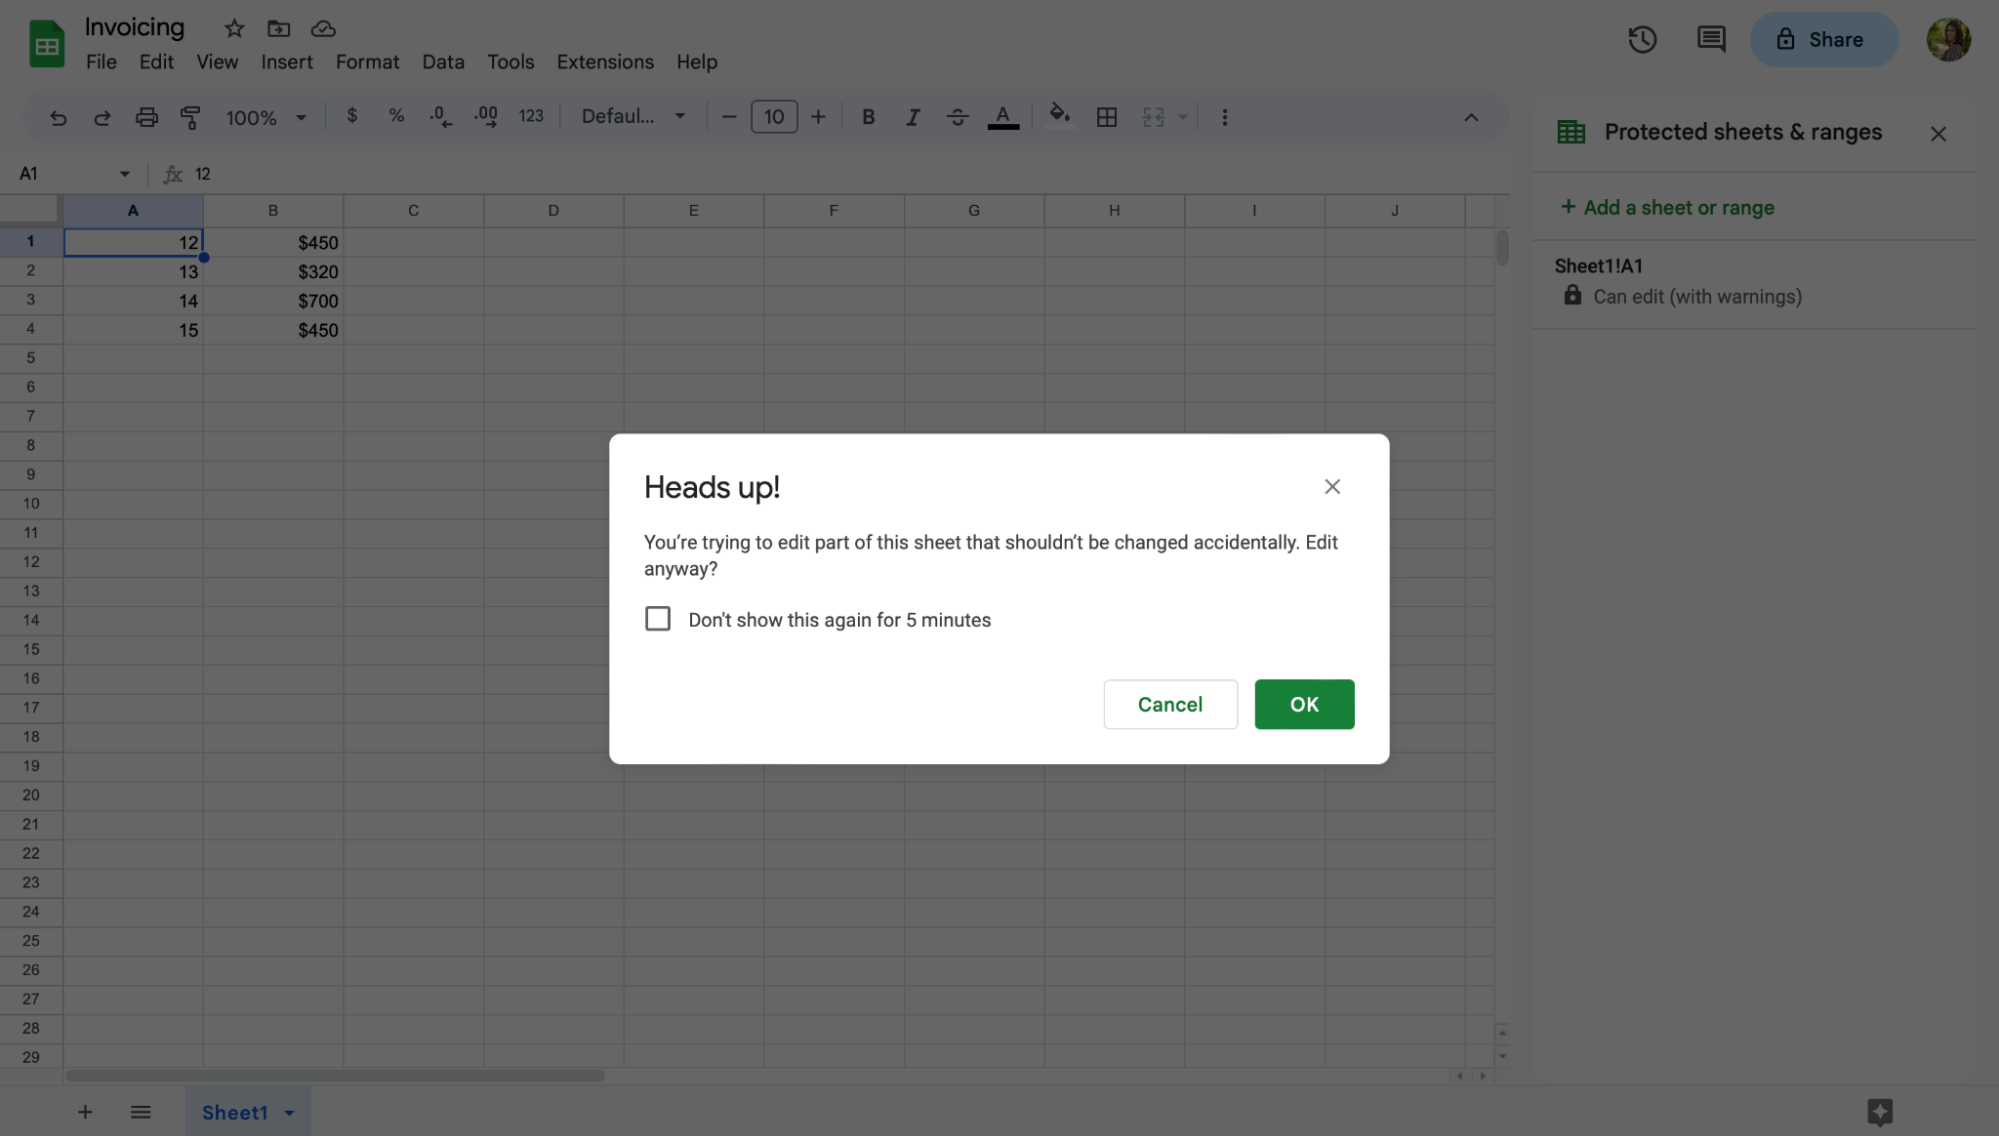
If an individual tries to make changes throughout the semi-locked mobile or Sheet, they’re going to acquire a warning message as a heads-up. Consumers must each click on on “Cancel” or “Ok” to make changes or revert to the original file.
How you can Unlock Cells
Locking a mobile or a Sheet may be very helpful in maintaining the integrity of your knowledge. Then again, there may well be events when you will need to liberate a mobile to switch or change the guidelines within it.
Now that you understand how to lock cells, let’s take a look at learn to liberate them.
1. Right kind-click on the cells you want to disencumber.
In your Google Sheet, right-click on the mobile you wish to have to disencumber. This movement opens a dropdown menu.
2. Hover over “View additional mobile actions.”
Seek for the “View additional mobile actions” chance throughout the drop-down menu. This option is located at the bottom of the dropdown menu. Whilst you in finding it, hover your mouse over the movement.
3. Select “Protect range.”
Like locking a mobile, you’ll nevertheless want to click on on on the “Protect range” chance. This will likely on occasion open an aspect panel menu where you’ll select to disencumber the mobile.
4. Click on on on the locked mobile.
Throughout the side panel menu, you’ll see a list of locked cells within your Sheet. Click on on on the mobile or mobile range that you simply want to liberate.
5. Click on at the rubbish can icon.
Next, click on on on the rubbish can icon to the side of the description box.
6. Select “Remove.”
A warning visual display unit will pop up asking if you want to remove the safe range. If you’re sure you want to disencumber the mobile, click on at the “Remove” button.
When you click on at the button, your mobile is loose to be edited by the use of any person with enhancing permission for the file.

Locking Cells in Google Sheets
And there you may have it! Bear in mind to take a while to set enhancing preferences and assign positive cells or sheets to your body of workers.
When you’ve performed that, you and your body of workers can confidently artwork on the an identical Google Sheet without worrying any person will accidentally edit or delete essential wisdom.

![]()
0 Comments