
Are you still confused via Gutenberg? Or are you among those who firmly believe in the opportunity of the block editor and wish to learn how some distance can push their creativity using the block editor?
Regardless of magnificence of consumers you fall into, Gutenberg is correct right here to stay and this publish gives you an in-depth evaluate of what’s going on behind the scenes of the WordPress block editor. Then again that’s not all!
Following our earlier educational where we provided an ordinary introduction to Gutenberg block development, this article goes previous the basics, introducing further sophisticated block sorts. The ones blocks are referred to as dynamic blocks.
At the moment you’ll learn what dynamic blocks are, how they artwork, and all that you wish to have to seize to create dynamic blocks from scratch.
So, what are Gutenberg dynamic blocks, and what are the vital factor diversifications between static and dynamic blocks?
What Are Dynamic Blocks? An Example
While with static blocks the content material subject material is manually added via the individual while editing a publish or internet web page, with dynamic blocks the content material subject material is loaded and processed on the fly on internet web page load. With dynamic blocs, the block content material subject material is picked up from the database and displayed as is or because of any more or less data manipulation.
Let’s explain that with an example. Say you want to create a number of nested blocks showing publish creator details with a collection of the newest posts from the identical creator.
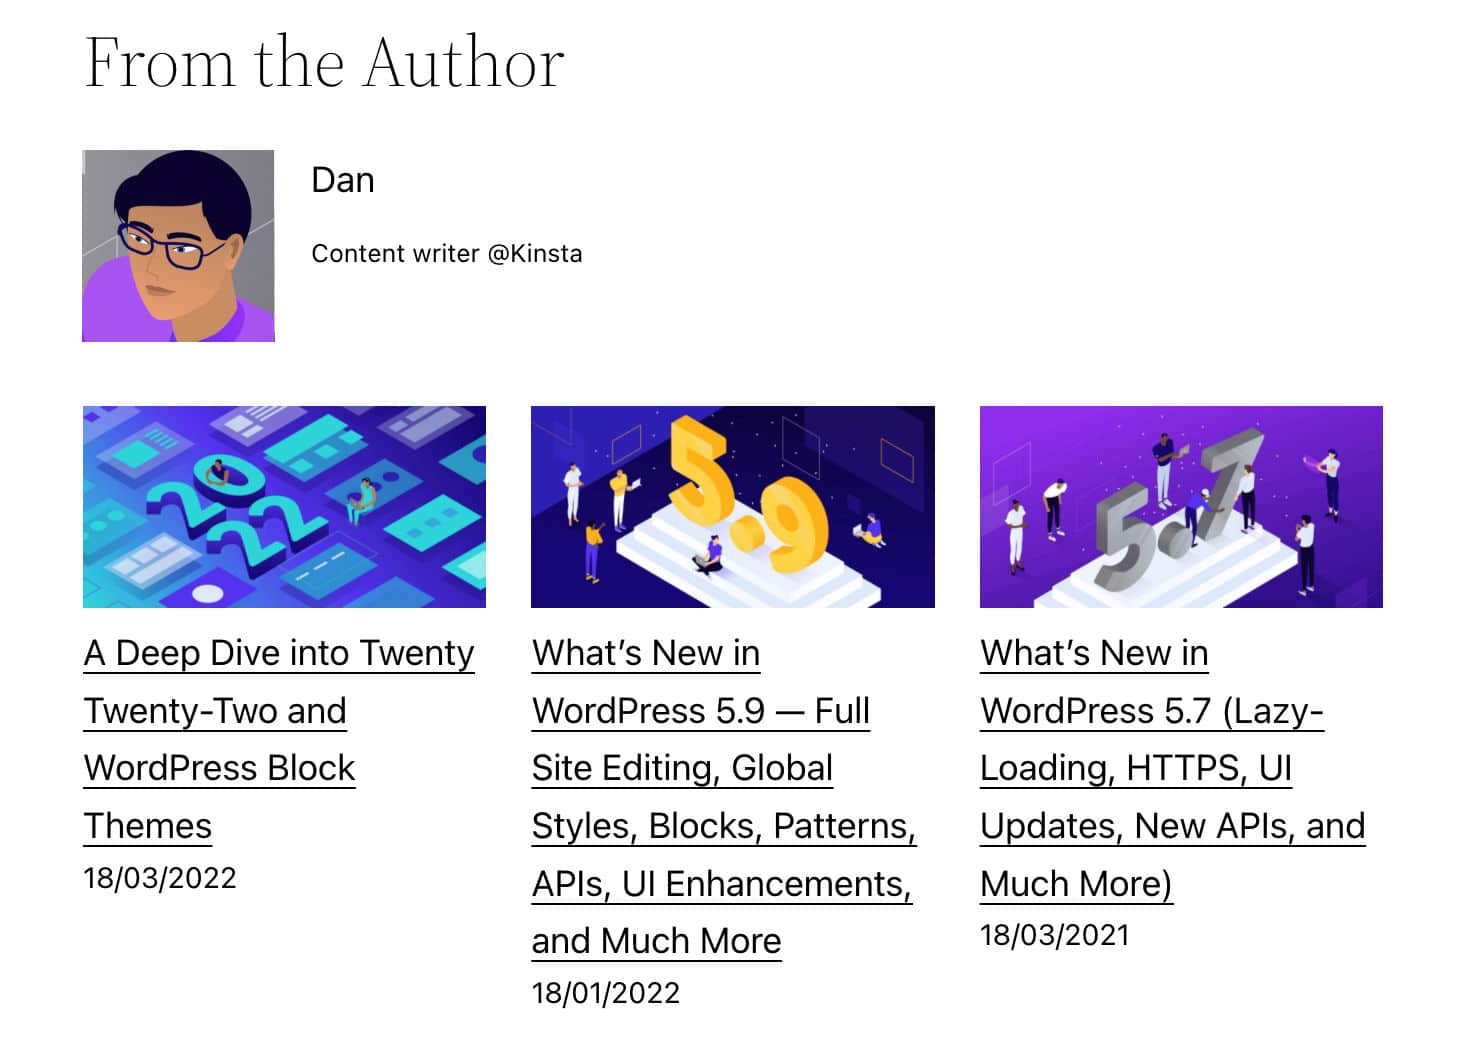
As Gutenberg shoppers, you should utilize the following blocks:
- The Heading core block
- The Submit Author core block
- The Latest Posts core block
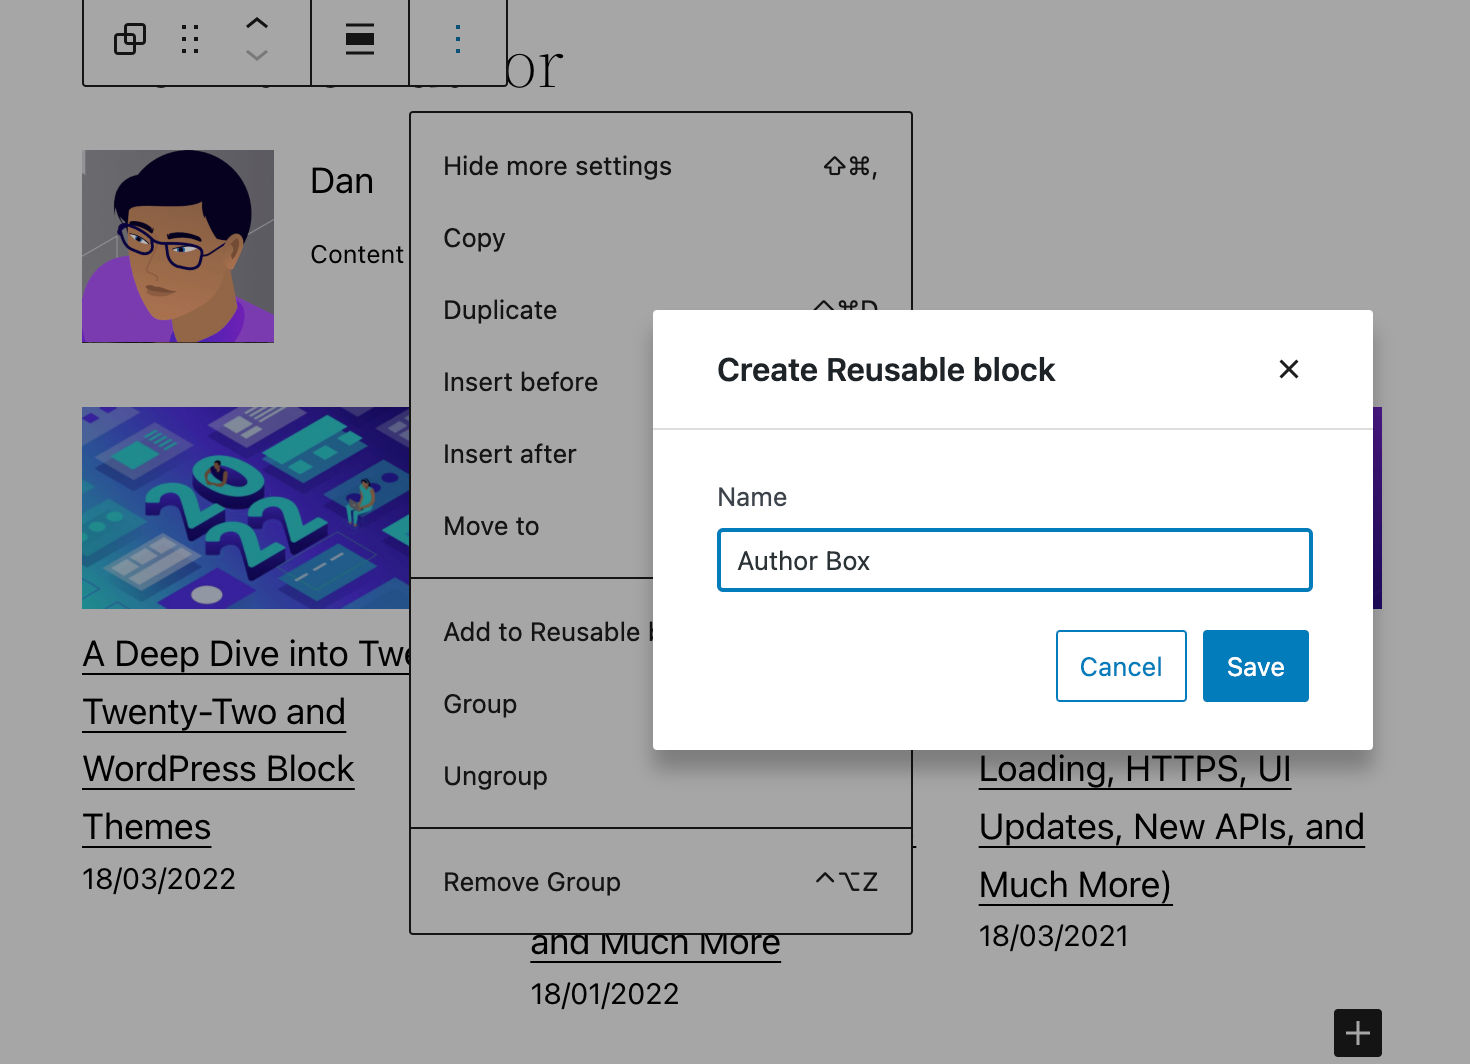
It’s excellent to moreover create a number in conjunction with those blocks and add the group to reusable blocks for longer term use.
It’s quite simple, isn’t it? You’ll create a dynamic block and add it to your posts and pages in a snap.
As of WordPress 5.9, the block editor provides more than 90 different blocks, and likelihood is that that you just’ll to seek out the block that’s right for you merely out of the sector. And, while you’d need further, run a at hand information a coarse search throughout the WordPress plugin record and likewise you’ll to seek out numerous loose plugins providing further blocks.
Then again what while you’re a WordPress developer – otherwise you’re planning a career as a WordPress developer? Most likely you will have very specific needs and can’t to seek out the block you’re on the lookout for, in a different way you simply wish to gain new professional skills. In such situations, it’s conceivable you’ll wish to discover ways to create your dynamic blocks.

 Get started with this large information to dynamic block construction!
Gutenberg Dynamic Blocks from a Developer’s Viewpoint
Dynamic blocks have two number one use circumstances.
The main use case is when you wish to have to switch a block’s content material subject material when the internet web page containing the block has not been up-to-the-minute. For instance, this happens when the block includes a report of the newest posts or comments, and at the entire each and every time the content material subject material of the block is dynamically generated using data retrieved from the database.
The second use case is when an substitute to the block code will have to be right away confirmed on the front end. Using a dynamic block instead of a static block causes the changes to be right away applied to all occurrences of the block.
Alternatively, while you’d trade the HTML produced via a static block, the individual will see an invalidation conversation until each single instance of the previous type of the block is removed and altered with the new type, in a different way you mark the former type as deprecated (see moreover Deprecation and Block Validation, Deprecation and Migration Enjoy).
That being said, there are a few concepts you wish to have to grasp previous to you’ll have the ability to get began building dynamic blocks.
Instrument State and Knowledge Stores
Gutenberg is a React SPA software, and the whole thing in Gutenberg is a React section. Submit identify, headers, paragraphs, photos and any block of HTML content material subject material throughout the editor is a React section, along with sidebar and block toolbar controls.
In our previous article, we only used properties to store data. In this article, we’ll take it a step further via introducing the concept of state.
To put it simply, the state object is a simple JavaScript object used to incorporate information about a component. The state of the section can trade over the years, and any time it changes, the section re-renders.
Similarly to the state object, properties are easy JavaScript goods used to hold information about the section. Then again there’s a key distinction between props and state:
propsget passed to the section (similar to function parameters) whilststateis managed throughout the section (similar to variables declared within a function).
You could believe of the state as a snapshot of data taken at a given time limit that an device stores to keep an eye on a component’s habits. For instance, if the block editor settings sidebar is open, a piece of data can be stored somewhere throughout the state object.
When the ideas is shared within a single section, we identify it local state. When the ideas is shared during parts within an device, we identify it Instrument State.
Instrument State is thoroughly related to the concept of store. In line with the Redux medical doctors:
A store holds all the state tree of your device. The only method to trade the state inside it’s to dispatch an motion on it.
So, Redux stores an device state in a single immutable object tree (in particular a store). The item tree can only be changed via rising a brand spanking new object using movements and reducers.
In WordPress, stores are managed throughout the WordPress data module.
Modularity, Programs, and Knowledge Stores in Gutenberg
The Gutenberg repository is created from the ground up on various reusable and independent modules that, jumbled in mixture, assemble the editing interface. The ones modules are steadily referred to as packages.
The original documentation lists two different varieties of applications:
- Production packages make up the producing code that runs throughout the browser. There are two kinds of production packages in WordPress:
- Programs with stylesheets provide stylesheets to function appropriately.
- Programs with data stores define data stores to take care of their state. Applications with information retail outlets can be used via third-party plugins and problems to retrieve and manipulate data.
- Development packages are used in development mode. Those packages include tools for linting, trying out, building, and lots of others.
Proper right here we’re maximum repeatedly interested in applications with information retail outlets, used to retrieve and manipulate data.
The WordPress Knowledge Store
The WordPress data module is built upon Redux and shares the 3 Redux core rules, even though with some key variations.
The original documentation provides the following definition:
WordPress’ data module serves as a hub to keep watch over device state for each and every plugins and WordPress itself, providing tools to keep watch over data within and between distinct modules. It’s designed as a modular pattern for organizing and sharing data: simple enough to satisfy the wishes of a small plugin, while scalable to serve the must haves of a fancy single-page device.
By the use of default, Gutenberg registers a number of information retail outlets throughout the device state. Each and every of the ones stores has specific establish and serve as:
core: WordPress Core Informationcore/annotations: Annotationscore/blocks: Block Sorts Informationcore/block-editor: The Block Editor’s Informationcore/editor: The Put up Editor’s Informationcore/edit-post: The Editor’s UI Informationcore/notices: Notices Informationcore/nux: The NUX (New Person Enjoy) Informationcore/viewport: The Viewport Information
Through the ones stores, it’s conceivable so that you can to get right of entry to a whole bunch of data:
- Knowledge related to the current publish, similar to publish identify, excerpt, categories and tags, blocks, and lots of others.
- Knowledge related to the individual interface, i.e. if a toggle is grew to turn into on or off.
- Knowledge related to the entire WordPress arrange, similar to registered taxonomies, publish sorts, blog identify, authors, and lots of others.
The ones stores are living throughout the international wp object. To get right of entry to the state of a store, you’ll use the select function.
To see how it works, create a brand spanking new publish or internet web page and unencumber your browser’s inspector. Find the console and type throughout the following line of code:
wp.data.select("core")The result can be an object in conjunction with an inventory of functions you’ll have the ability to use to get data from the core data store. The ones functions are referred to as selectors and act as interfaces to get right of entry to state values.
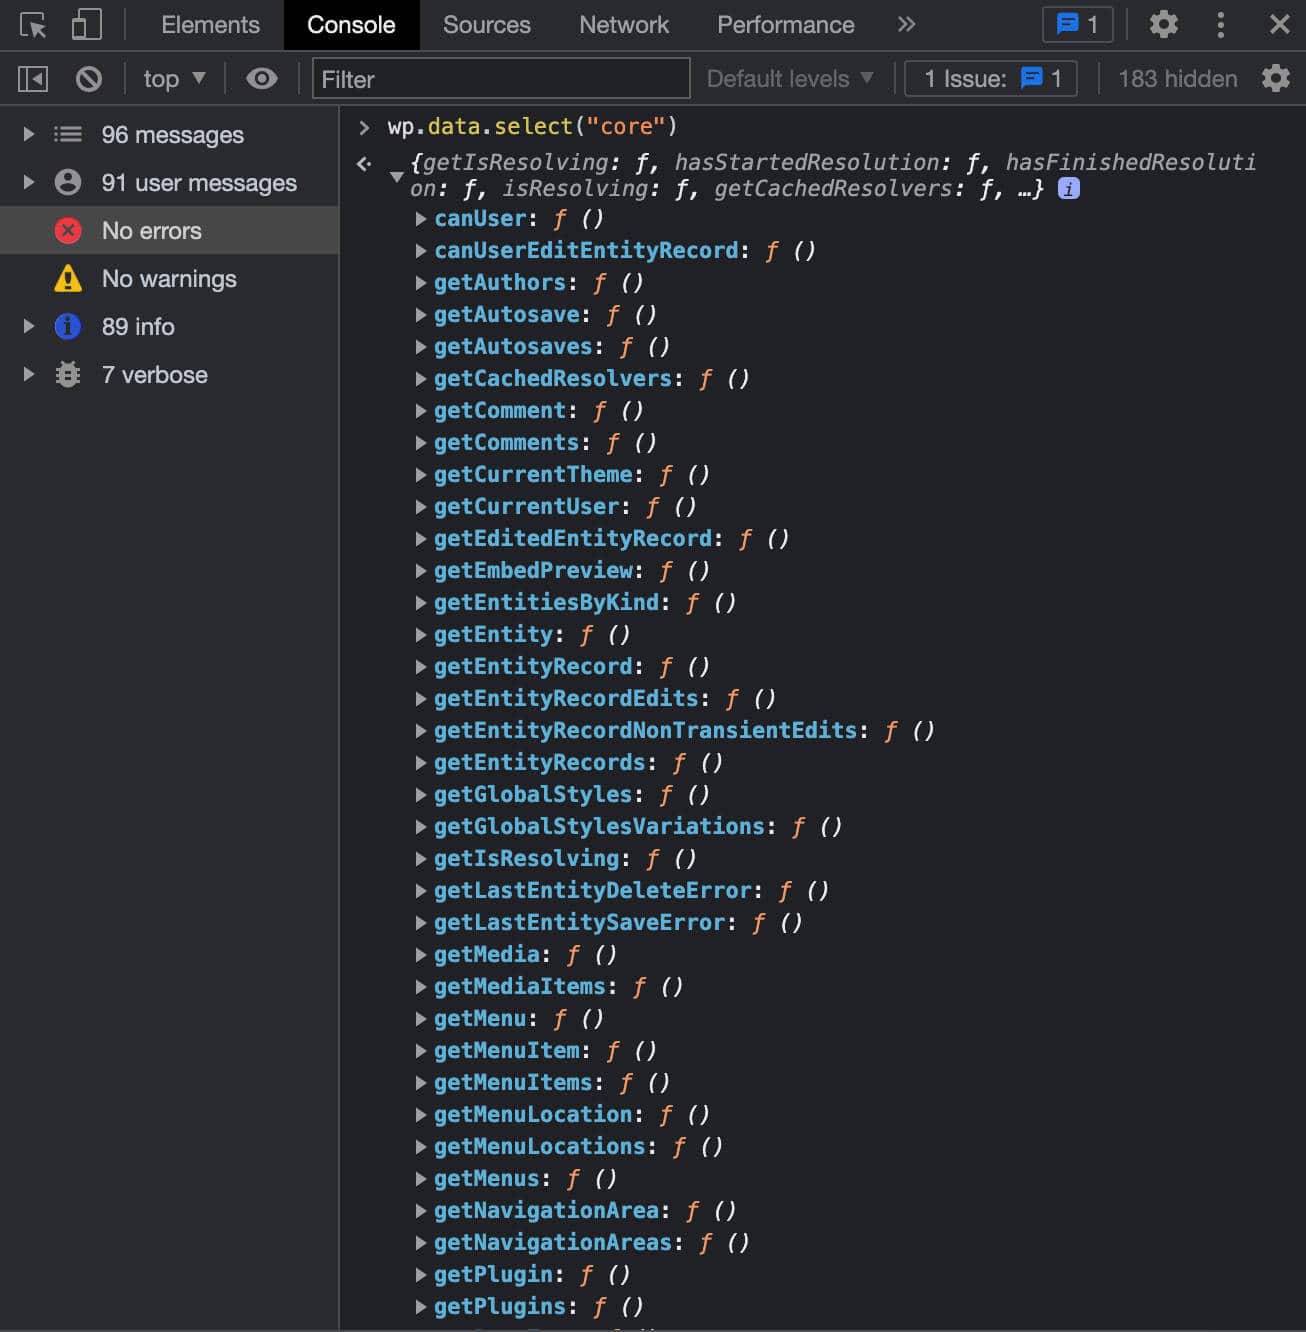
The WordPress data store incorporates information about WordPress at the entire and selectors are the way in which by which you’ll get that wisdom. For instance, getCurrentUser() returns details for the prevailing individual:
wp.data.select("core").getCurrentUser()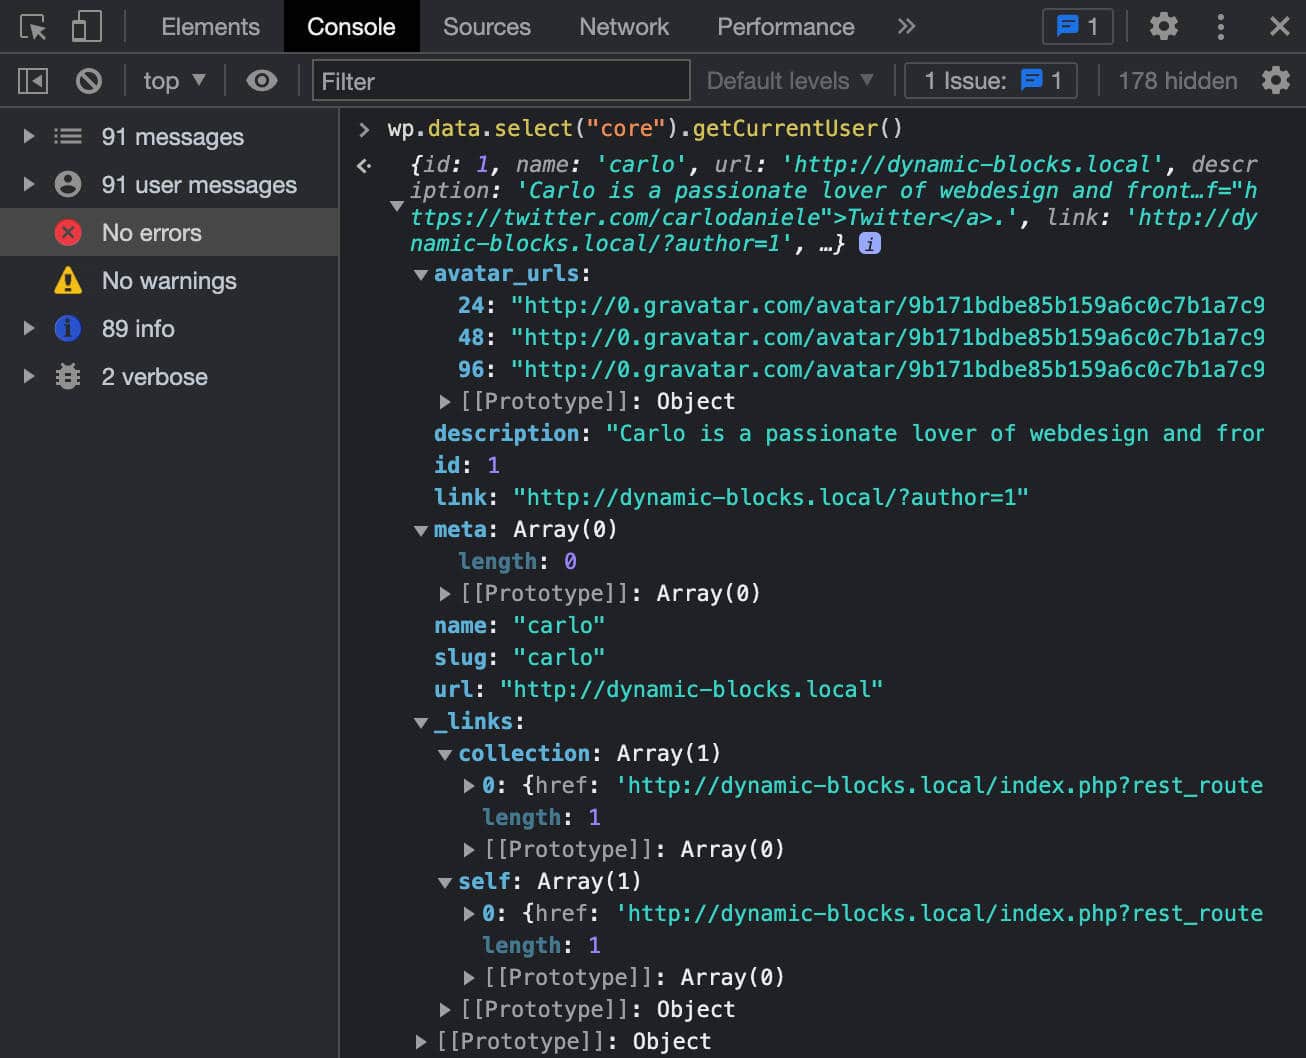
Another selector you’ll have the ability to use to retrieve individual details from the information store is getUsers():
wp.data.select("core").getUsers()The following image displays the response object:

To get details for a single individual, you’ll have the ability to merely kind the following line:
wp.data.select("core").getUsers()[0]Using the identical selector you’ll have the ability to moreover retrieve internet website online shoppers with creator serve as assigned:
wp.data.select( 'core' ).getUsers({ who: 'authors' })You’ll moreover retrieve registered taxonomies:
wp.data.select("core").getTaxonomies()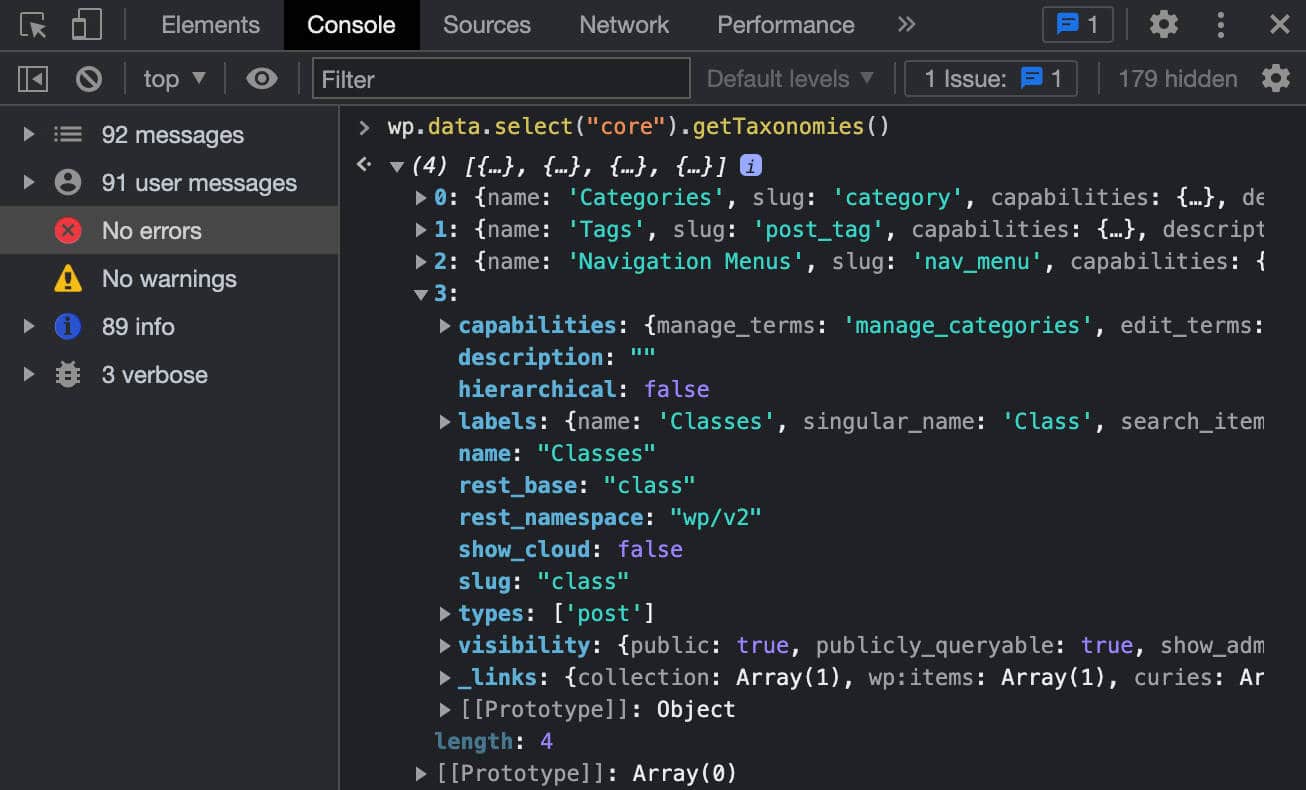
An inventory of the registered publish sorts:
wp.data.select("core").getPostTypes()Or an inventory of plugins:
wp.data.select("core").getPlugins()Now let’s try to get right of entry to a definite data store. To take a look at this, you’ll nevertheless use the select function, on the other hand providing a definite namespace. Let’s check out the following:
wp.data.select("core/edit-post")Now you’ll get the following response object.
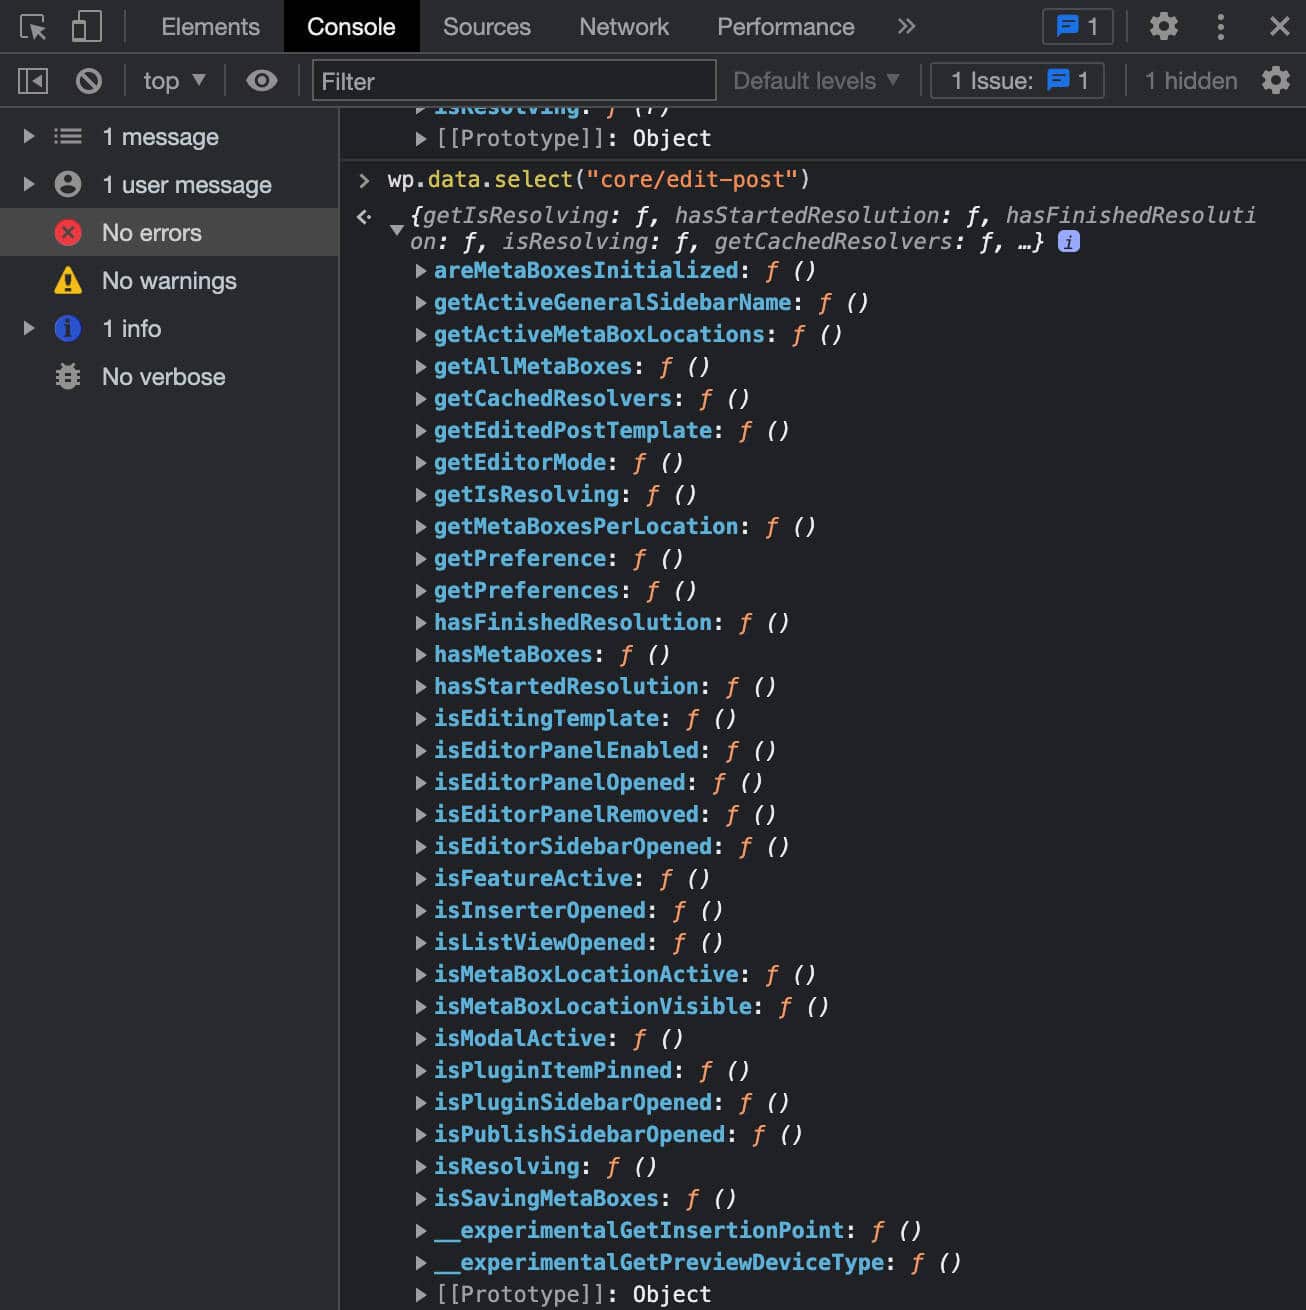
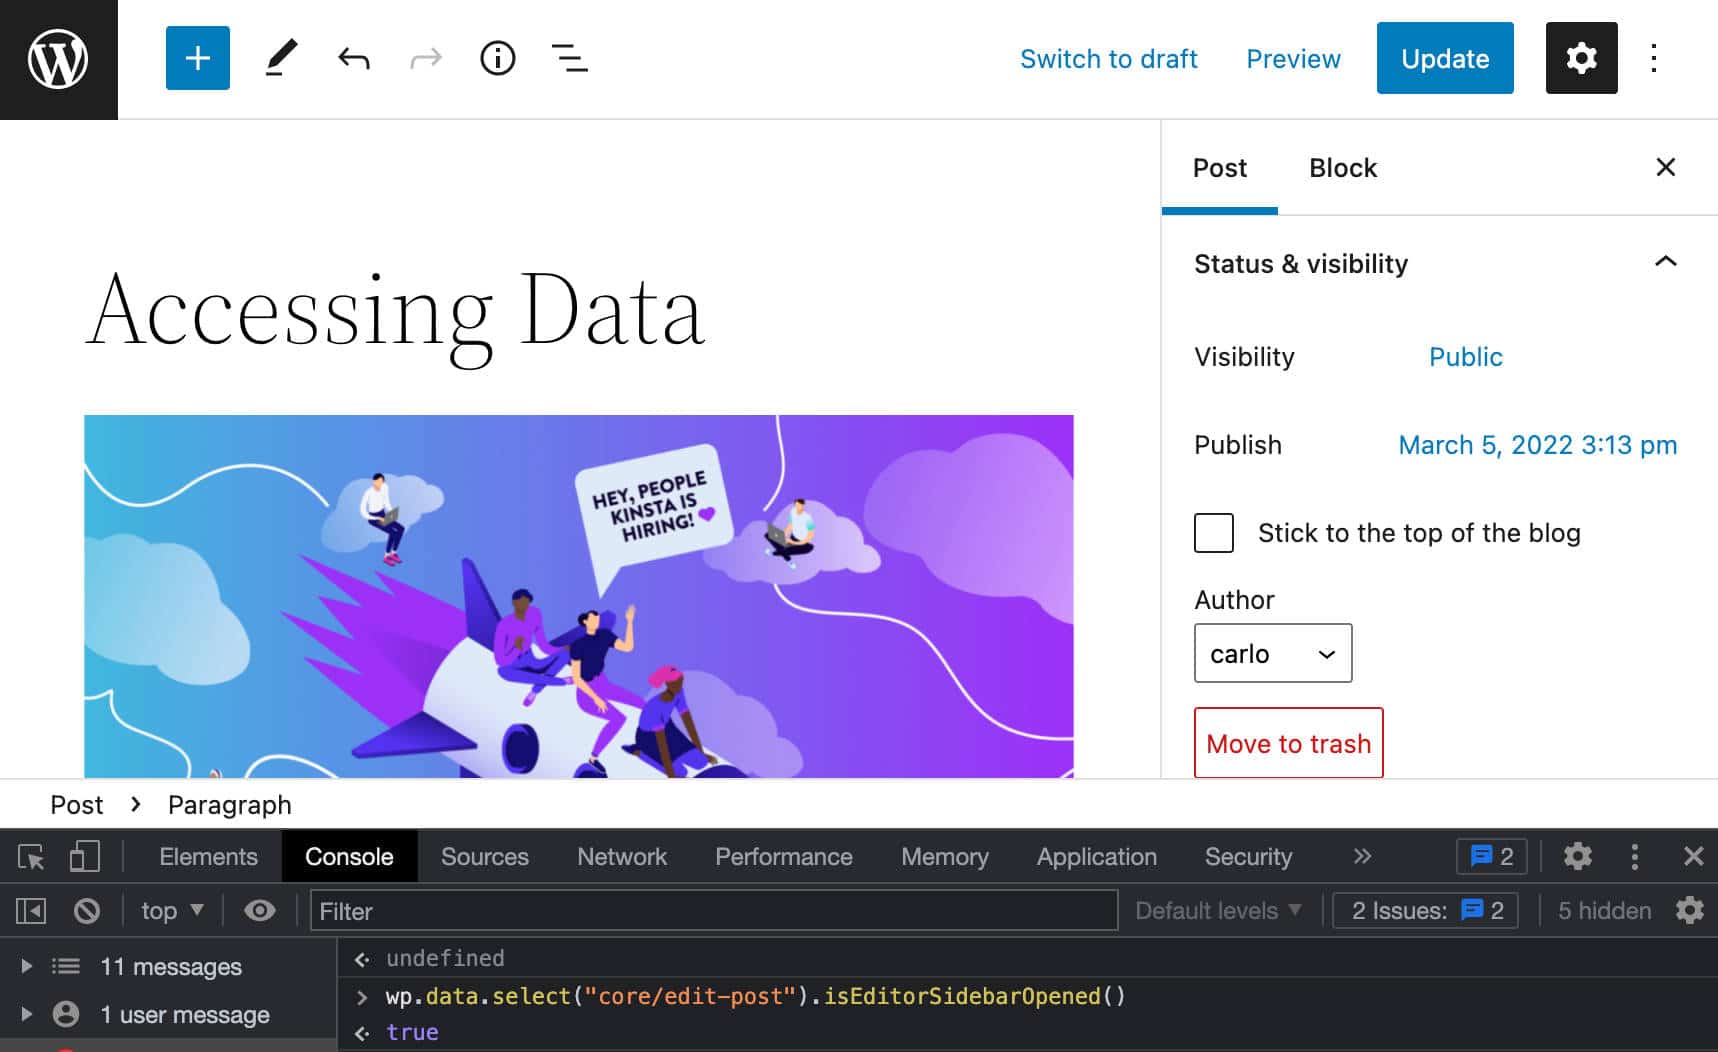
If you want to know whether or not or no longer the settings sidebar is open or not, you’ll use the isEditorSidebarOpened selector:
wp.data.select("core/edit-post").isEditorSidebarOpened()This function returns true if the sidebar is open:
The easiest way to Get right to use Submit Knowledge
You’ll have to now have a basic understanding of discover ways to get right of entry to data. Now we’ll take a greater check out a decided on selector, the getEntityRecords serve as, which is the selector that gives get right of entry to to the publish data.
Throughout the block editor, proper click on on and select Check out. Throughout the Console tab, copy and paste the following line:
wp.data.select("core").getEntityRecords('postType', 'publish')This sends a request to the Recreational API and returns an array of knowledge related to the rest published blog posts.

getEntityRecords accepts 3 parameters:
kindstring: Entity kind (i.e.postType).establishstring: Entity establish (i.e.publish).query?Object: Not obligatory words query (i.e.{creator: 0}).
You’ll assemble further specific requests using an object of arguments.
For instance, it’s conceivable you’ll make a decision that the response must only come with posts in a specified magnificence:
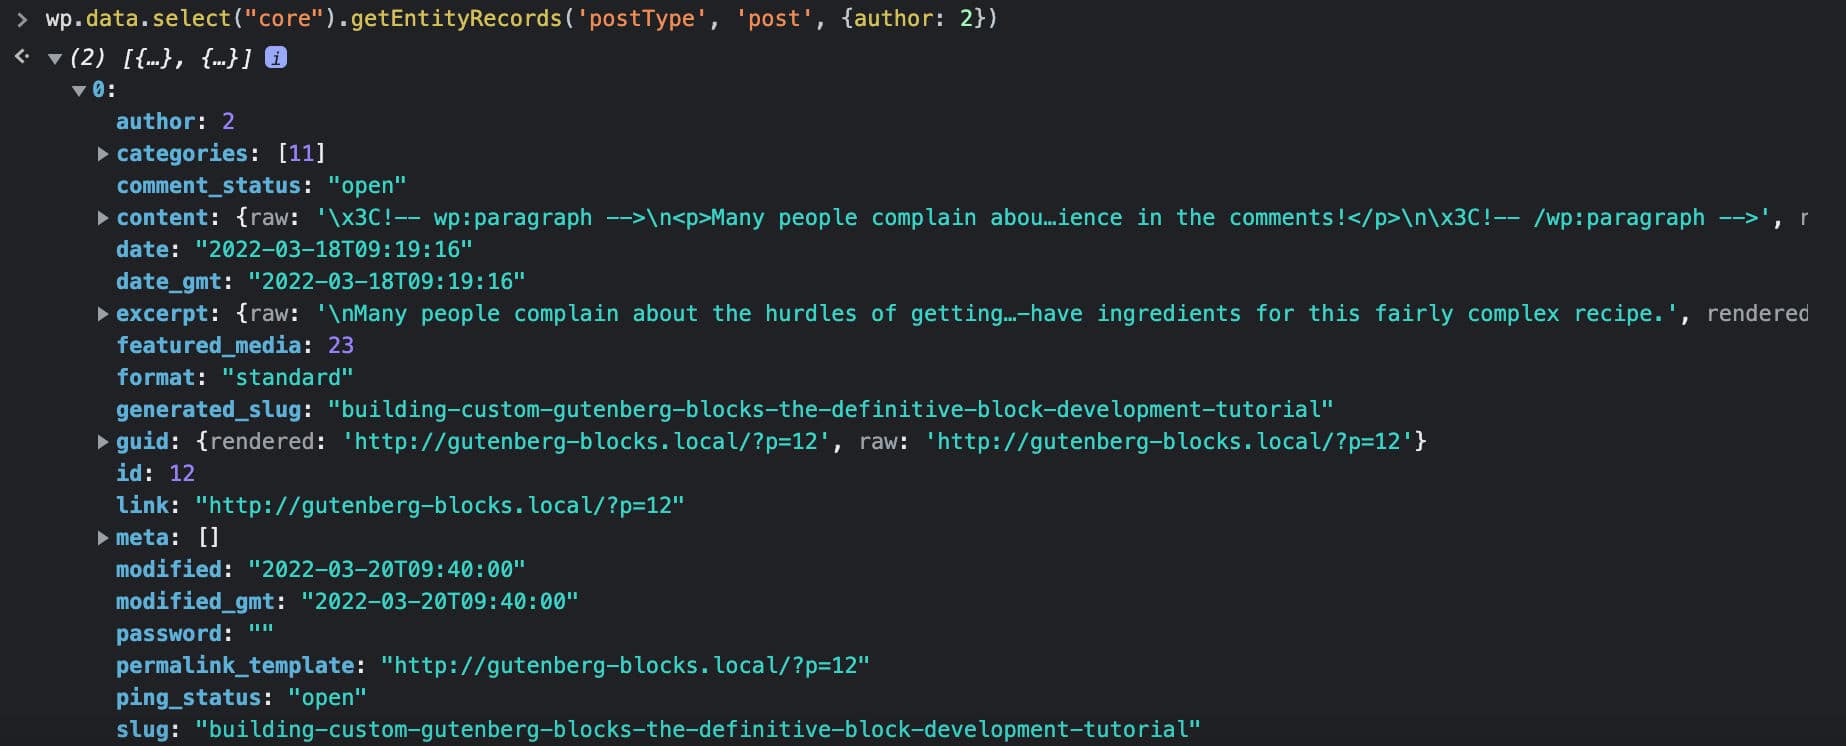
wp.data.select("core").getEntityRecords('postType', 'publish', {categories: 3})You’ll moreover request only articles from a given creator:
wp.data.select("core").getEntityRecords('postType', 'publish', {creator: 2})For individuals who click on on on any of the ideas returned via getEntityRecords, you get an inventory of houses for the selected record:
If you want to have the response to include the featured image, you’ll wish to add an additional argument to your previous request:
wp.data.select("core").getEntityRecords('postType', 'publish', {creator: 2, _embed: true})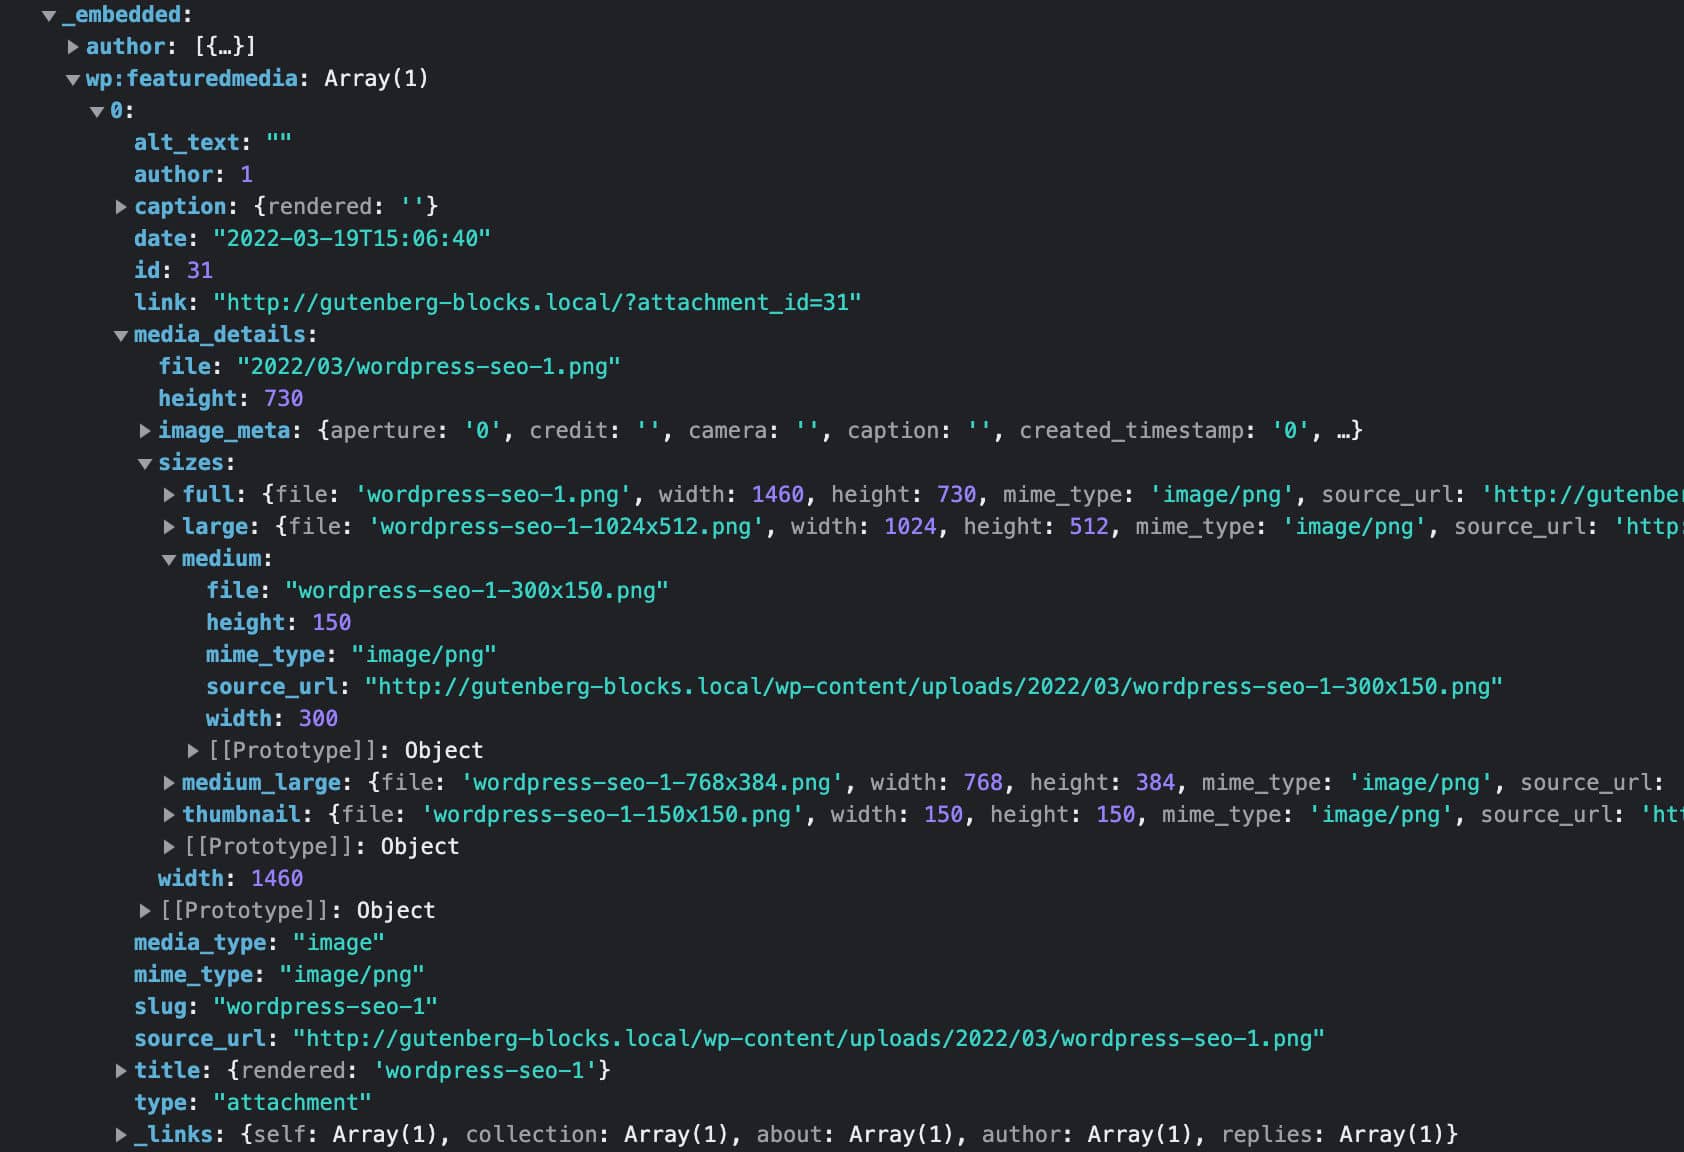
Now you’ll have a better understanding of discover ways to get right of entry to the WordPress datastore and retrieve publish details. For a greater view at the getEntityRecords selector, see moreover Asking for information in Gutenberg with getEntityRecords.
The easiest way to Create a Dynamic Block: An Example Problem
After our long theoretical premise, we will be able to switch at once to apply and create a dynamic block using the tools we offered in our previous block development instructional.
In that article, we discussed:
- The best way to Set Up a WordPress Construction Surroundings
- What’s a Block Scaffolding
- How To Construct a Static Gutenberg Block
That’s why we gained’t be masking those topics extensive throughout the supply article, on the other hand feel free to talk over with our previous data for any longer data, or just for a refresher.
Set Up A JavaScript Development Setting
Let’s get began via setting up a JavaScript development environment.
Arrange or Exchange Node.js
First, set up or replace Node.js. Once you’re completed, unencumber your command line tool and run the following command:
node -vYou’ll have to see your node type.
Set Up Your Development Setting
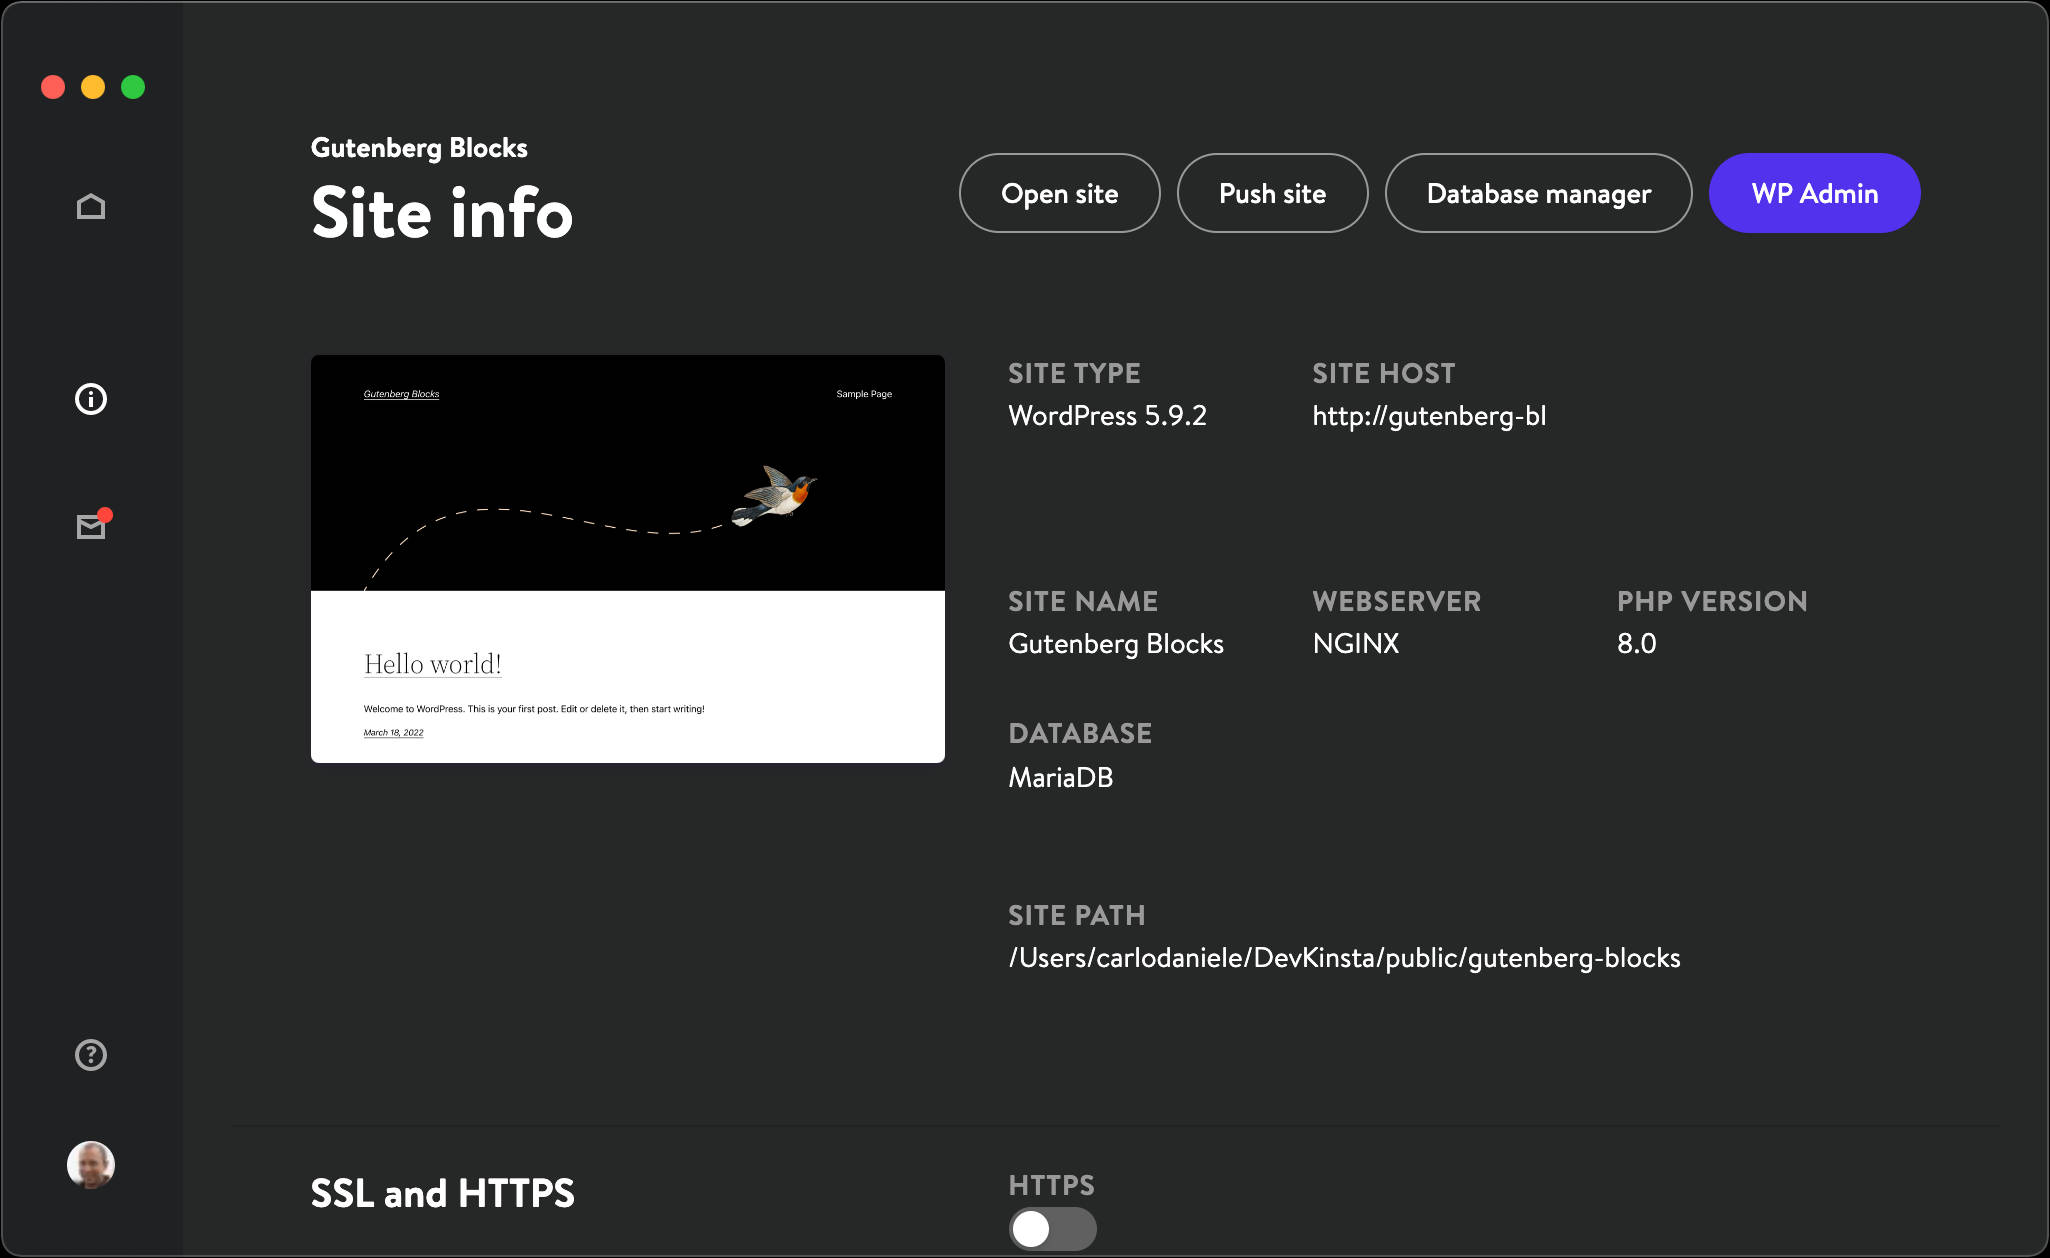
Next, you’ll desire a development environment for WordPress. For our examples, we used DevKinsta, our loose WordPress development tool that permits you to unencumber a space WordPress internet web page in no time.
Then again you’re nevertheless loose to make a choice any WordPress native construction surroundings you favor, similar to MAMP or XAMPP, or even the original wp-env resolution.
For those who’re using DevKinsta, click on on on New WordPress Website or on Custom designed Website, fill throughout the form fields and push Create internet website online.
The arrange process takes a minute or two. When it’s complete, unencumber your local WordPress development internet web page.
Set Up Your Block Plugin
What you wish to have now is usually a starter block plugin. To steer clear of all the trouble of a manual configuration, the WordPress core developer workforce introduced the @wordpress/create-block device, which is the original 0 configuration tool for rising Gutenberg blocks.
We covered @wordpress/create-block extensive in our earlier article, so appropriate right here we will be able to soar get began the set-up right away.
To your command line tool, navigate to the /wp-content/plugins folder:
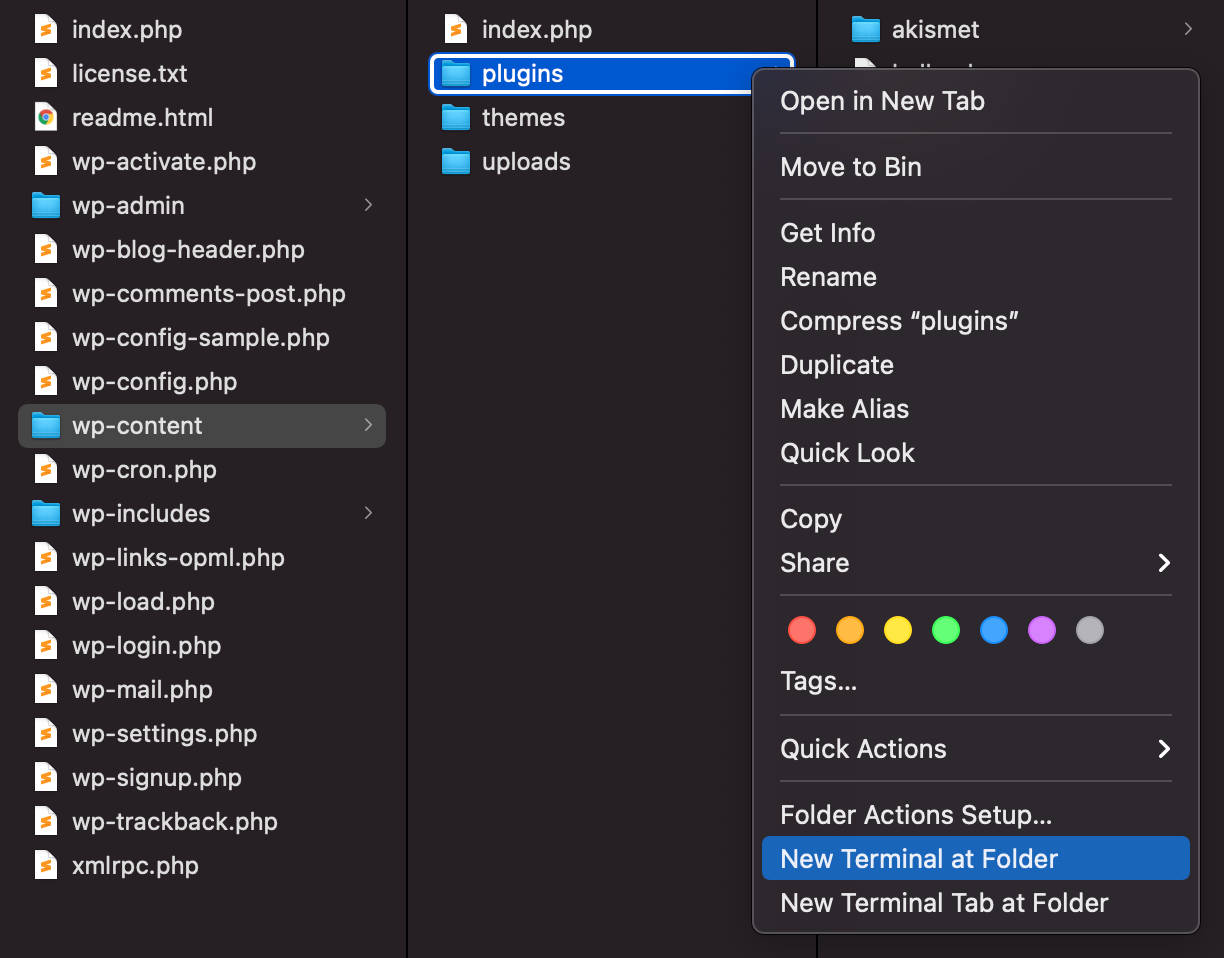
Once there, run the following command:
npx @wordpress/create-blockYou’re in truth in a position to place within the @wordpress/create-block package:
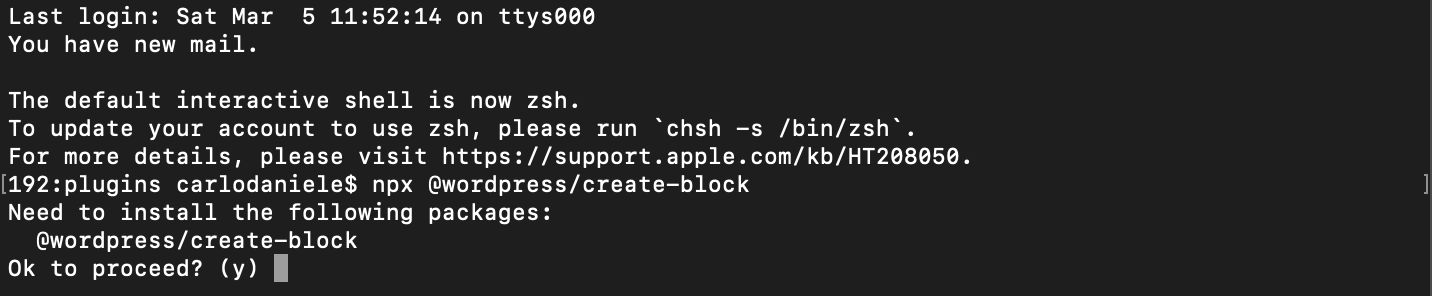
To confirm, kind y and press Enter.
This generates the plugin’s PHP, SCSS, and JS data in interactive mode.
Below are the details we can be using in our example. Be happy to change the ones details in keeping with your own tastes:
Every time you hit enter, it downloads and configures the plugin.
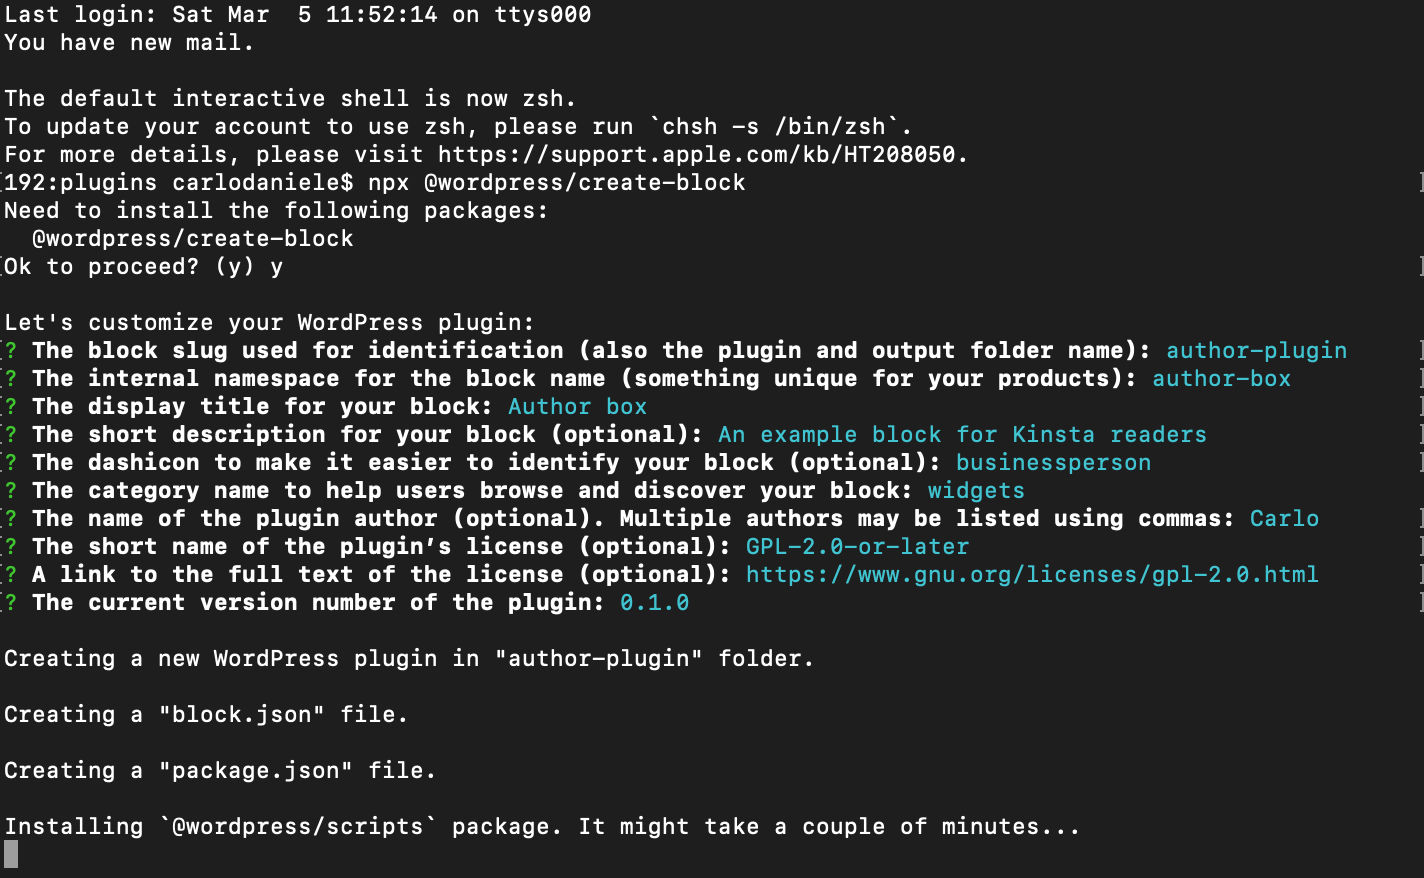
The process would most likely take a couple of minutes. When it’s complete, you’ll have to see the following show:
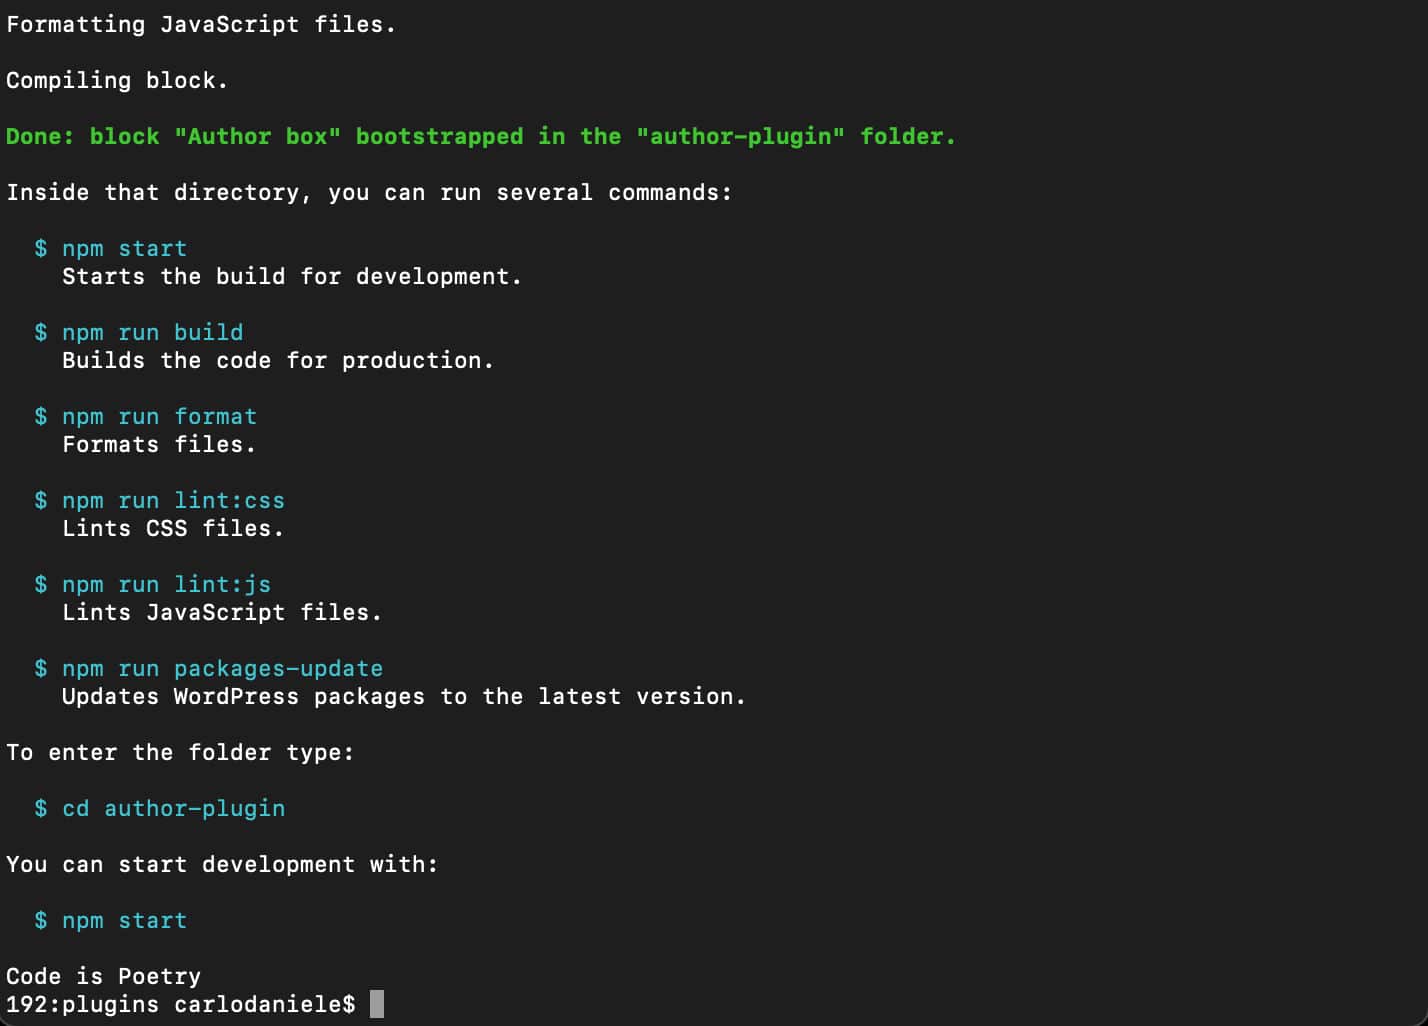
You’re going to peer an inventory of the directions you’ll have the ability to run from throughout the plugin record:
$ npm get began– Get began the assemble for development.$ npm run assemble– Assemble the code for production.$ npm run structure– Format data.$ npm run lint:css– Lint CSS data.$ npm run lint:js– Lint JavaScript data.$ npm run packages-update– Exchange WordPress packages to the newest type.
Okay, now switch to the plugin record with the following command:
cd author-pluginAnd get began your development assemble:
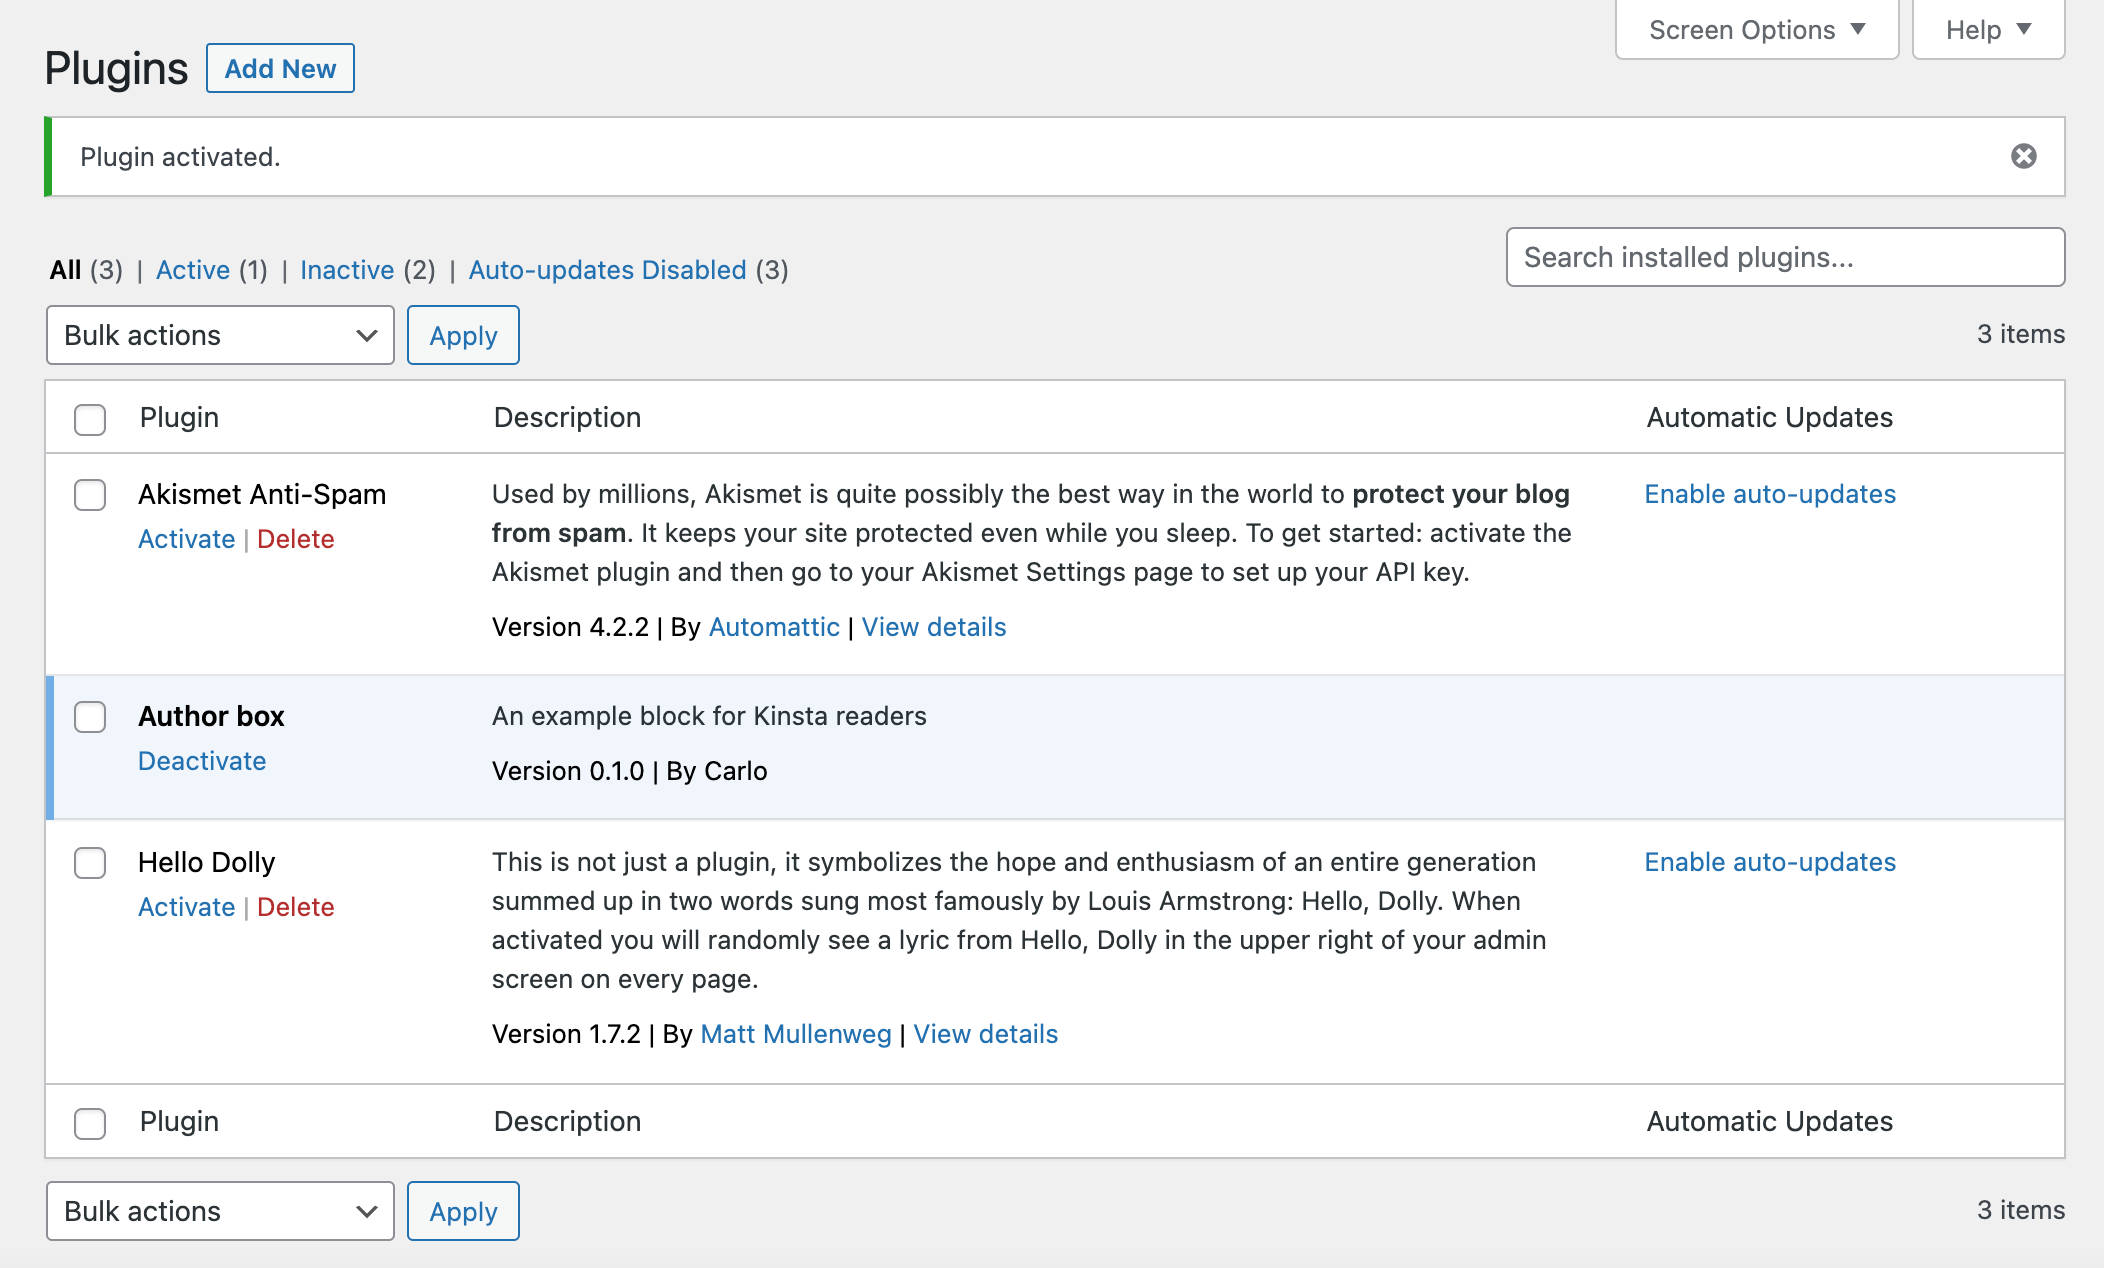
npm get beganNext, navigate to the Plugins show in your WordPress dashboard and switch at the Author box plugin:
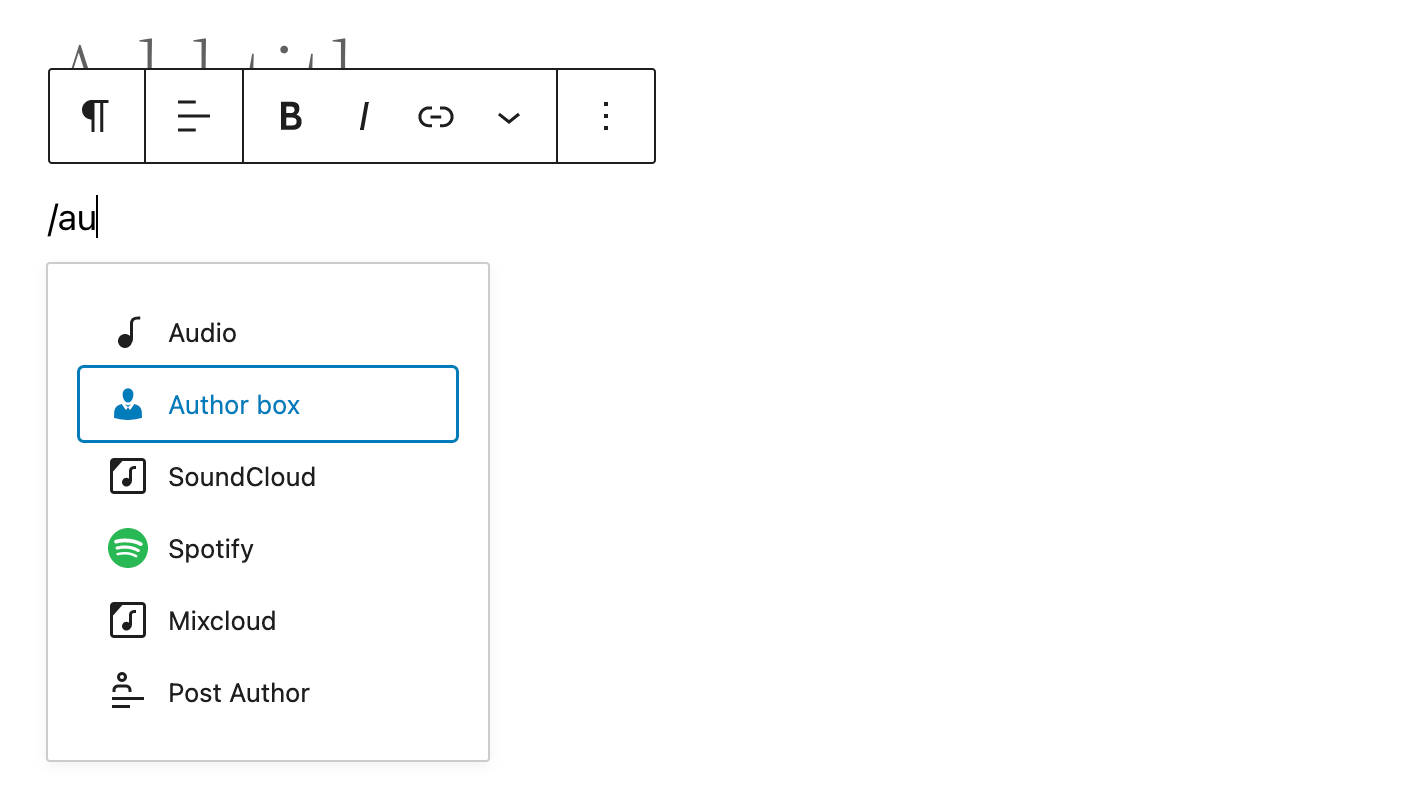
Now you’ll have the ability to take a look at if the plugin is working correctly. Create a brand spanking new publish and get began typing / to unencumber the fast inserter:
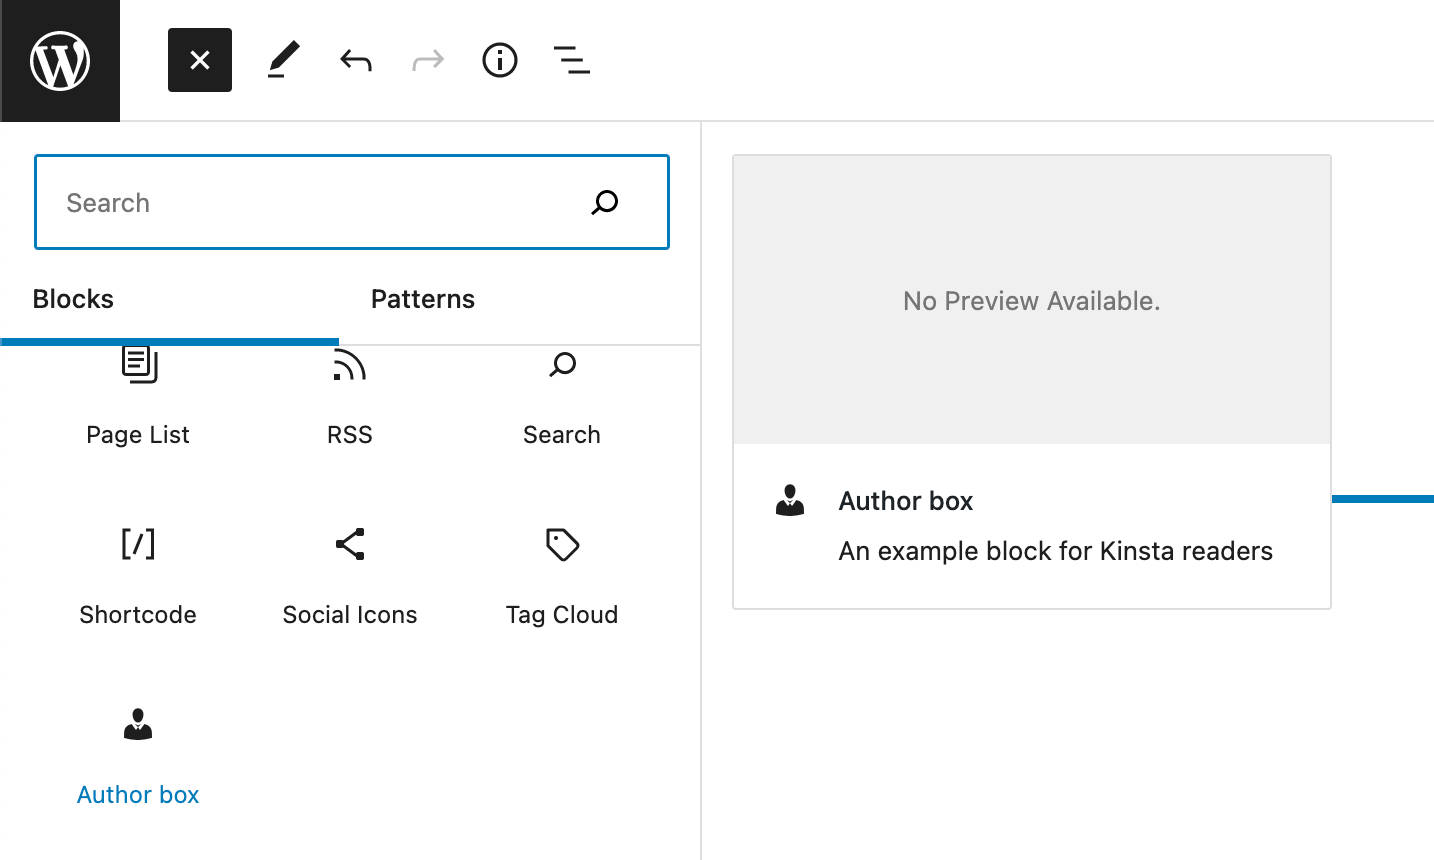
You’ll moreover to seek out the Author box block throughout the Block Inserter, beneath the Widgets magnificence. Make a selection the block to be able to upload it to the editor canvas:
You’re completed. Now save the publish and preview the internet web page to check if the block presentations correctly.
The Block Scaffolding
We lined the block scaffolding in our previous publish. So, appropriate right here we can only provide a at hand information a coarse evaluate of the ideas we’re going to regulate for our examples.
The Root Folder
The root folder is where you’ll to seek out the principle PHP report and various different subfolders.
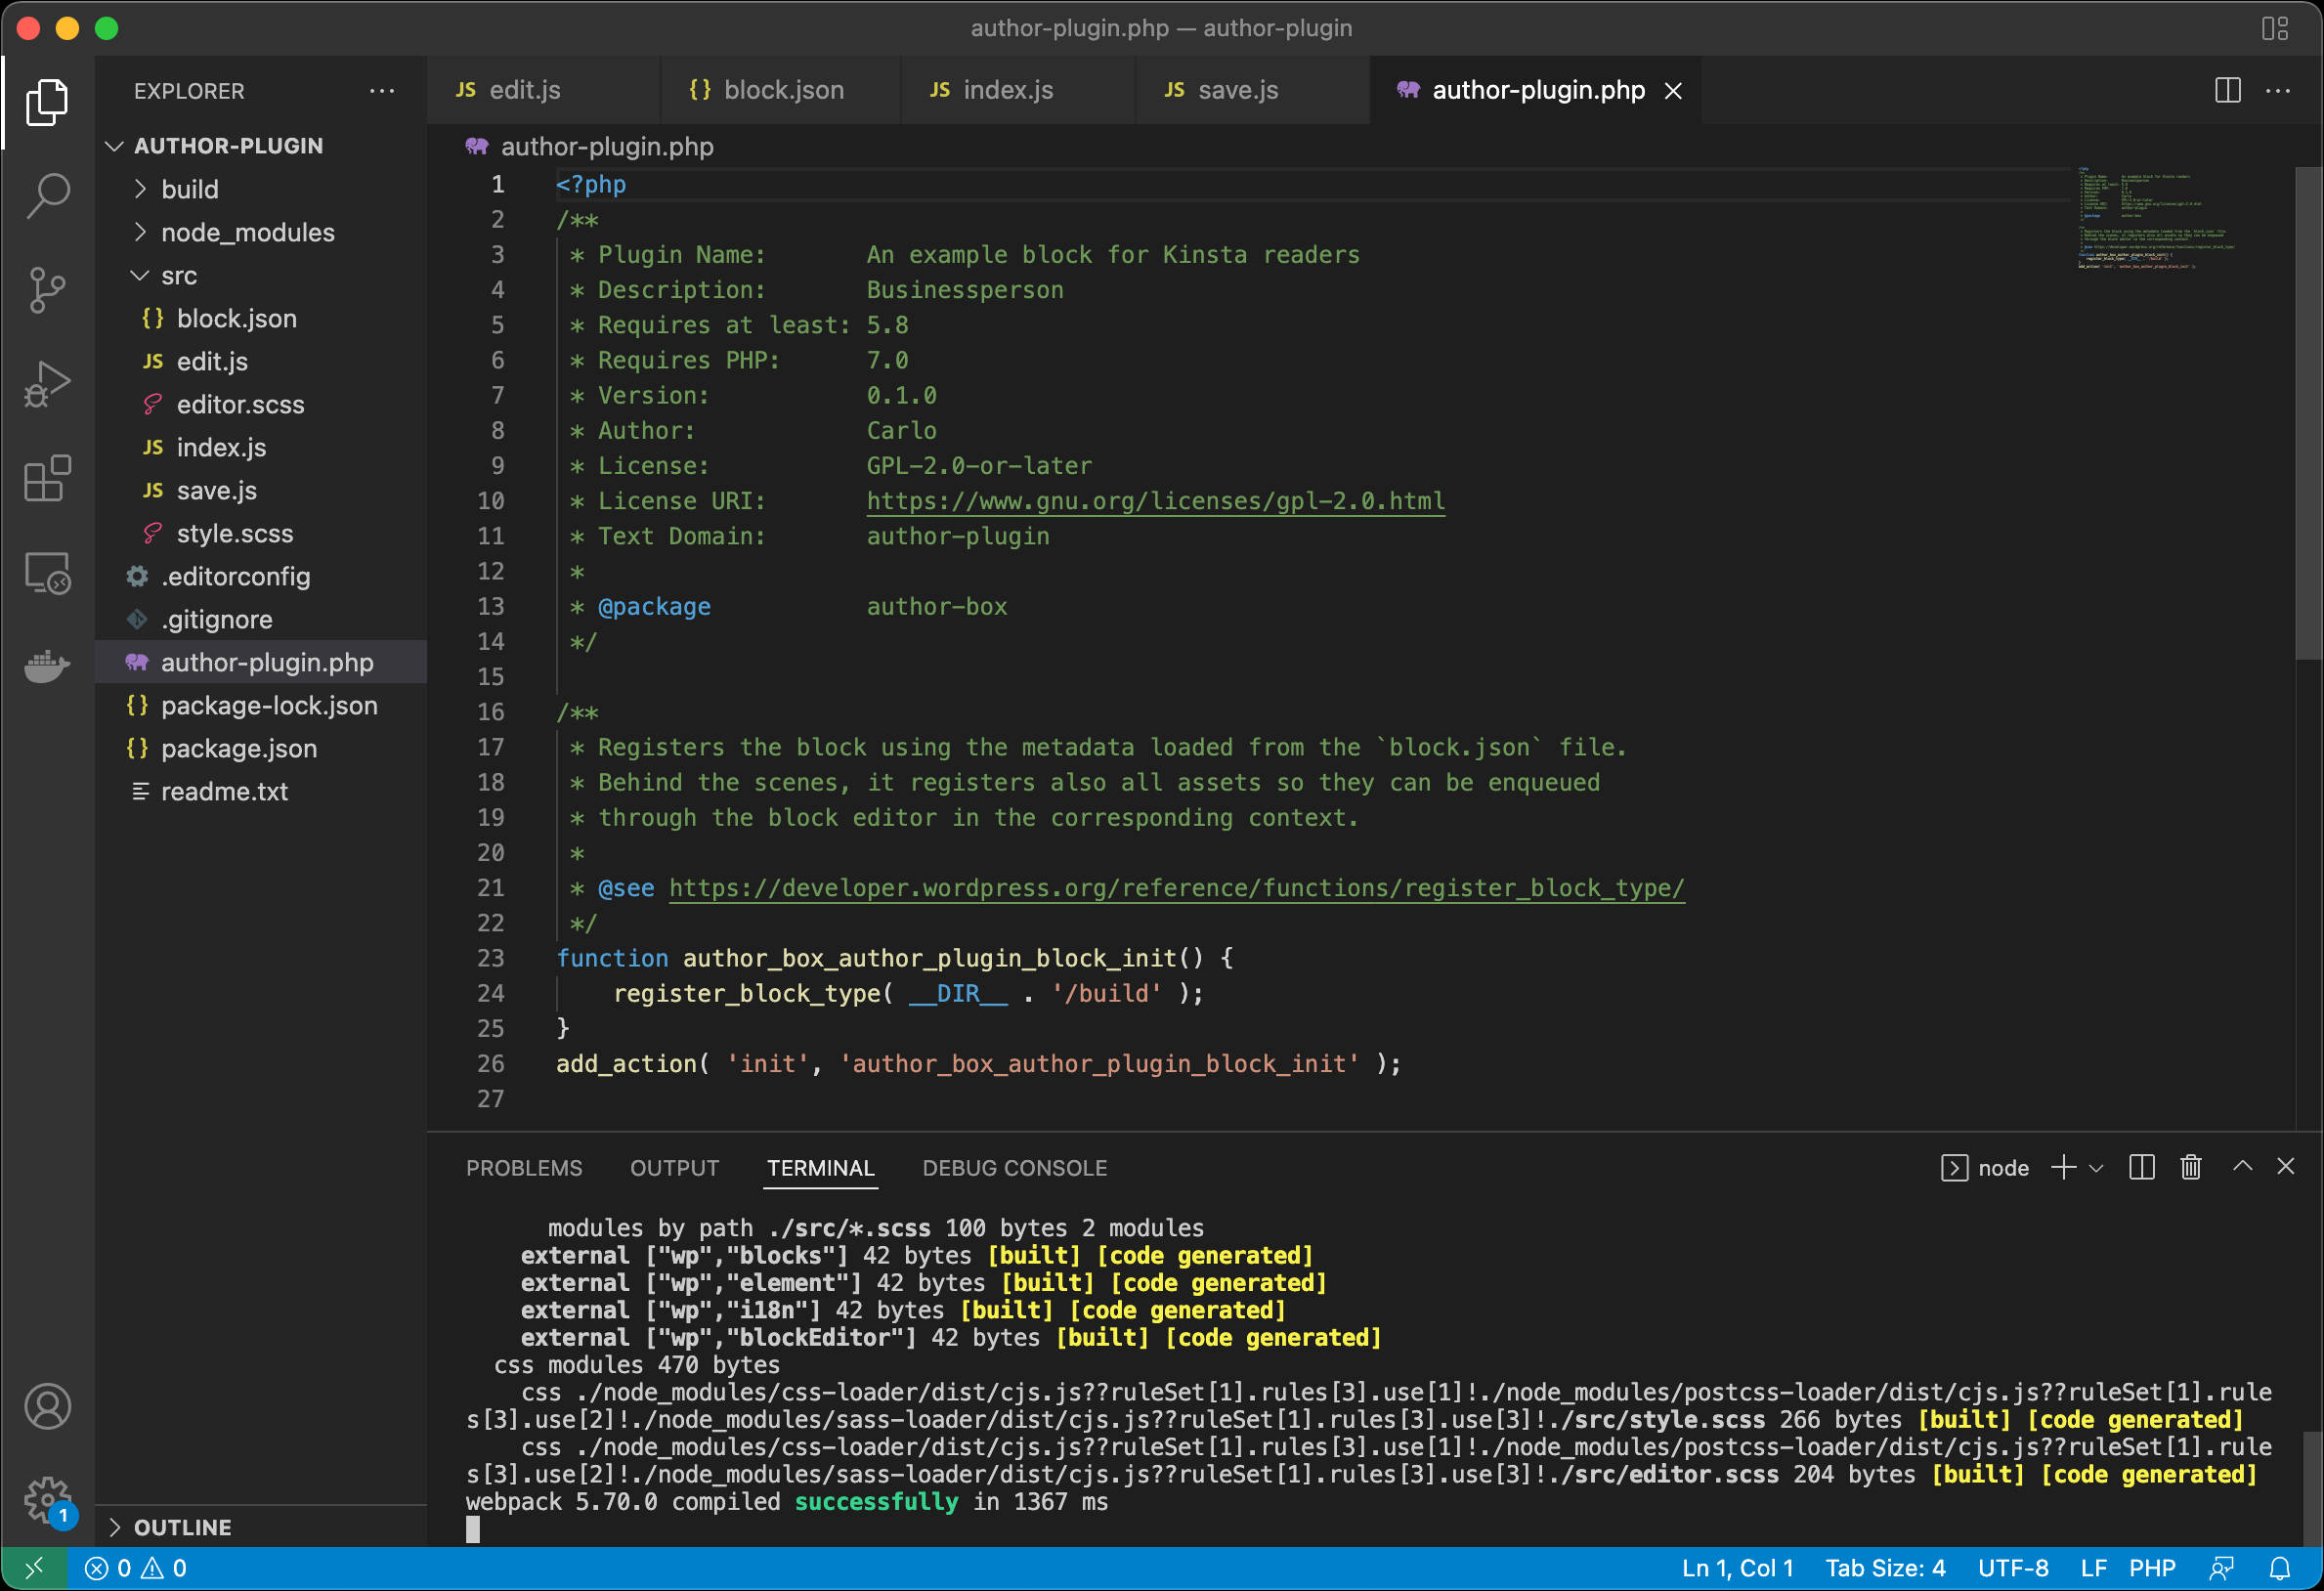
author-plugin.php
By the use of default, the @wordpress/create-block package provides the following PHP record:
/**
 * Plugin Identify:       Author box
 * Description:       An example block for Kinsta readers
 * Calls for a minimum of: 5.8
 * Requires PHP:      7.0
 * Type:           0.1.0
 * Author:            Carlo
 * License:           GPL-2.0-or-later
 * License URI:       https://www.gnu.org/licenses/gpl-2.0.html
 * Text Space:       author-plugin
 *
 * @package           author-box
 */

/**
 * Registers the block using the metadata loaded from the `block.json` report.
 * Behind the scenes, it registers moreover all property so they are able to be enqueued
 * during the block editor throughout the corresponding context.
 *
 * @see https://developer.wordpress.org/reference/functions/register_block_type/
 */
function author_box_author_plugin_block_init() {
	register_block_type( __DIR__ . '/assemble' );
}
add_action( 'init', 'author_box_author_plugin_block_init' );
Throughout the heading, you’ll perceive the details we entered on setup.
With static blocks, extra steadily than no longer you’ll be operating on the JavaScript data located throughout the src folder. With dynamic blocks, you’ll write PHP code to turn the block content material subject material on the front end.
The src Folder
The src folder is your development folder. Proper right here you’ll to seek out the following data:
- block.json
- index.js
- edit.js
- save.js
- editor.scss
- style.scss
block.json
The block.json is your metadata report. @wordpress/create-block generates the following block.json report:
{
	"$schema": "https://schemas.wp.org/trunk/block.json",
	"apiVersion": 2,
	"establish": "author-box/author-plugin",
	"type": "0.1.0",
	"identify": "Author box",
	"magnificence": "widgets",
	"icon": "businessperson",
	"description": "An example block for Kinsta readers",
	"is helping": {
		"html": false
	},
	"textdomain": "author-plugin",
	"editorScript": "report:./index.js",
	"editorStyle": "report:./index.css",
	"style": "report:./style-index.css"
}
For a greater view at the block.json report at the entire, please talk over with our earlier weblog submit.
index.js
The index.js report is where you signal within the block kind on the shopper:
import { registerBlockType } from '@wordpress/blocks';

import './style.scss';

import Edit from './edit';
import save from './save';

registerBlockType('author-box/author-plugin', {
	edit: Edit,
	save,
});
edit.js
The edit.js report is where you’ll assemble the block interface rendered throughout the editor:
import { __ } from '@wordpress/i18n';

import { useBlockProps } from '@wordpress/block-editor';

import './editor.scss';

export default function Edit() {
	return (

			{__('Author box – hello from the editor!', 'author-plugin')}

	);
}
save.js
The save.js report incorporates the script that builds the block content material subject material to be saved into the database. We gained’t use this report in this instructional:
import { __ } from '@wordpress/i18n';

import { useBlockProps } from '@wordpress/block-editor';

export default function save() {
	return (

			{__('Author box – hello from the saved content material subject material!', 'author-plugin')}

	);
}
Development the Block to Render throughout the Editor
Open your project in Visible Studio Code or any code editor you favor.
For those who’re using Visual Studio Code, pass to Terminal -> New Terminal. This may increasingly every now and then unencumber a terminal window on your project’s root folder.
Throughout the terminal (or in your favorite command line tool), kind throughout the following command:
npm get beganYou’re now running the node environment in development mode.
From appropriate right here on, you’ll be following two different routes. To render the block throughout the editor, you’ll artwork throughout the edit.js report. To render the block on the front-end, you’ll wish to write PHP code in the principle plugin report.
Now roll up your sleeves because the coding begins:
Signal within the Block on the Server
First, you want to signal within the block on the server and write the PHP code to retrieve data from the database.
Throughout the author-plugin.php report, it is important to transfer a second argument to the register_block_type serve as:
function author_box_author_plugin_block_init() {
	register_block_type( __DIR__ . '/assemble', array(
		'render_callback' => 'author_box_author_plugin_render_author_content'
	) );
}
add_action( 'init', 'author_box_author_plugin_block_init' );
The second argument is an array of arguments for registering a block kind (see the complete record of to be had arguments right here). Throughout the code above we’ve were given only provided render_callback, which determines the callback function that renders the block on the show.
Next, you’ll declare the function:
function author_box_author_plugin_render_author_content() {
	return 'Hello International!';
}
Save the report, create a brand spanking new publish or internet web page, and add the Author Box block to the editor canvas.
The block editor continues to be showing the starter block, as we haven’t changed the edit.js report however.
Then again while you preview the publish throughout the front-end, you’ll see that the original block content material subject material has now been modified throughout the “Hello International” string.
Now, since the HTML rendered on the front-end is generated throughout the PHP report, there can be no need for the save function to return anything. So let’s pass right away to the save.js report and change the code as confirmed underneath:
export default function save() {
	return null;
}
Define Block Attributes
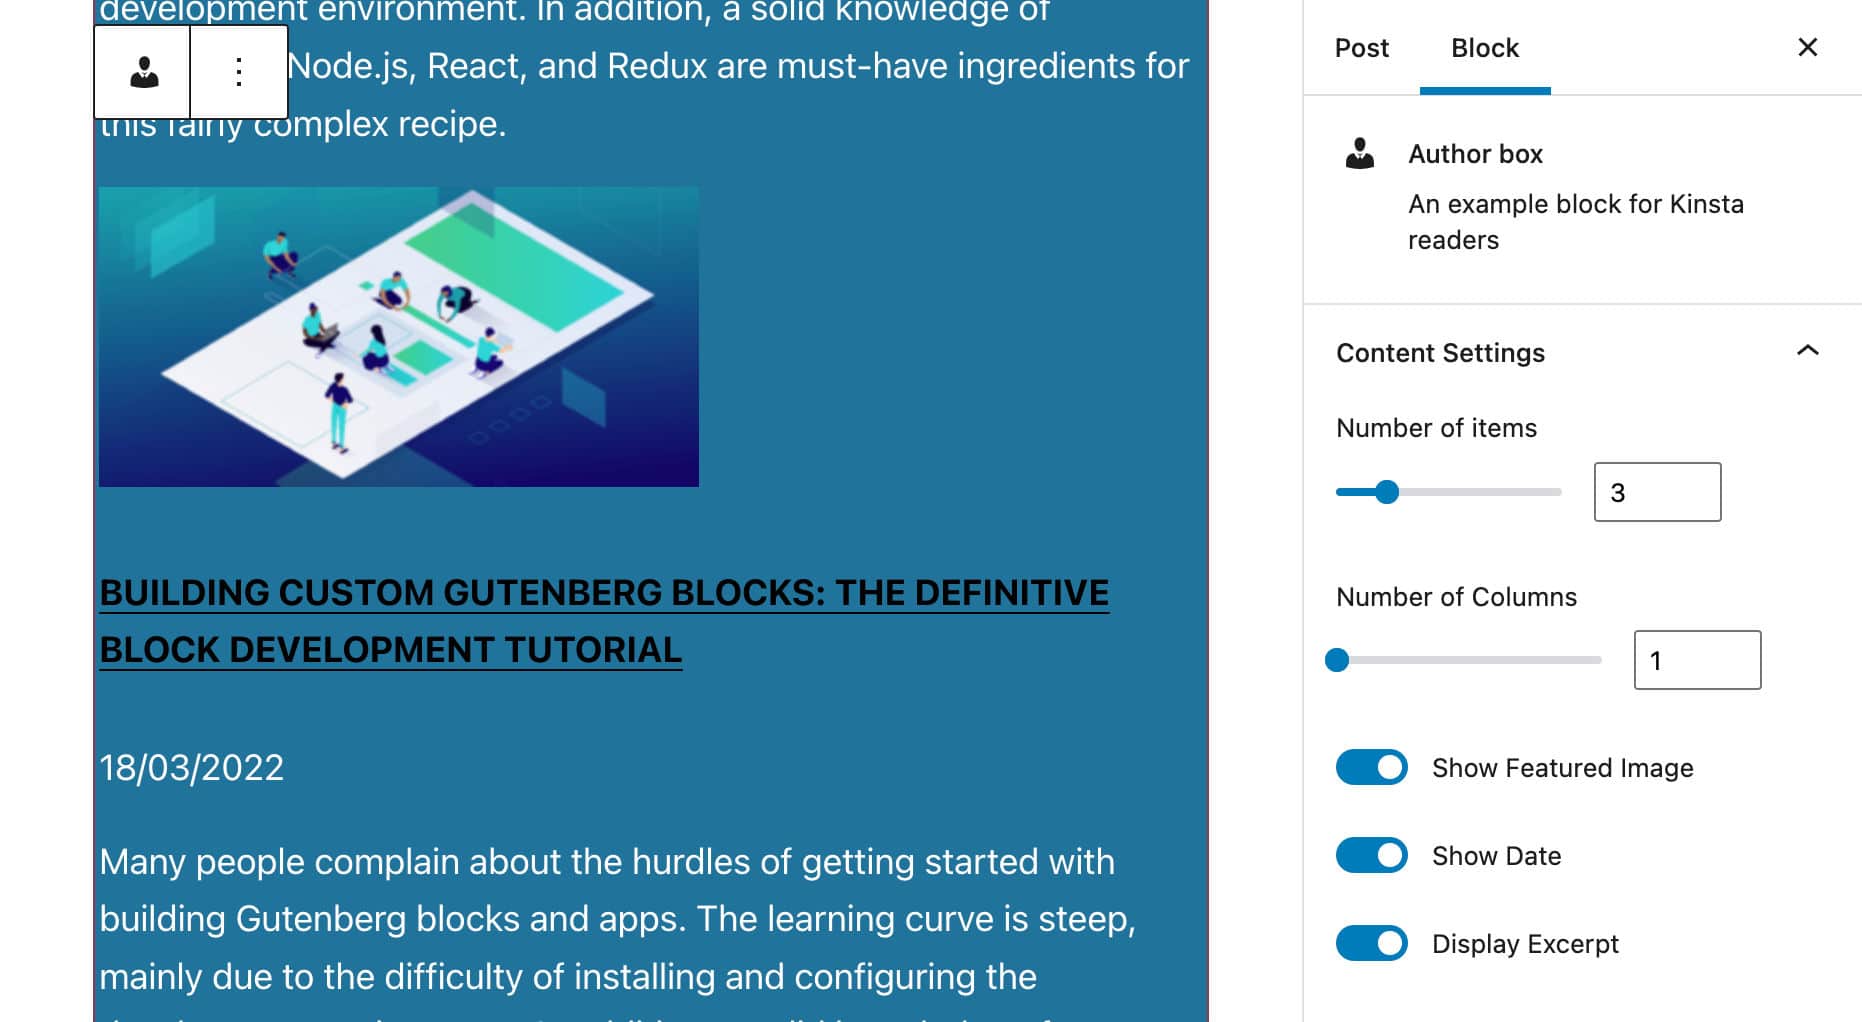
Now you wish to have a place to store individual settings. For instance, the choice of publish items to retrieve from the database, whether or not or to not display or not a specified field, and lots of others. To take a look at this, you’ll define moderately a couple of attributes throughout the block.json report.
For instance, you will have to give the individual the ability to come to a decision the choice of posts to be included throughout the block, the option to display featured image, date, excerpt, and/or cover/show the creator’s profile symbol.
That is all the report of attributes we can use to build our example block:
{
	...
	"attributes": {
		"numberOfItems": {
			"kind": "amount",
			"default": 3
		},
		"columns": {
			"kind": "amount",
			"default": 1
		},
		"displayDate": {
			"kind": "boolean",
			"default": true
		},
		"displayExcerpt": {
			"kind": "boolean",
			"default": true
		},
		"displayThumbnail": {
			"kind": "boolean",
			"default": true
		},
		"displayAuthorInfo": {
			"kind": "boolean",
			"default": true
		},
		"showAvatar": {
			"kind": "boolean",
			"default": true
		},
		"avatarSize": {
			"kind": "amount",
			"default": 48
		},
		"showBio": {
			"kind": "boolean",
			"default": true
		}
	}
}
Assemble the Block to Be Rendered throughout the Editor
The getEntityRecords selector is included throughout the @wordpress/data package. To use it, you’ll wish to import the useSelect hook from that package in your edit.js report:
import { useSelect } from '@wordpress/data';Next, add the following code to the Edit() function:
const posts = useSelect( ( select ) => {
	return select( 'core' ).getEntityRecords( 'postType', 'publish', {
		'per_page': 3
	});
});
Throughout the code above, we hardcoded the choice of posts. Then again it’s conceivable you’ll wish to give shoppers the ability to set a definite choice of posts. You’ll use an function for that.
To your block.json you’ll have defined a numberOfItems function. You’ll use it in your Edit function as confirmed underneath:
export default function Edit( { attributes } ) {

	const { numberOfItems } = attributes;

	const posts = useSelect( ( select ) => {
		return select( 'core' ).getEntityRecords( 'postType', 'publish', {
			'per_page': numberOfItems
		});
	});

	console.log( posts );

	return (
		...
	);
}
You gained’t see the posts on the show however, on the other hand run a console.log and see what happens in your browser inspector’s console:
useSelect would possibly take two arguments: an inline callback and an array of dependencies. Each and every return a memoized type of the callback that only changes when one of the crucial dependencies changes.
So, so to refetch posts on each numberOfItems function trade, you want to trade the Edit function as confirmed underneath:
export default function Edit( { attributes } ) {

	const { numberOfItems } = attributes;

	const posts = useSelect(
		( select ) => {
			return select( 'core' ).getEntityRecords( 'postType', 'publish', {
				'per_page': numberOfItems
			});
		},
		[ numberOfItems ]
	);

	console.log(posts);

	return (
		...
	);
}
Next you want to render your record of posts. To take a look at this you should utilize the built-in JavaScript map means:
export default function Edit( { attributes } ) {
const { numberOfItems } = attributes;
const posts = useSelect(
( select ) => {
return select( 'core' ).getEntityRecords( 'postType', 'publish', {
'per_page': numberOfItems
});
},
[ numberOfItems ]
);
console.log(posts);
return (
{ posts && posts.map( ( publish ) => {
return (
-
{
submit.name.rendered ?
submit.name.rendered :
__( 'Default name', 'author-plugin' )
}
)
})}
);
}First, it checks if in case you don’t have any not up to one publish throughout the array, then runs the loop.
Phrase that, as we’re using the map manner with a React section, we are also using a key function to assign the publish ID to the current report products.
publish.link and publish.identify.rendered render the publish URL and identify respectively.
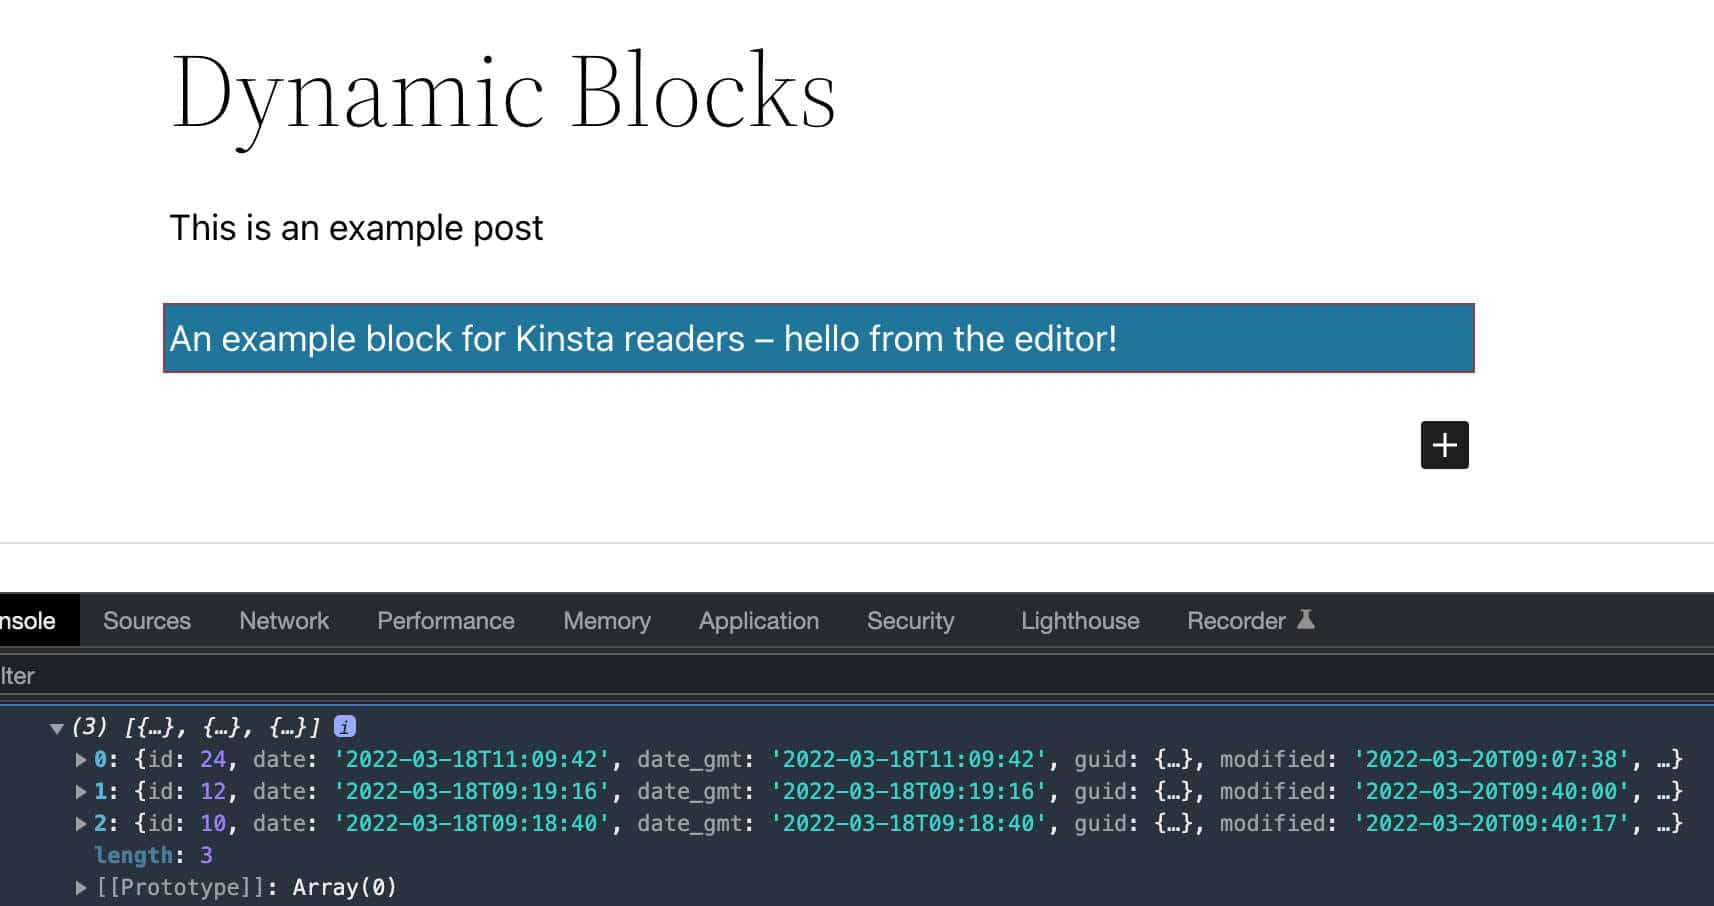
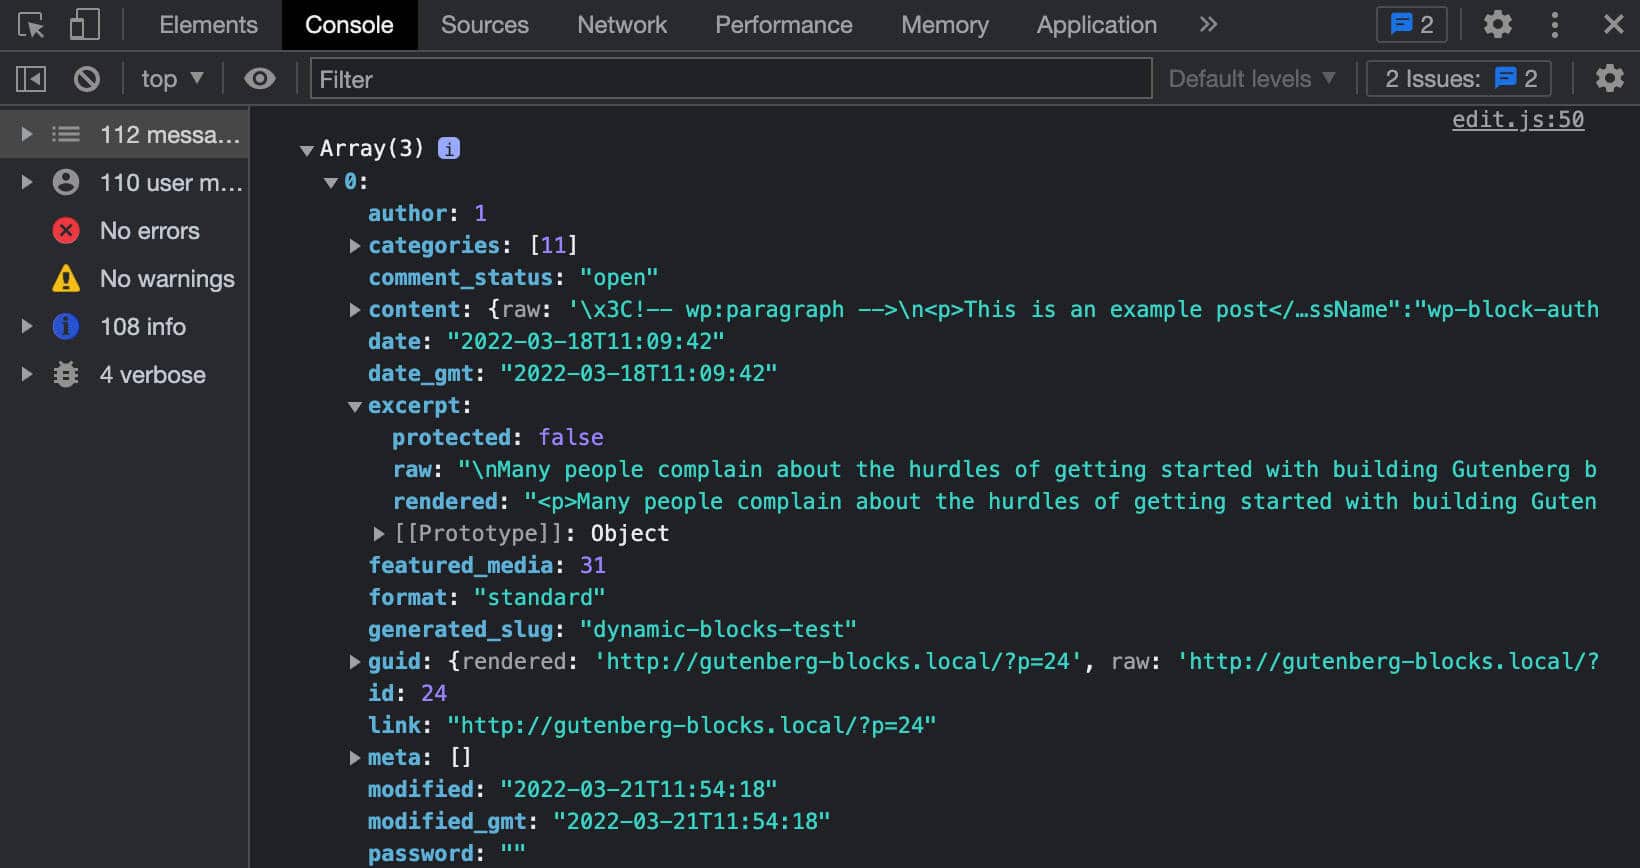
The image underneath displays all the report of the publish object properties.
The code above is just a basic example of usage of getEntityRecords. Now it’s time to place our knowledge into apply.
Say you want to forestall your block from rendering HTML tags that the individual will have added to the publish identify. WordPress provides a RawHTML part for that.
First, you’ll import the section from the @wordpress/component bundle:
import { RawHTML } from '@wordpress/part';Next, you’ll wrap the publish identify within a RawHTML part:
{ posts && posts.map((publish) => {
return (
-
{ submit.name.rendered ? (
{ submit.name.rendered }
) : (
__( 'Default name', 'author-plugin' )
)}
)
})}
And that’s it. Now add an HTML tag to your publish identify and save the publish. Then test your code with and without RawHTML and see how your block’s content material subject material changes on the show.
Add the Date
WordPress provides moderately a couple of JavaScript functions to keep watch over and structure dates. To use those functions you’ll first wish to import them from the @wordpress/date bundle in your edit.js report:
import { dateI18n, structure, __experimentalGetSettings } from '@wordpress/date';dateI18n: Format a date, translating it into internet website online’s locale.structure: Format a date.__experimentalGetSettings: Display the date throughout the structure set in WordPress standard settings.
Those functions aren’t documented, on the other hand you’ll to seek out useful examples throughout the provide code of various blocks. See for instance the latest-posts and post-date edit.js data.
Now add the displayDate function:
const { numberOfItems, displayDate } = attributes;Then add the following code throughout the
{
	displayDate && (

			{ dateI18n(
				__experimentalGetSettings().formats.date,
				publish.date_gmt
			)}

	)
}
What happens appropriate right here?
- If
displayDateistrue, then display the date using atimecomponent. - The
dateTimefunction provides the time and/or date of the part in one of the crucial allowed codecs. dateI18nretrieves the date in localized structure. This function works one way or the other similar to the PHPPHPdate_i18nWordPress serve as.
Add the Excerpt
Now it is going to need to be easy to be able to upload the publish excerpt. First, take a look at the excerpt property throughout the browser’s inspector. You’ll see that the actual content material subject material is stored in excerpt.rendered.
Next, add the displayExcerpt function to the attributes object:
const { numberOfItems, displayDate, displayExcerpt } = attributes;Then add the following code previous to the
closing tag throughout the Edit function:
{
	displayExcerpt &&
	publish.excerpt.rendered && (


				{ publish.excerpt.rendered }


	)
}
For individuals who aren’t familiar with JavaScript, appropriate right here and above we used the Temporary Circuit Research, through which, if all conditions are true, then the price of the rest operand is returned (be told further in Inline If with Logical && Operator and Logical AND (&&)).
In the end, you’ll have the ability to test your code yet again. Industry the function value throughout the block.json report and see what happens throughout the editor.
Add the Featured Image
Now you wish to have to be able to upload the code that renders the featured photos. Get began together with the displayThumbnail function to attributes:
const {
	numberOfItems,
	displayDate,
	displayExcerpt,
	displayThumbnail
} = attributes;
Now you wish to have to resolve where the featured image is stored. As we mentioned above, to get the featured image you wish to have to be able to upload a brand spanking new _embed argument to your query. Once more to your code, trade the query arguments as follows:
const posts = useSelect(
	( select ) => {
		return select( 'core' ).getEntityRecords( 'postType', 'publish', {
			'per_page': numberOfItems,
			'_embed': true
		});
	},
	[ numberOfItems ]
);
Proper right here we simply added '_embed': true to the array of arguments. This gives a publish object containing the _embedded property, which gives the image details you wish to have to dispay the featured photos.
Now you’ll have to know where to to find the picture main points.
You merely wish to add the code that renders the image on the show:
{
	displayThumbnail &&
	publish._embedded &&
	publish._embedded['wp:featuredmedia'] &&
	publish._embedded['wp:featuredmedia'][0] &&

}
}Save the report, switch to the block editor, and take a look at if the image presentations correctly when the displayThumbnail function is able to true.

Add Sidebar Controls
Previously we’ve were given been using the function default values set throughout the block.json. Then again from our earlier article everyone knows that we will be able to define fit handlers to provide shoppers the ability to assign custom designed values to each and every function.
To take a look at this, you’ll add a set of controls to the block settings sidebar. In edit.js, import the following parts from the corresponding packages:
import {
	useBlockProps,
	InspectorControls
} from '@wordpress/block-editor';

import {
	PanelBody,
	PanelRow,
	QueryControls,
	ToggleControl,
	RangeControl
} from '@wordpress/parts';InspectorControls: Incorporates sidebar settings that have an effect on the entire block (see on GitHub)PanelBody: Supplies a collapsible container to the Settings Sidebar (see on GitHub)PanelRow: Produces a generic container for sidebar controls (see on GitHub)QueryControls: Provides settings controls to build a query (see on GitHub)ToggleControl: Provides a toggle button for purchasers to allow/disable a decided on risk (see on GitHub)RangeControl: Is used to make possible choices from a variety of incremental values (see on GitHub)
Next, you wish to have to switch the Edit function to use the controls now available. First, alter the Edit function as follows:
export default function Edit( { attributes, setAttributes } ) {

	const {
		numberOfItems,
		columns,
		displayExcerpt,
		displayDate,
		displayThumbnail
	} = attributes;

	const posts = useSelect(
		( select ) => {
			return select( 'core' ).getEntityRecords( 'postType', 'publish', {
				'per_page': numberOfItems,
				'_embed': true
			});
		},
		[ numberOfItems ]
	);
	...
}
Phrase the setAttributes property passed to the Edit function.
Now you’ll have the ability to add the corresponding parts to your JSX code:
return (


							setAttributes( { numberOfItems: value } )
						}
						minItems={ 1 }
						maxItems={ 10 }
					/>


							setAttributes( { columns: value } )
						}
						min={ 1 }
						max={ 4 }
						required
					/>


							setAttributes( { displayThumbnail: ! displayThumbnail } )
						}
					/>


							setAttributes( { displayDate: ! displayDate } )
						}
					/>


							setAttributes( { displayExcerpt: ! displayExcerpt } )
						}
					/>


			...


);
Wow, that’s numerous code, isn’t it? Then again it’s pretty easy to grasp.
The part attributes which could be one of the crucial worthy of your attention listed here are onNumberOfItemsChange in QueryControls and onChange in RangeControl and ToggleControl. Those attributes set the match handlers needed to allow the individual to customize the appearance and/or habits of a block.
You’re going to moreover remember that we used and tags, which are the short syntax for mentioning React fragments.
Now, save your report, leap over into the editor, and refresh the internet web page:
Is the whole thing in there? Then let’s switch on and add the publish creator’s details.
Find the Submit Author
As we mentioned above, our block will show an inventory of articles written throughout the identical creator as the prevailing publish.
To get the publish creator’s ID, you’ll import the getCurrentPostAttribute selector from the core/editor datastore:
wp.data.select( 'core/editor' ).getCurrentPostAttribute( 'creator' )getCurrentPostAttribute returns an function value for the saved publish.
Every time you get the creator ID, you’ll have the ability to trade the query as confirmed underneath:
const posts = useSelect(
	( select ) => {

		const _authorId = select( 'core/editor' ).getCurrentPostAttribute( 'creator' );

		return select( 'core' ).getEntityRecords( 'postType', 'publish', {
			'creator': _authorId,
			'per_page': numberOfItems,
			'_embed': true
		});
	},
	[ numberOfItems ]
);
With this code, you’ll get an inventory of n articles throughout the identical creator as the prevailing publish.
Now that you simply’ve were given the creator ID, you’ll have the ability to moreover use it to fetch additional data from the database.
Display Author Details
Since we don’t have any documentation available, we used the code from the core Put up Writer block as a reference.
To turn creator details, you first wish to import a brand spanking new dependency:
import { forEach } from 'lodash';Then, throughout the Edit function, substitute the attributes object as follows:
const {
	numberOfItems,
	columns,
	displayExcerpt,
	displayDate,
	displayThumbnail,
	displayAuthorInfo,
	showAvatar,
	avatarSize,
	showBio
} = attributes;
Once completed, you’ll edit the code seen throughout the previous section to retrieve creator details:
const { authorDetails, posts } = useSelect(
	( select ) => {

		const _authorId = select( 'core/editor' ).getCurrentPostAttribute( 'creator' );

		const authorDetails = _authorId ? select( 'core' ).getUser( _authorId ) : null;

		const posts = select( 'core' ).getEntityRecords( 'postType', 'publish', {
			'creator': _authorId,
			'per_page': numberOfItems,
			'_embed': true
		});

		return {
			authorDetails: authorDetails,
			posts: posts
		};
	},
	[ numberOfItems ]
);
Phrase that we used the getUser selector to get the creator details.
Next, it’s conceivable you’ll wish to get the creator’s avatar. The code underneath builds an array of items storing avatar URLs and sizes:
const avatarSizes = [];
if ( authorDetails ) {
	forEach( authorDetails.avatar_urls, ( url, measurement ) => {
		avatarSizes.push( {
			value: measurement,
			label: `${ measurement } x ${ measurement }`,
		} );
	} );
}
You then unquestionably’ll add the sidebar panels and controls to allow shoppers to customize the creator’s house throughout the block:
return (
setAttributes( { displayAuthorInfo: ! displayAuthorInfo } )
}
/>
{ displayAuthorInfo && (
setAttributes( { showAvatar: ! showAvatar } )
}
/>
{ showAvatar && (
{
setAttributes( {
avatarSize: Amount( measurement ),
} );
} }
/>
) }
setAttributes( { showBio: ! showBio } )
}
/>
) }
...
...
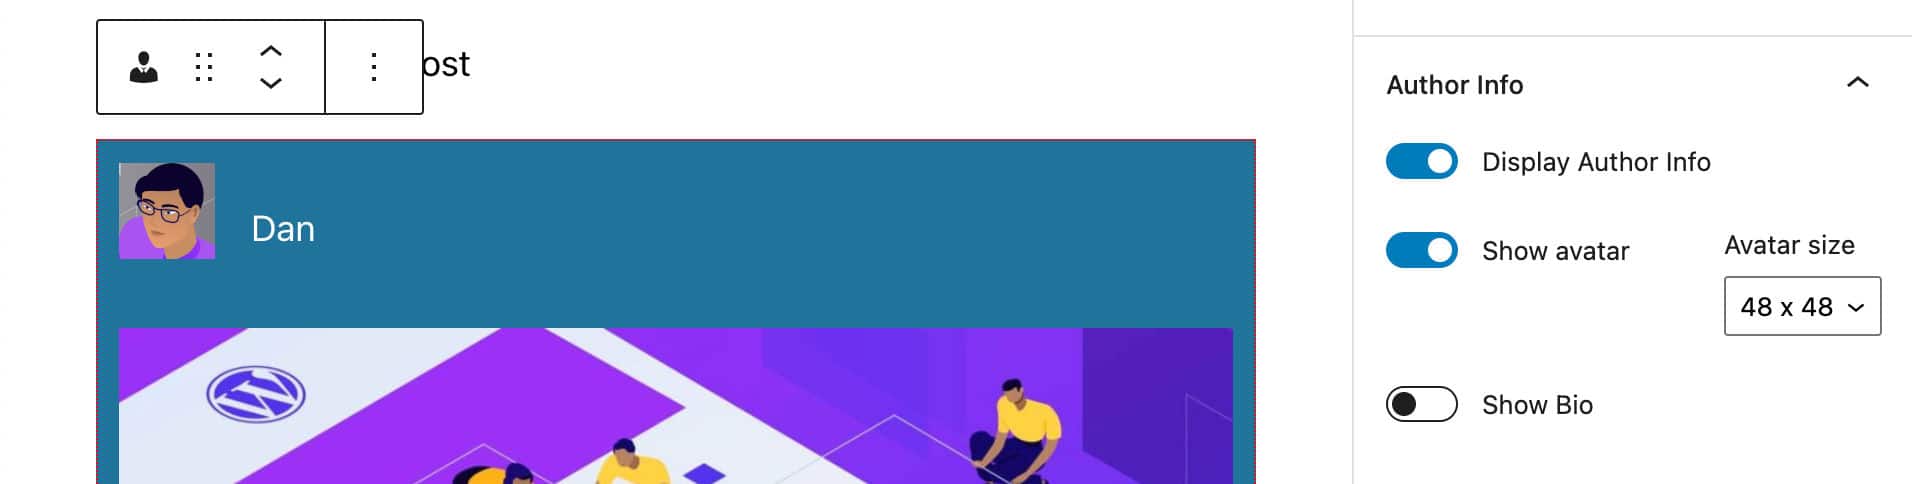
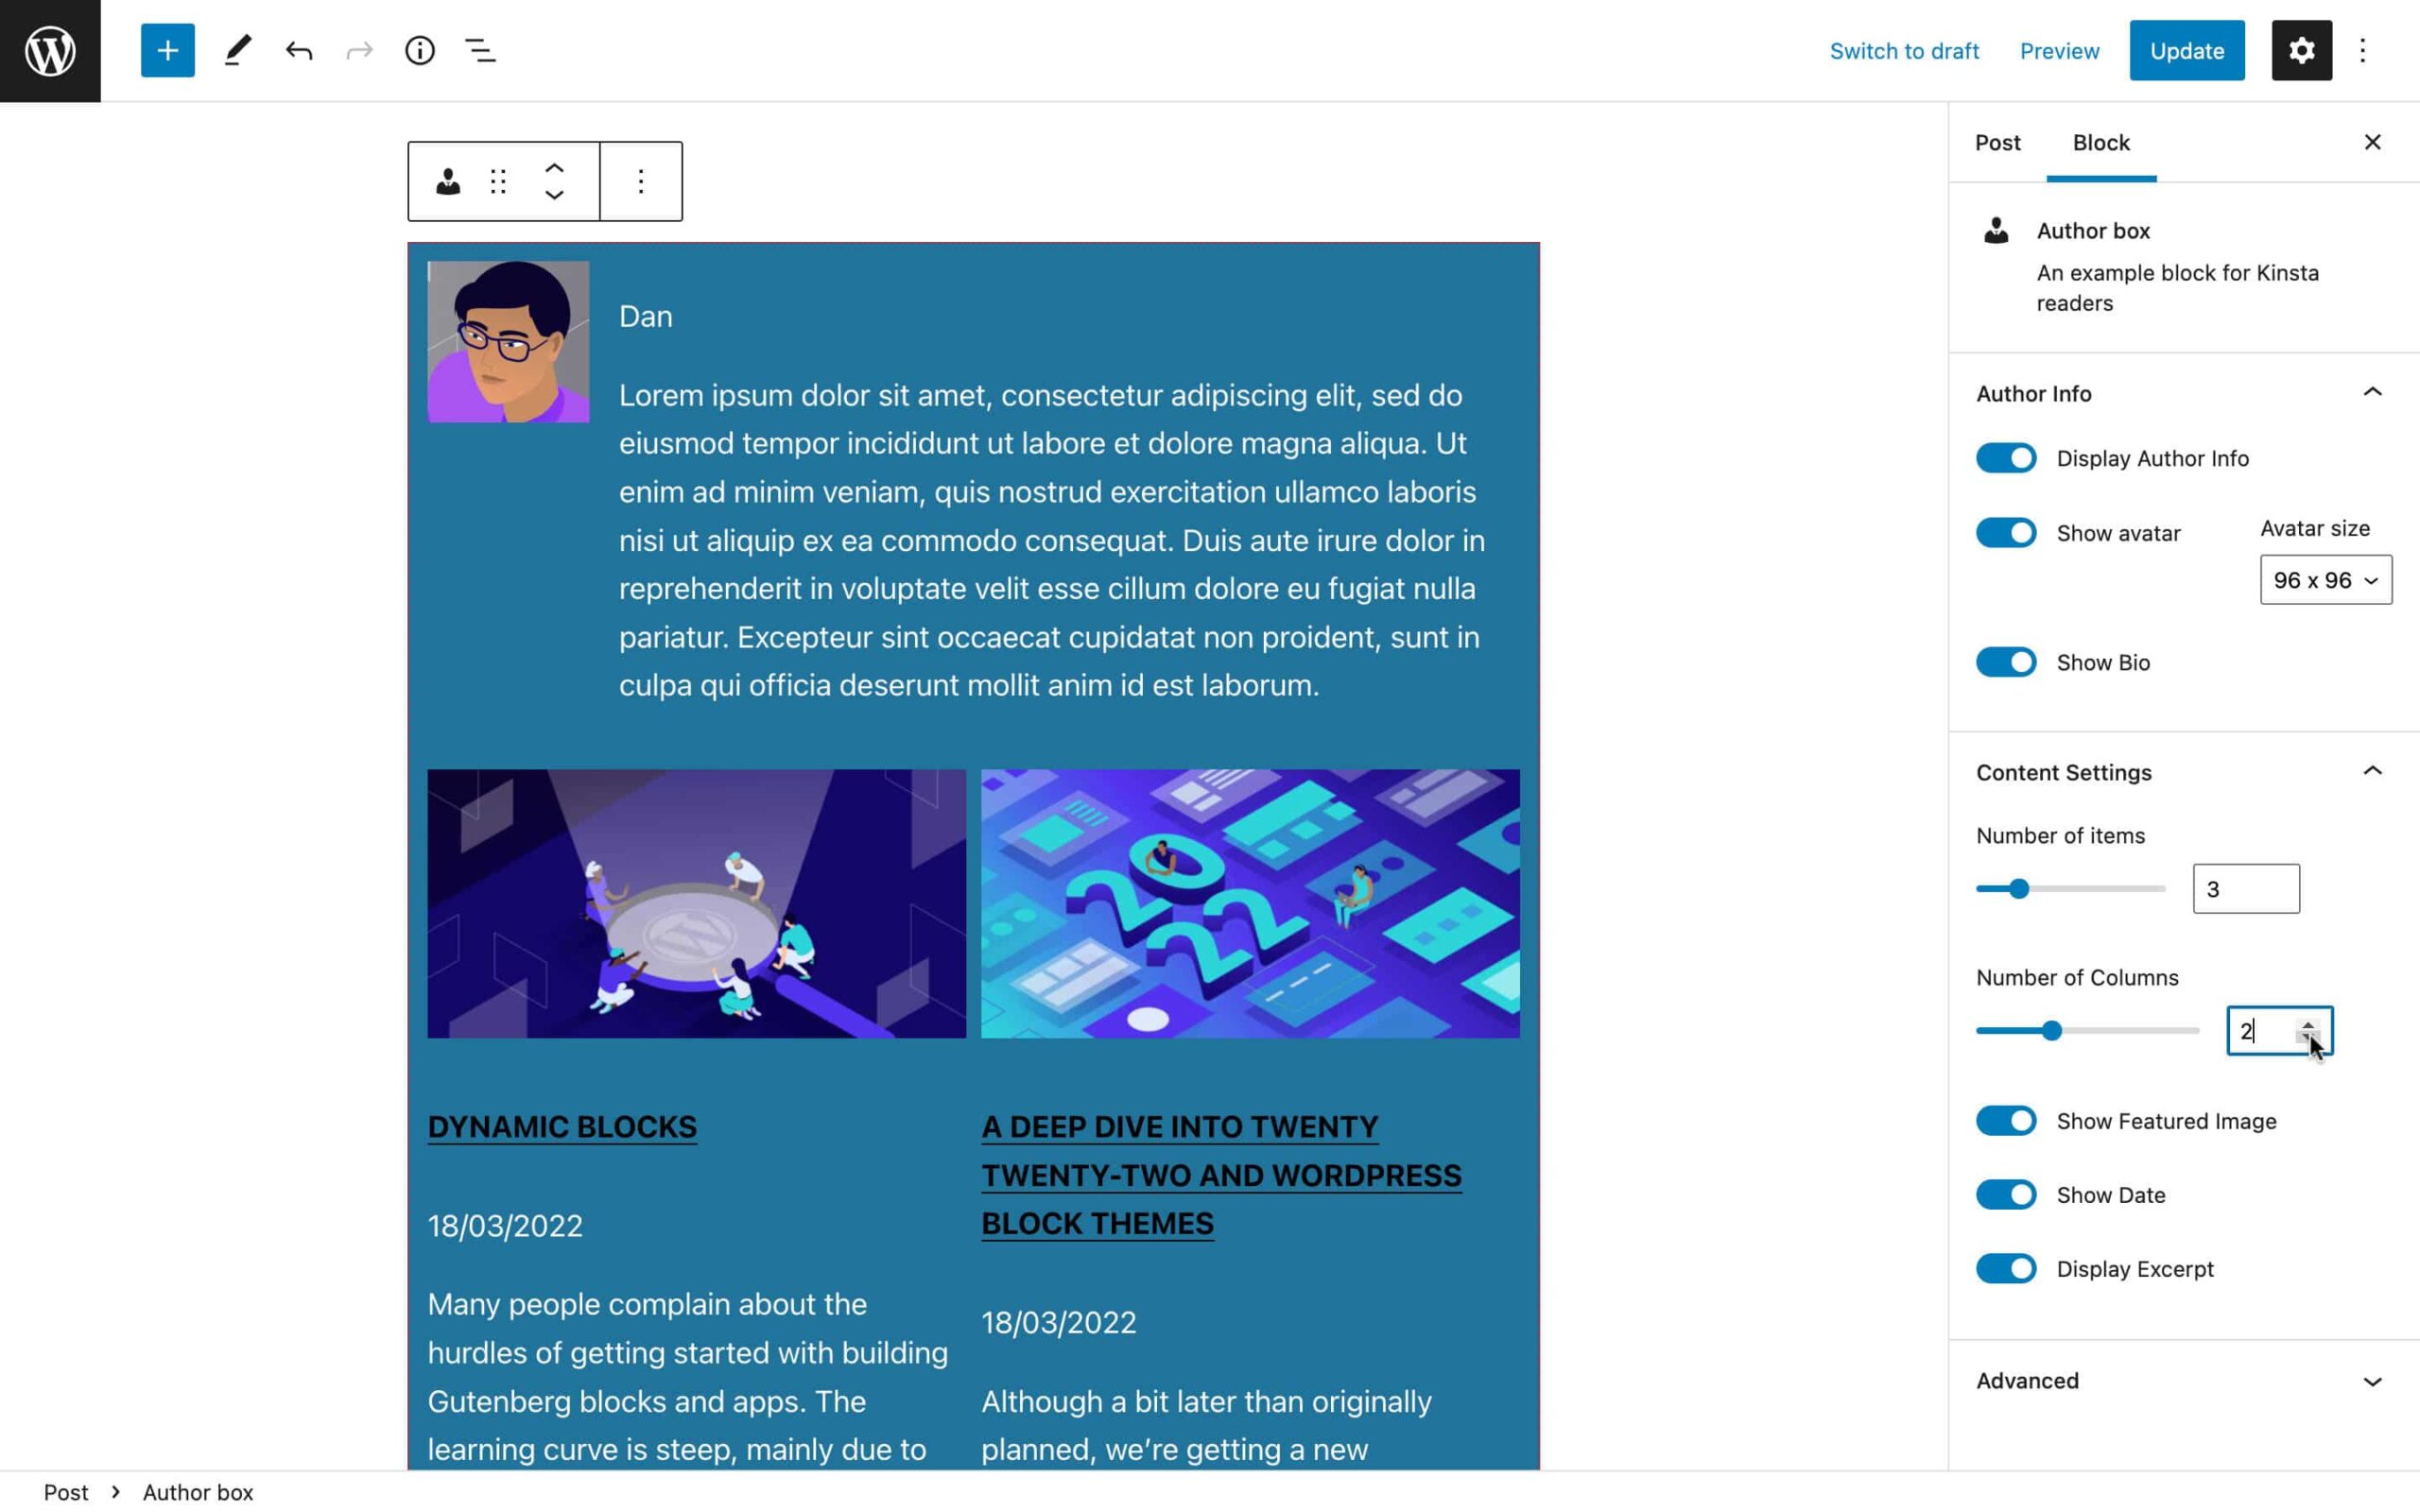
);The image underneath displays the up-to-the-minute settings sidebar:
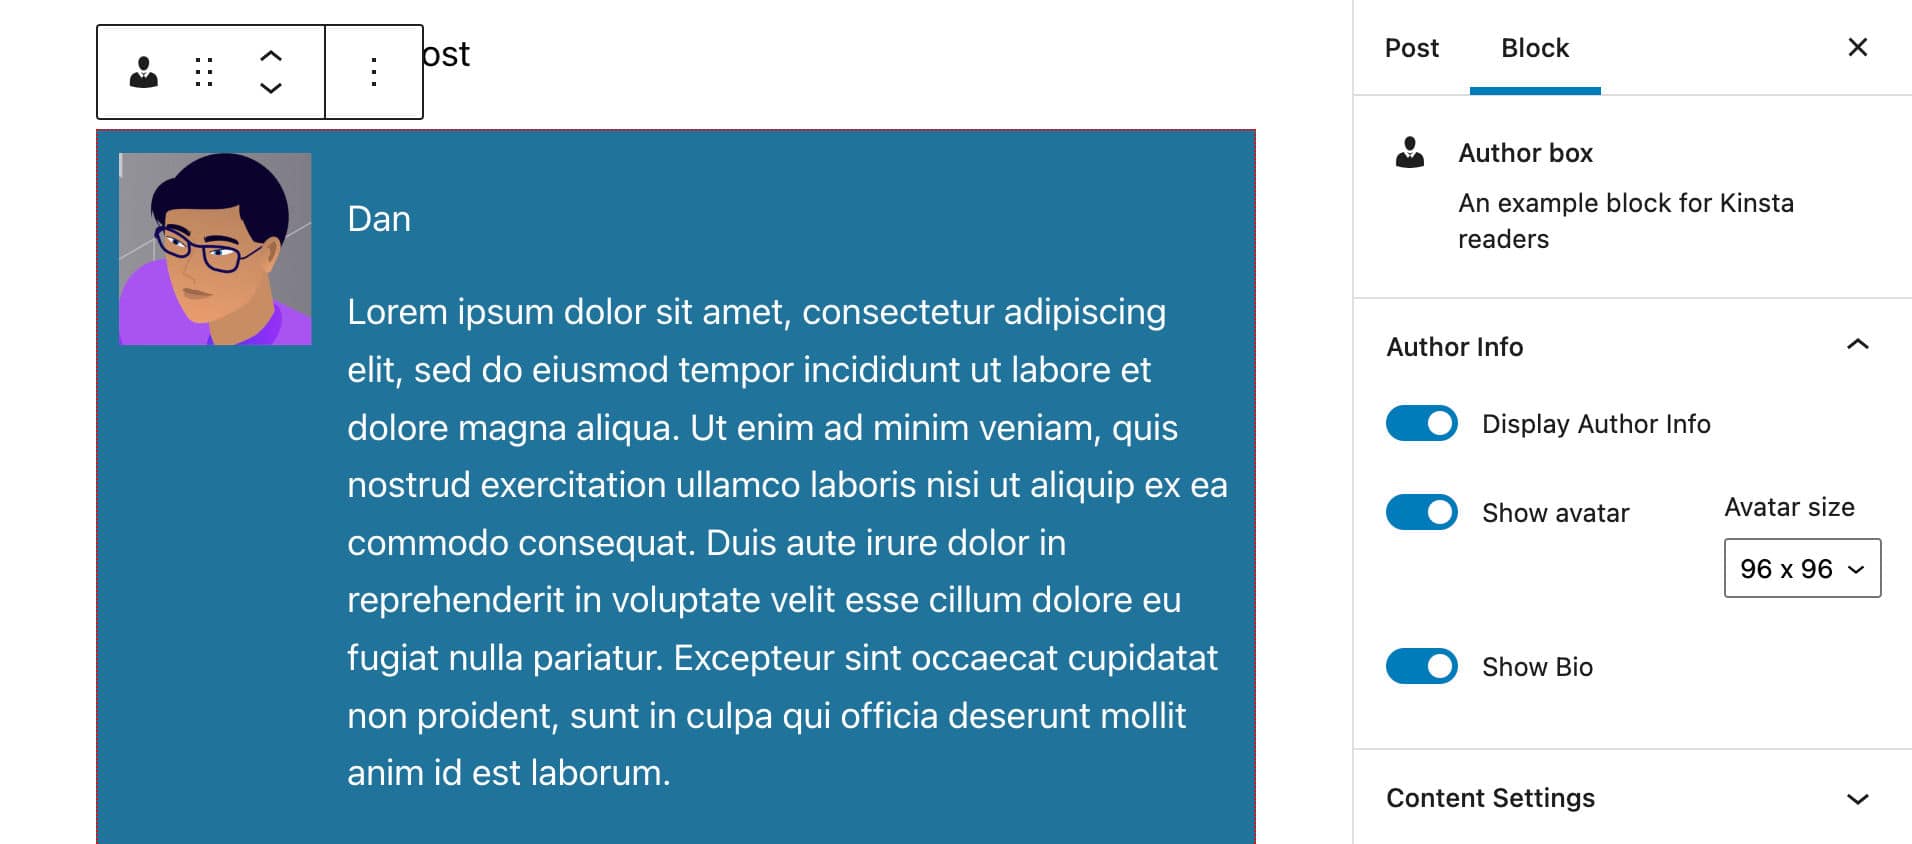
In the end, you’ll have the ability to add the creator’s section to your block:
return (
...
{ displayAuthorInfo && authorDetails && (
{ showAvatar && (
) }
{ authorDetails.establish }
{ showBio &&
// https://developer.mozilla.org/en-US/scientific medical doctors/Web/JavaScript/Reference/Operators/Optional_chaining
authorDetails?.description &&
authorDetails.description.duration > 0 && (
{ authorDetails.description }
) }
)}
...
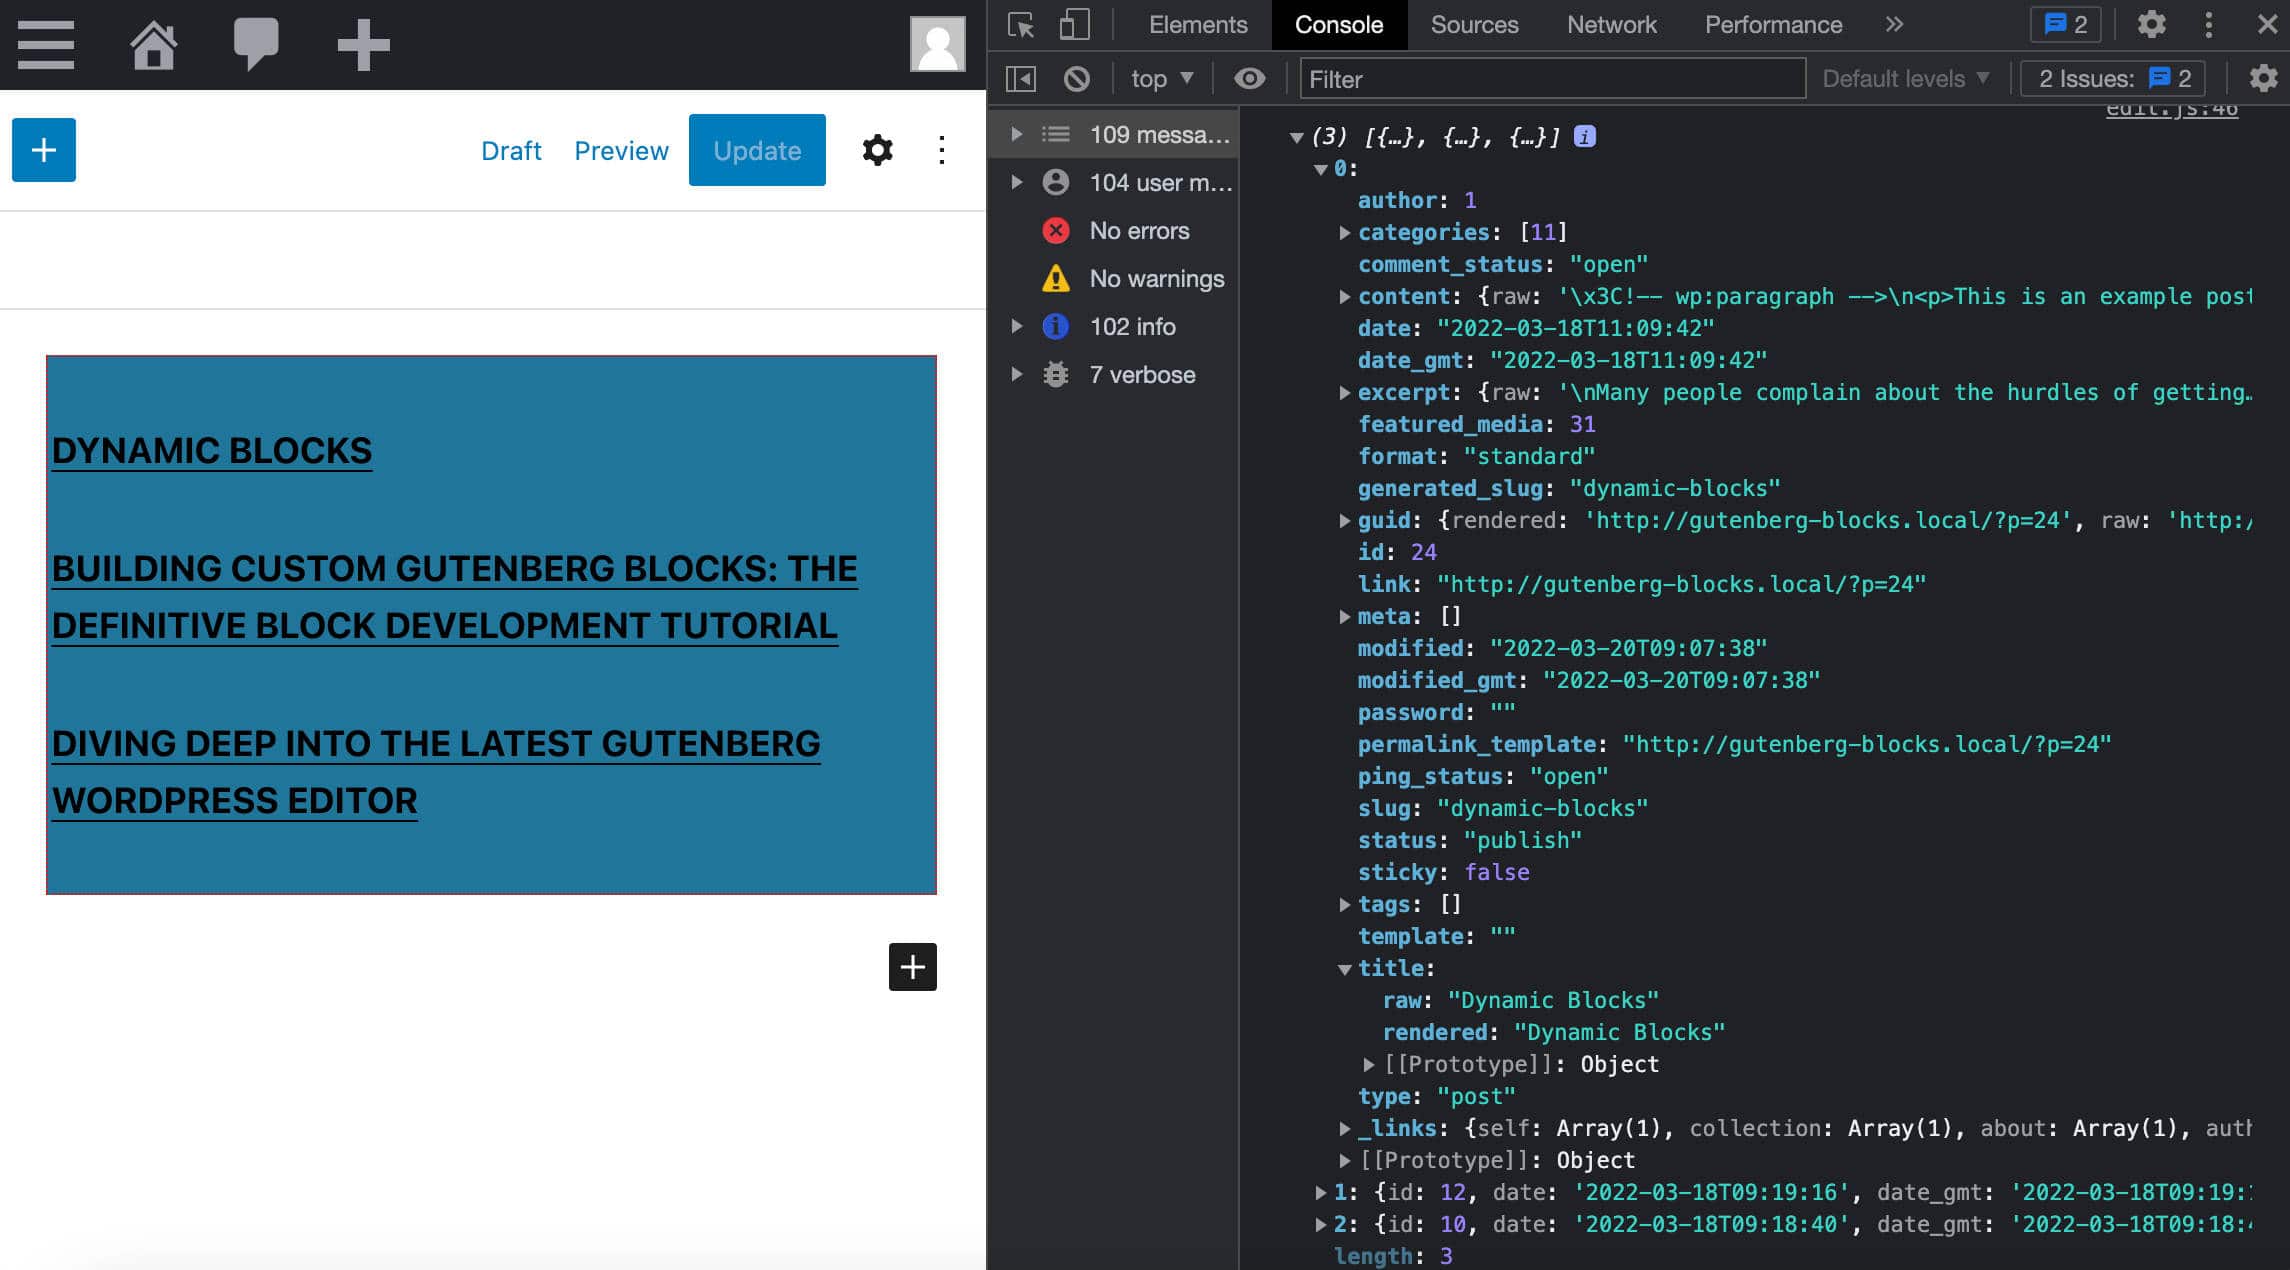
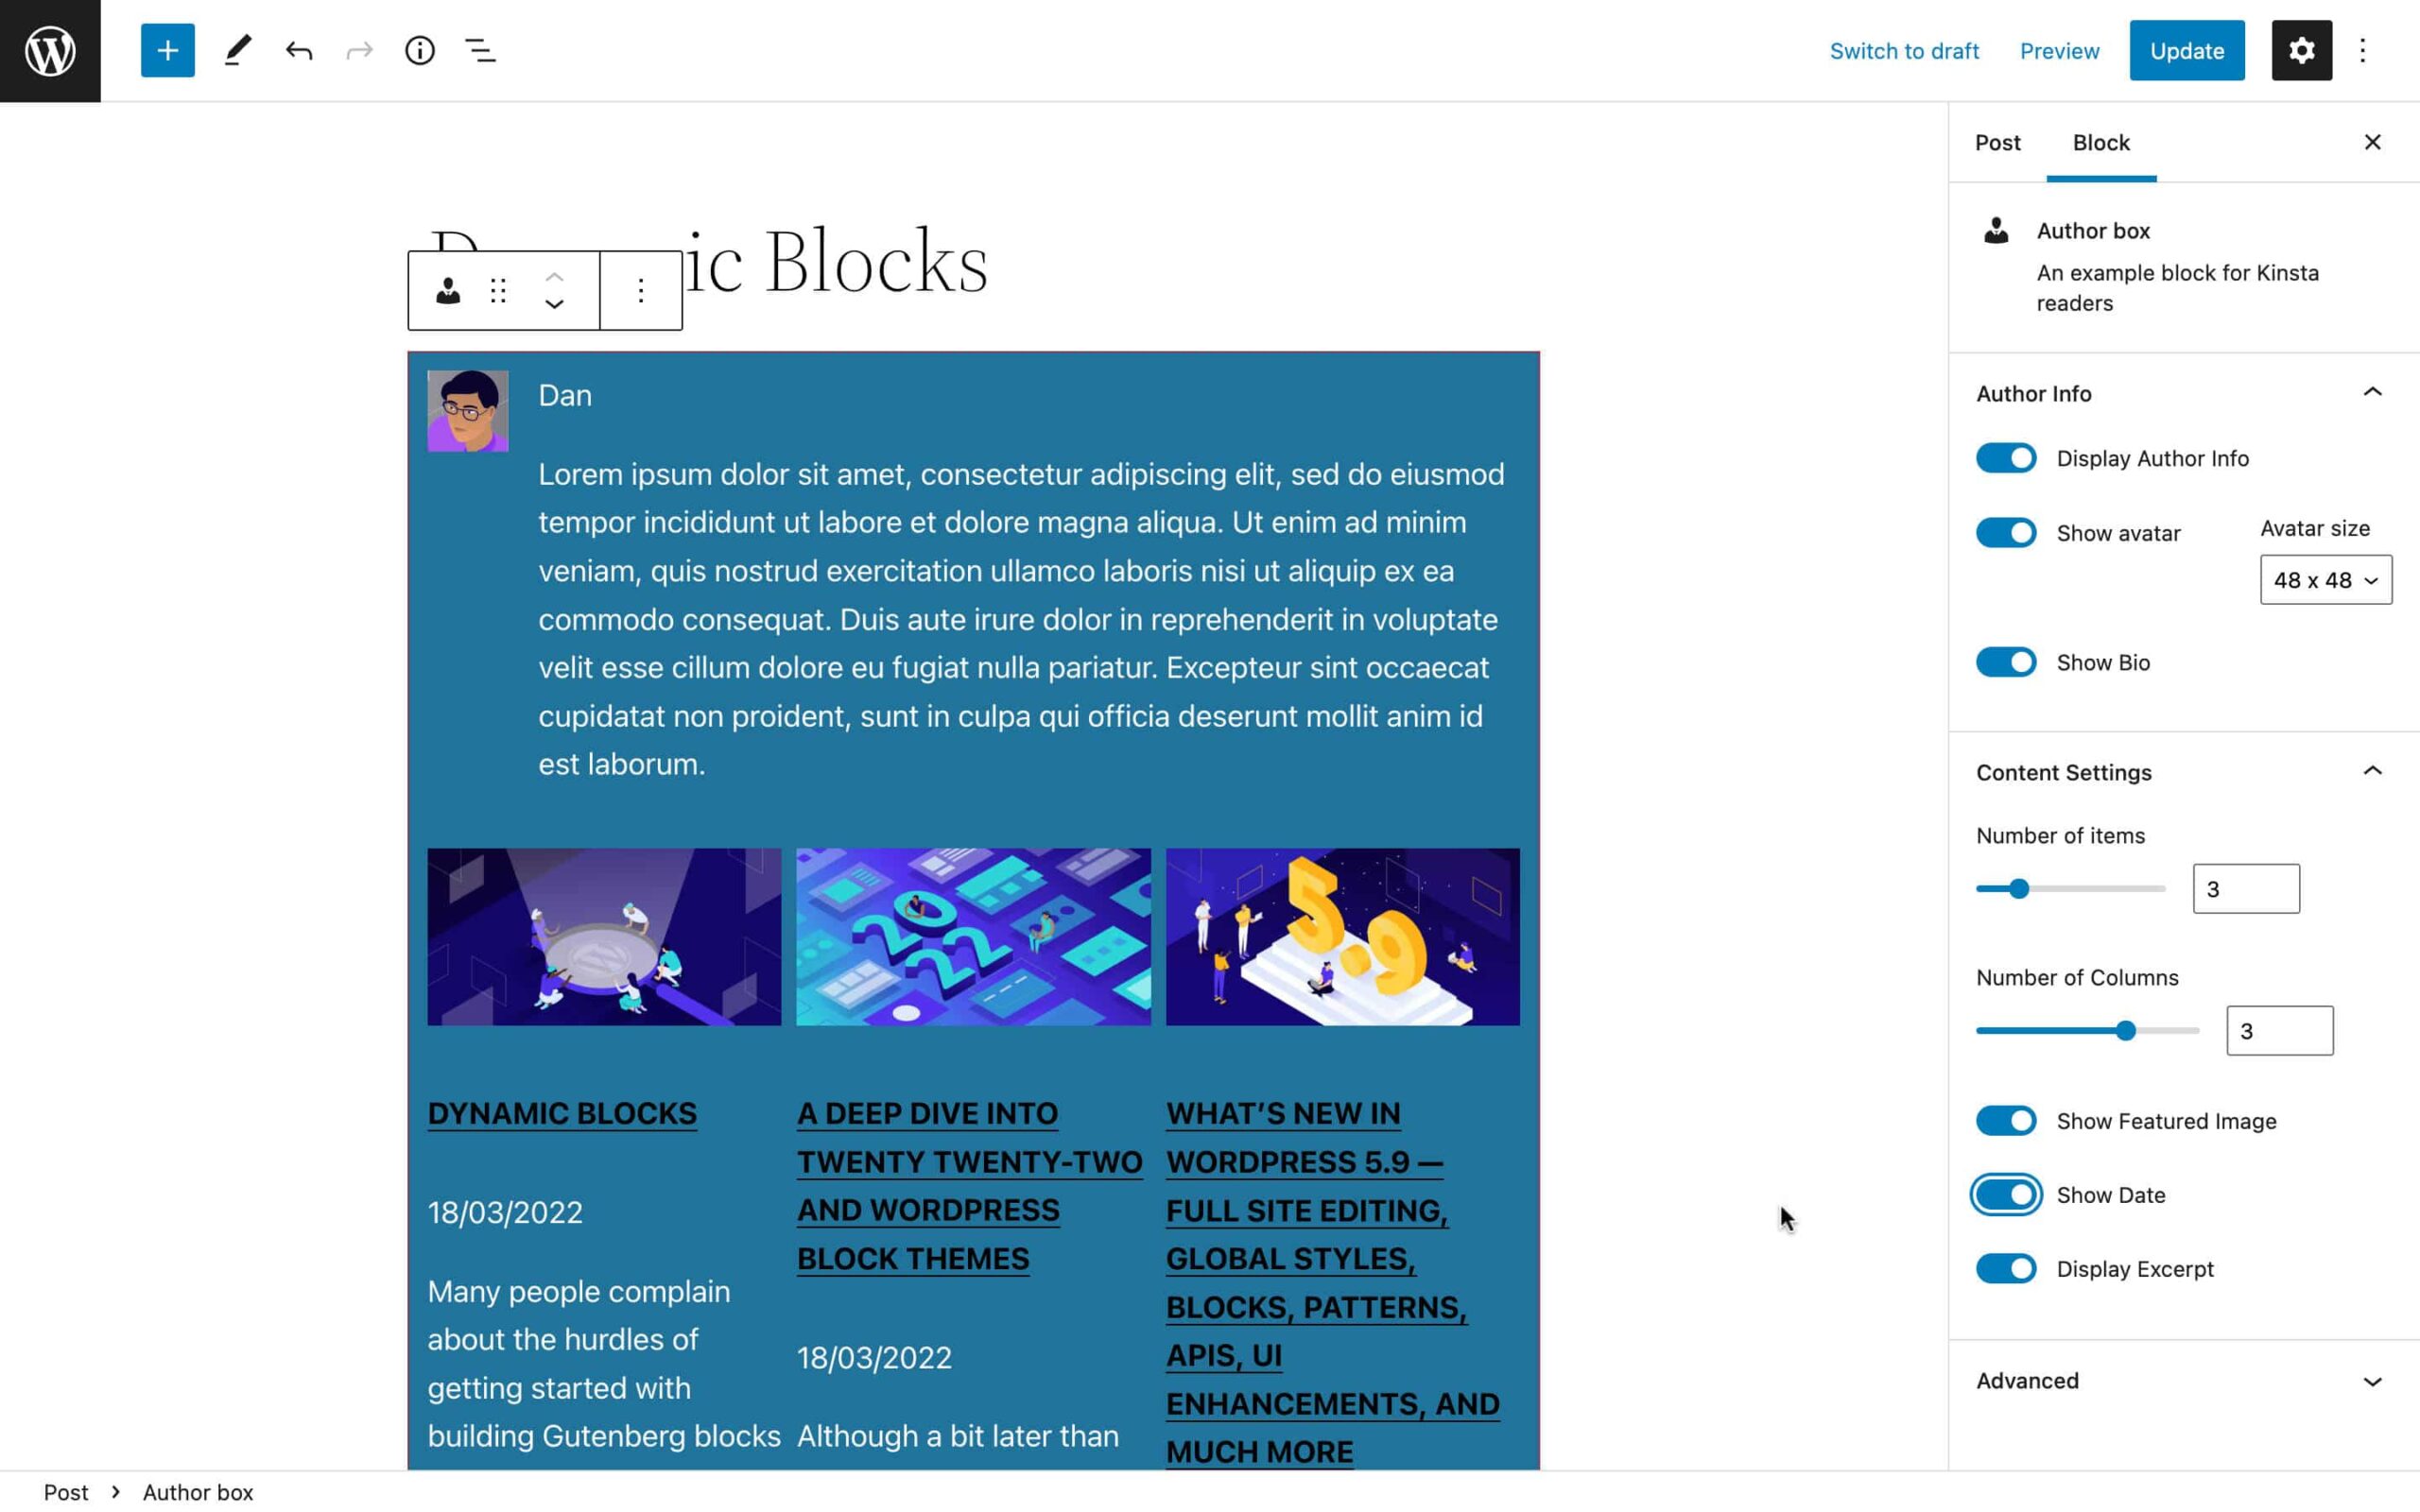
);The following image displays how it renders on the show.
Now save your edit.js report and run your tests. Your block must include different parts depending on block settings.
One very last thing continues to be missing: the choice of columns to turn articles.
Industry the Number of Columns
To give you the individual the ability to show article previews in columns, we defined the columns function throughout the block.json report. We moreover included a columns function throughout the script and created a settings keep an eye on to allow shoppers to change the choice of columns, even though this change has no have an effect on at the present time.
Throughout the JSX code above you’ll have noticed that we added CSS classes to various parts:
Classes assigned to parts throughout the Author section:
wp-block-author-box-author-plugin__authorwp-block-author-box-author-plugin__avatarwp-block-author-box-author-plugin__author-contentwp-block-author-box-author-plugin__namewp-block-author-box-author-plugin__description
Classes assigned to parts throughout the content material subject material section:
wp-block-author-box-author-plugin__post-itemswp-block-author-box-author-plugin__post-thumbnailwp-block-author-box-author-plugin__post-titlewp-block-author-box-author-plugin__post-datewp-block-author-box-author-plugin__post-excerpt
One magnificence continues to be missing. The establish of this magnificence can be generated dynamically to replicate the choice of columns set via the individual.
Go back to the Edit.js report and alter the ul part as follows:
...
We added a brand spanking new columns-${ columns } magnificence in keeping with the Template literals syntax to insert an expression inside a string. This manner, the function hooked as much as the ul part is decided by way of individual settings (e.g. columns-1, columns-2, and lots of others.).
Now open the style.scss report and alter the prevailing code with the following:
.wp-block-author-box-author-plugin {
	background-color: #21759b;
	coloration: #fff;
	padding: .6em;
	ul.wp-block-author-box-author-plugin__post-items {
		padding: 0;
		list-style-type: none;
		display: grid;
		hollow: .5em;
		@for $i from 2 via 4 {
			&.columns-#{ $i } {
				grid-template-columns: repeat(#{ $i }, 1fr);
			}
		}
		li {
			list-style: none;
			img.wp-block-author-box-author-plugin__post-thumbnail {
				best: auto;
				max-width: 100%;
			}
		}

	}
}
.wp-block-author-box-author-plugin__author {
	display: flex;
    flex-wrap: wrap;
}

.wp-block-author-box-author-plugin__avatar {
	margin-right: 1em;
}

.wp-block-author-box-author-plugin__author-content {
	flex-basis: 0;
    flex-grow: 1;
}
We gained’t pass deep in that code, being previous the scope of this article. Then again if you wish to dive deeper, you will have to talk over with the following assets:
And that’s it for the rendering of the block throughout the editor.
Development the Block to Render on the Internet web page
Now that the code that renders the block throughout the editor is complete, we will be able to switch on and assemble the block for rendering on the front end.
As we mentioned earlier, in relation to dynamic blocks, the plugin report is responsible to generate the HTML to be rendered on the front end.
So, open the principle report of your plugin (author-plugin.php in our example).
The first thing to do is to make the block attributes available to the WordPress PHP function. To your PHP report, trade the function definition as follows:
function author_box_author_plugin_render_author_content( $attr ) {
	...
}
Now you’ll have the ability to use the WordPress functions to retrieve and manipulate data. For instance, you’ll have the ability to use get_posts to retrieve the newest blog posts (be told further in our in-depth article masking the get_posts serve as):
function author_box_author_plugin_render_author_content( $attr ) {
$args = array(
'numberposts' => $attr['numberOfItems'],
);
$my_posts = get_posts( $args );
if( ! empty( $my_posts ) ){
$output = '';
foreach ( $my_posts as $p ){
$output .= '- ID ) ) . '">'
. $p->post_title . '
';
}
$output .= '
';
}
return $output ?? 'Sorry. No posts matching your requirements!';
}The function above retrieves the newest numberOfItems blog posts from your WordPress database (via default post_type is able to publish) and returns an array of $publish goods. Than it iterates over the array to build the report items.
For individuals who take a look at the HTML output, you’ll follow that it’s a simple report of posts, like the one confirmed throughout the following image:

In our previous article we mentioned that you just’ll use the useBlockProps React hook to mark the block’s wrapper component in your JSX code. You’ll wish to do the very similar to your PHP function.
WordPress provides the get_block_wrapper_attributes serve as for that.
So, trade your PHP code as follows:
function author_box_author_plugin_render_author_content( $attr ) {
$args = array(
'numberposts' => $attr['numberOfItems']
);
$my_posts = get_posts( $args );
if( ! empty( $my_posts ) ){
$output = '';
$output .= '';
foreach ( $my_posts as $p ){
$identify = $p->post_title ? $p->post_title : 'Default identify';
$url = esc_url( get_permalink( $p->ID ) );
$output .= '- ';
$output .= '' . $name . '';
$output .= '
';
}
$output .= '
';
$output .= '';
}
return $output ?? 'Sorry. No posts matching your requirements!';
}Now a wp-block-author-box-author-plugin elegance has been assigned to the container part and the block has a definite background coloration.
Then the get_posts function gets WP_Posts data and the foreach cycle builds the report items (see moreover The best way to Show get_posts Returned Information).

Add Featured Image, Date, and Excerpt
Next, you’ll wish to add publish thumbnails, dates and excerpts. Within the identical report, trade your PHP code as following:
function author_box_author_plugin_render_author_content( $attr ) {
$args = array(
'numberposts' => $attr['numberOfItems']
);
$my_posts = get_posts( $args );
if( ! empty( $my_posts ) ){
$output = '';
$output .= '';
$output .= '';
}
return $output ?? 'Sorry. No posts matching your requirements!';
}The foreach loop iterates over the $my_posts array. At each and every iteration, various conditions take a look at function values and assemble the output accordingly.
Now take a look at the output on the show:

Now you’ll have the ability to run your tests. Industry date, excerpt, and thumbnail settings and take a look at how the block content material subject material changes on the front-end.
Display Posts in Columns
In our JavaScript code, we used a columns-${ columns } magnificence to turn publish previews in columns. Now we wish to do the identical in PHP.
To take a look at this, you simply have to be able to upload the ones two lines of code:
$num_cols = $attr['columns'] > 1 ? strval( $attr['columns'] ) : '1';
$output .= 'This may increasingly every now and then append a columns-n magnificence to the ul part containing the publish previews. Now the choice of columns displayed on the internet web page must are compatible the choice of columns set throughout the block settings.
Assemble the Author Box
Ultimate, you wish to have to build the sector containing the creator’s details, in conjunction with avatar, establish, and description.
Within the callback function, you’ll wish to add a set of conditions to check the prevailing value of each and every function:
if( $attr['displayAuthorInfo'] ){
$output .= '';
}The code is quite simple. It checks the prevailing value of each and every function, and if it is true, then it generates the vital HTML.
Now save your PHP report and read about the block throughout the editor vs the identical block on the front end.
You’ll to seek out all the code of the example block in this public Gist.
 and this information covers all you want to grasp to create dynamic blocks to your subsequent mission
In point of fact useful Property for Dynamic Block Development
For individuals who perked up your ears while finding out this article and started recognizing the professional development possible choices coming with finding out discover ways to create Gutenberg blocks, well, our advice is to continue exploring and acquiring new skills throughout the technologies behind block development.
Even if unswerving original documentation continues to be missing, nonetheless there are very good assets out there, each and every loose and paid, we consulted while writing this article. Various the numerous assets available, we recommend the following:
Authentic Property
- Information
- Core Information
- Developing dynamic blocks
- Intro to Gutenberg Block Construction
- WordPress Social Studying on MeetUp
In point of fact useful Tutorials from WordPress Core People
- Asking for information in Gutenberg with getEntityRecords via Ryan Welcher (@ryanwelcher)
- A Sensible Evaluation of the @wordpress/information API via Darren Ethier (@nerrad)
JavaScript, React, and Redux Property
- JavaScript Tutorials via MDN
- Getting Began with React (original)
- Redux Educational (original)
Equivalent Property from Kinsta
- What Is JavaScript? A Take a look at the Internet’s Maximum Fashionable Scripting Language
- A Definitive Information to Dealing with Mistakes in JavaScript
- What Is Node.js and Why You Will have to Use It
- The best way to Set up Node.js and npm on Home windows, macOS, and Linux
- The best way to Debug Node.js Code The use of A couple of Gear
- Node.js vs PHP: A Head-to-Head Comparability
- 10 Maximum Fashionable Sorts of Node.js Apps in 2022
- Angular vs React: A Detailed Aspect-by-Aspect Comparability
Summary
We have now now reached the highest of this (second) long journey via Gutenberg block development.
In this article, we covered some sophisticated topics, similar to Instrument State and Redux stores. Then again expectantly, you’ll have to now have a better understanding of block development at the entire.
Positive, Node.js, Webpack, Babel, React, and Redux skills are a very powerful in relation to building sophisticated Gutenberg blocks, on the other hand you don’t wish to be a React ninja to get started. Finding out discover ways to building up Gutenberg blocks doesn’t necessarily will have to be tricky. Do just it with the correct motivation and thru following the right kind finding out path.
And we hope this article – and the former one – provide the exact map to go looking out your path and get started with Gutenberg development right away.
Up to you at the moment! Have you ever ever created dynamic blocks however? Do you will have any examples to percentage with us? And what were the most important hurdles in your revel in? Be happy to drop a statement underneath.
The publish The best way to Create Dynamic Blocks for Gutenberg gave the impression first on Kinsta®.
0 Comments