
Do you need to make a social media web page?
Creating a social media web page allows you to provide a platform for purchasers to proportion knowledge, updates, and opinions on quite a lot of topics. It should smartly assemble some way of crew among consumers with shared interests and boost engagement with discussions and forums.
In this article, we can show you the easiest way to easily make a social media web page in WordPress, step by step.

Forward of You Get began: Create a Social Media Web site Checklist
Forward of starting your social media web page, you’ll have to first in moderation plan the choices and concepts that you need your social platform to include.
First, you’ll have to make a selection the type of social media web page that you just’re going to be growing. For example, it’s imaginable you’ll make a media-sharing web page like Instagram or a professional trade website online like Glassdoor.
You will have to moreover create an informational dialogue board web page like Quora or a social neighborhood web page like Facebook.
Once you have come up with an idea, you’ll have to go through the following checklist to create a foolproof plan to your web page:
- Objective Audience: Determine your audience in response to age personnel, location, and behavior.
- Characteristics and Preferences: Learn about consumer traits for the world of passion you’ve got determined on and take a look at to look out choices that your target market will to seek out useful.
- Research Legal Aspects: Make sure that your platform complies with knowledge privacy, intellectual property, and other comparable rules. This may increasingly indicate chatting with a lawyer.
- Hire a Developer: Once you have achieved your research, you will have to merely hire a developer to build a social media web page for you. We advise going with Seahawk Media Services and products to get an Search engine optimization-ready web page in no time.
On the other hand, for individuals who don’t need to rent a developer, then you definately’ll moreover assemble a social media web page by yourself without any coding required.
Realize: This newsletter is waiting creating a social media web page. If you want to embed social media feeds from platforms like Facebook or Instagram for your provide web page, then you definately’ll use the Spoil Balloon plugin. For details, please see our tutorial on the best way to upload your social media feeds to WordPress.
Having said that, let’s take a look at the easiest way to easily make a social media web page, step by step:
- Step 1: Make a selection a Website online Builder
- Step 2: Make a selection a Area Identify and Internet hosting for Your Social Media Website online
- Step 3: Create a New WordPress Website online
- Step 4: Make a choice a Theme for Your Social Media Website online
- Step 5: Set Up Your Social Media Website online With BuddyPress
- Step 6: Use bbPress to Create a Discussion board (Non-compulsory)
- Step 7: Create a Navigation Menu and Homepage
- Step 8: Use WPForms to Upload a Touch Shape
- Step 9: Use All in One Search engine marketing to Beef up Web site Ratings
- Bonus Equipment to Beef up Your Social Media Web site
Step 1: Make a choice a Web site Builder
WordPress is the very best website online builder to make a social media platform on account of it’s super easy to use, scalable, and has powerful choices. Plus, it powers over 43% of the internet sites on the net.
It’s used by many firms, on-line shops, and social media internet pages for info and updates, making a gaggle, recreational, and promoting and advertising.
On the other hand, understand that there are two varieties of WordPress on the net.
WordPress.com is a blog web hosting platform, while WordPress.org is an open-source, self-hosted tool. For additonal detailed information, you’ll see our comparability between WordPress.com and WordPress.org.
To create a social media web page, we advise opting for WordPress.org on account of it’s totally free, can mix with numerous WordPress plugins, and will give you whole regulate over your web page.
For more information, chances are you’ll like to see our WordPress.org assessment.
Now that you just’ve decided on a web page builder, it’s time to begin out construction your web page.
Step 2: Make a choice a Space Establish and Web webhosting for Your Social Media Web site
To create a WordPress web page, you’re going to first wish to gain a web site name and a web hosting plan.
A area title might be your social media platform’s name on the net. It’s what customers will form of their browsers to visit your web page, like www.socialmediawebsite.com or www.sociallysavvy.com.
Similarly, web web hosting is where your web page lives online. To look out the easiest web web hosting to your social media web page, you’ll see our whole tick list of the very best WordPress webhosting products and services.
You’ll now needless to say even supposing WordPress is free, that’s the position your costs gets began together with up. A web site name will worth you about $14.99/12 months while web hosting costs get began from $7.99/month.
It is a bit expensive when you’ve got a small worth vary or are merely starting.
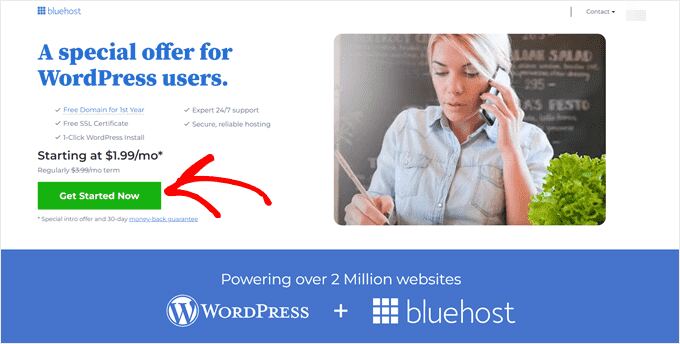
Thankfully, Bluehost is offering a HUGE discount to WPBeginner readers along side a free space name and an SSL certificates. They’re some of the largest companies on the earth and an first rate WordPress-recommended web hosting partner.
To get a discount, you’ll merely click on on on the following button:
This may increasingly every so often direct you to the Bluehost website online, where you must click on at the ‘Get Started Now’ button.
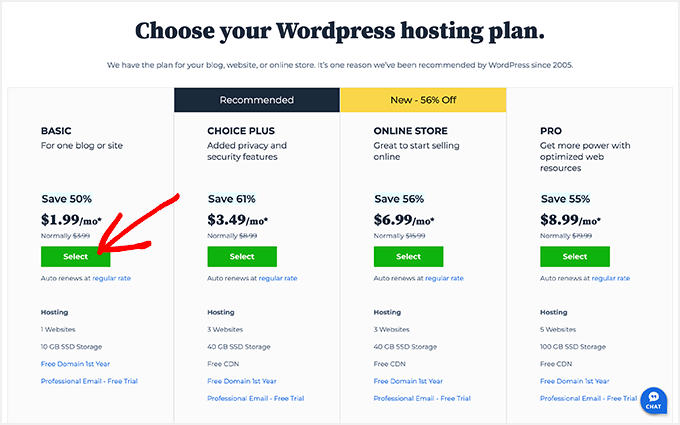
Whilst you do that, you’re going to be taken to the pricing internet web page, where you must select a web hosting plan in step with your social media web page’s prerequisites.
We advise opting for the Elementary or Variety Plus plan on account of they’re the most well liked web web hosting plans among our readers. Upon making a choice, merely click on at the ‘Select’ button under a plan.
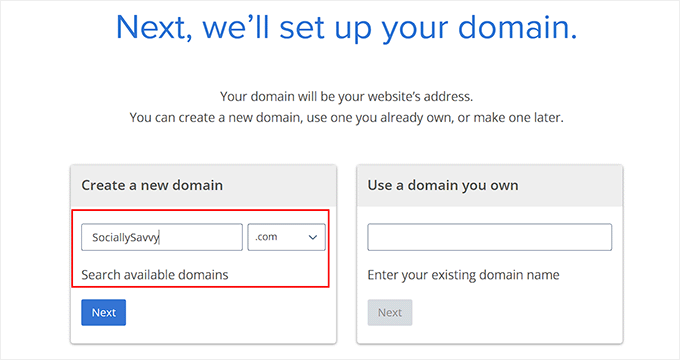
You’ll now be taken to a brand spanking new internet web page, where you must make a selection a web site name to your social media platform.
We advise settling on a name that is similar in your space of passion and is simple to spell, pronounce, and consider. For ideas, you’ll see our novice’s knowledge on how to select the most productive area title.
On the other hand, in the event you’re nevertheless perplexed and must no longer have a name to your social media platform however, then you definately’ll moreover take a look at WPBeginner’s Loose Trade Identify Generator to come up with a actually very best name.
After typing inside the name, merely click on on on the ‘Next’ button to continue.
This may increasingly every so often take you to the next step, where you must provide your account information, phone amount, trade electronic mail deal with, name, and country.
Whilst you do that, you’re going to moreover see no longer mandatory extras that you just’ll acquire.
We normally don’t recommend buying the ones extras straight away, as you’ll all the time add them later if your corporation needs them.

Next, kind for your charge information to shop for the web hosting plan.
Upon doing that, you’re going to acquire a confirmation piece of email with details to log in in your Bluehost dashboard. This might be your regulate panel where you’ll merely arrange your social media web page.
Now, it’s time to be able to arrange WordPress.
Step 3: Create a New WordPress Web site
For those who occur to signed up on Bluehost using our hyperlink above, then WordPress will mechanically be installed for your space name for you.
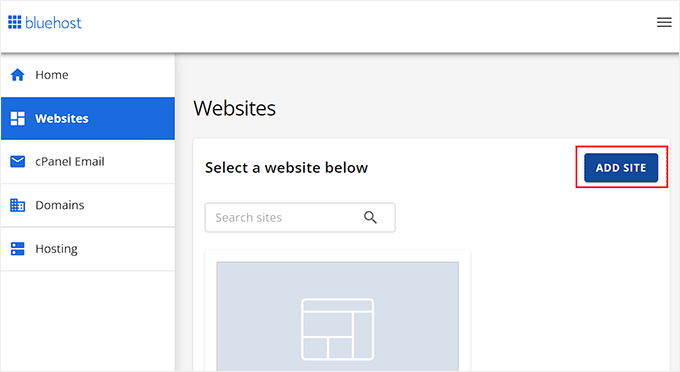
On the other hand, if you want to create a different WordPress web page to your social media platform, then you definately must switch to the ‘Web websites’ tab inside the Bluehost dashboard.
Once you could be there, click on at the ‘Add Internet web site’ button.
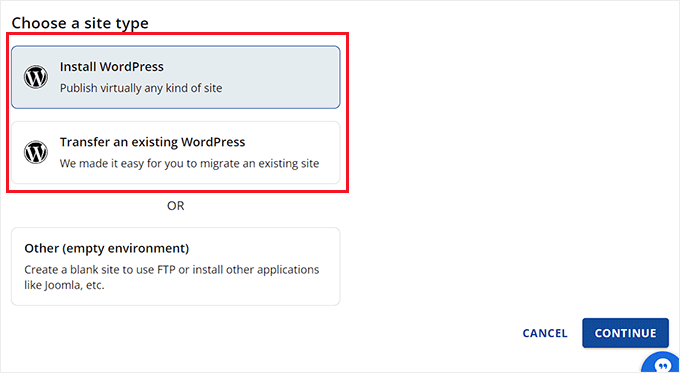
This may increasingly every so often take you to a brand spanking new show, where you’ve got to select a web page kind. To create a completely new WordPress web page, click on at the ‘Arrange WordPress’ selection.
However, to migrate an provide web page to some other space name, you’ll make a selection the ‘Transfer an provide WordPress’ selection. After that, click on at the ‘Continue’ button.
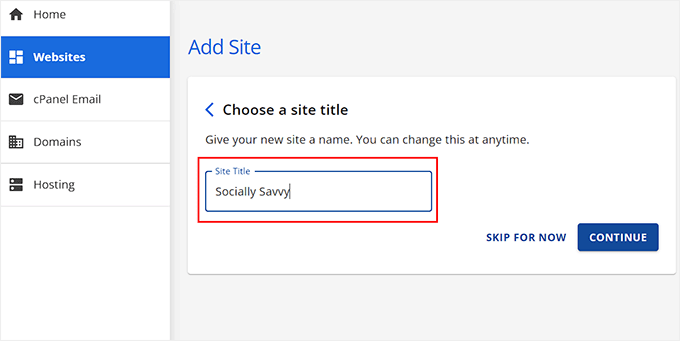
In the next step, you’ll add a name to your social media web page in step with your liking.
Then, click on on ‘Continue’ to move ahead.
Bluehost will now ask you to connect to a web site name to your social media platform.
On the other hand, for individuals who haven’t purchased one however, then you definately’ll opt for the ‘Use a temporary space’ selection inside the length in-between.
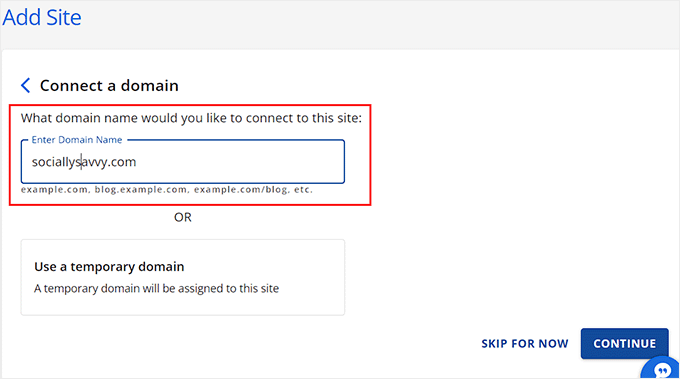
After that, click on at the ‘Continue’ button. Bluehost will now arrange and prepare your WordPress web page for you, which is in a position to take a few minutes.
Once that’s finished, you’re going to be redirected to the ‘Web websites’ tab, where you’re going to to seek out your newly created WordPress web page.
Proper right here, simply click on at the ‘Edit Internet web site’ button to log in in your WordPress admin area.

You’ll be capable to moreover log in in your WordPress dashboard by means of visiting yoursite.com/wp-admin/ inside the web browser. Merely you should definitely exchange yoursite.com with your own space name.
Realize: When you have decided on a different web web hosting to your social media web page, like WP Engine, HostGator, SiteGround, or Hostinger, then you definately’ll see our novice’s knowledge on the best way to set up WordPress for instructions.
Step 4: Select a Theme for Your Social Media Web site
Whilst you visit your WordPress web page, you’re going to needless to say it not too long ago has the default theme activated.
A theme is a professionally designed template that controls how your web page turns out in your visitors.
To get additional visitors in your web page and generate leads, this is a excellent concept to change the default theme with one that matches your social media web page’s space of passion.
For example, you’ll arrange any of the widespread WordPress subject matters and customize them in step with your liking.
You’ll be capable to moreover use topic issues which could be specifically designed for social media internet pages. For ideas, you’ll see our tick list of the very best WordPress BuddyPress subject matters.
BuddyPress is a smart common plugin that is used to make social media networks and websites. In fact, we can show you the easiest way to make use of it in a while in this tutorial.
If you want to have lend a hand setting up your decided on theme, then you definately’ll see our novice’s knowledge on the best way to set up a WordPress theme.
Upon activation, visit the Glance » Customize internet web page from the WordPress admin sidebar to edit the theme in step with your liking.
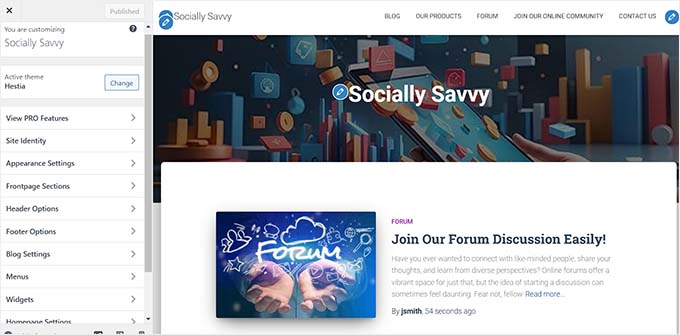
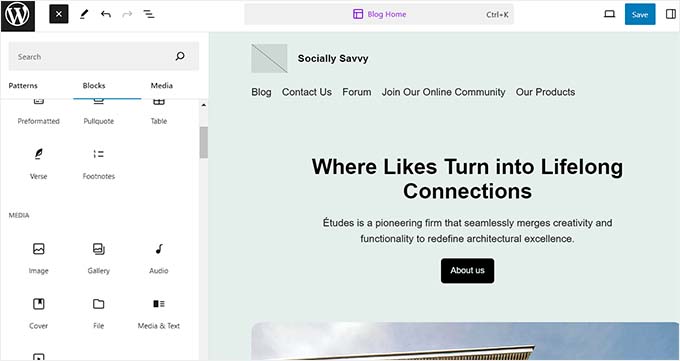
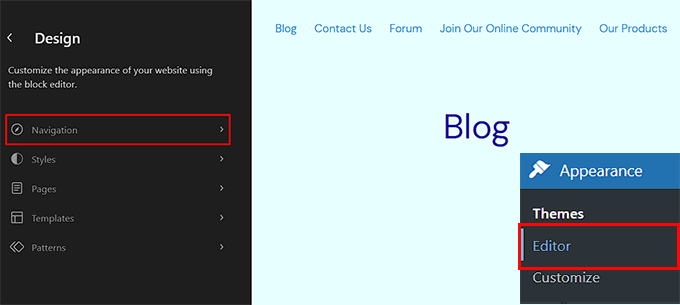
Understand that in the event you’re using a block theme, then you definately must visit the Glance » Editor internet web page from the WordPress dashboard to open the complete website online editor.
Proper right here, you’ll drag and drop the blocks from the left column to customize your web page. Once you could be achieved, don’t omit to click on at the ‘Save’ button to store your settings.
Step 5: Set Up Your Social Media Web site With BuddyPress
Thru default, WordPress does not have a built-in capacity to create a social media web page. That is why we advise using BuddyPress.
It is a common and free WordPress plugin that can become your web page proper right into a social neighborhood in only some minutes.
First, you need to place in and switch at the BuddyPress plugin. For detailed instructions, see our step-by-step knowledge on the best way to set up a WordPress plugin.
Upon activation, you need to visit the Settings » BuddyPress internet web page from your WordPress dashboard. This may increasingly every so often open the portions internet web page, which is in a position to show all of the BuddyPress choices which could be activated by means of default.
Proper right here, you’ll make a selection the choices that you need in an effort to upload in your social media web page. For example, if you want to have consumers as a way to observe each other like on Instagram, then you definately’ll take a look at the ‘Good friend Connections’ selection.
You’ll be capable to moreover make a selection the ‘Personal Messaging’ approach to allow consumers to the touch each other privately like on Facebook.
Additionally, you’ll select the ‘Individual Groups’ approach to allow consumers to create personal or public groups for more than a few movements and discussions.
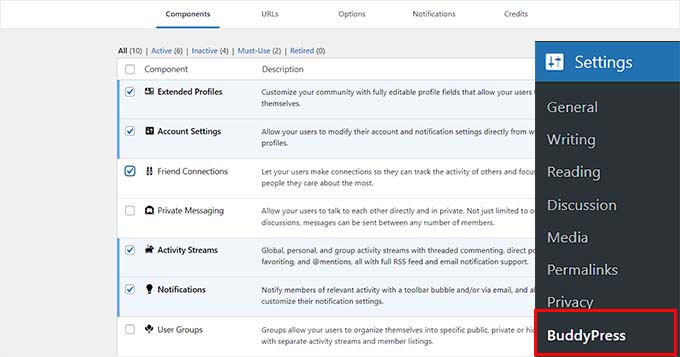
Once you have decided on the portions in an effort to upload in your social media web page, don’t omit to click on at the ‘Save Settings’ button to store your changes.
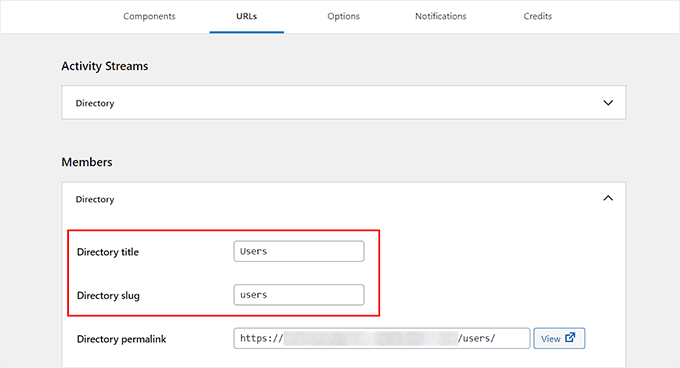
Next, switch to the ‘URLs’ tab. Proper right here, you’ll configure the slugs and titles for the pages that might be created with BuddyPress.
For example, if you want to identify the individuals of your web page ‘consumers’, then you definately’ll add that slug next to the ‘Record Slug’ selection after expanding the ‘Members’ tab.
Understand that you gained’t have the ability to edit the permalinks created by means of the plugin. Once you could be achieved, click on at the ‘Save Settings’ button.
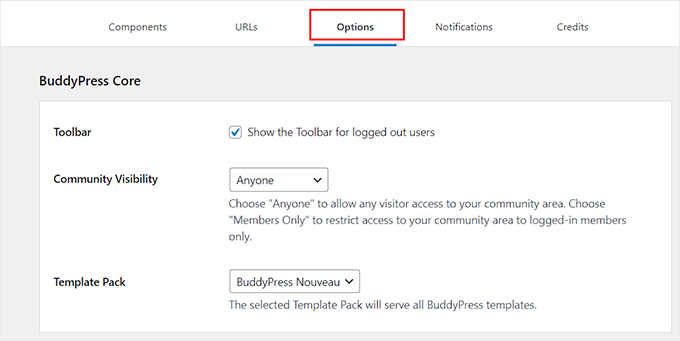
Now switch to the ‘Possible choices’ tab, where you’ll get began by means of choosing if you want to show the toolbar to logged-in consumers or not.
After that, you must set your crew visibility to ‘Somebody’ if you want to have any buyer as a way to view the social media process for your web page.
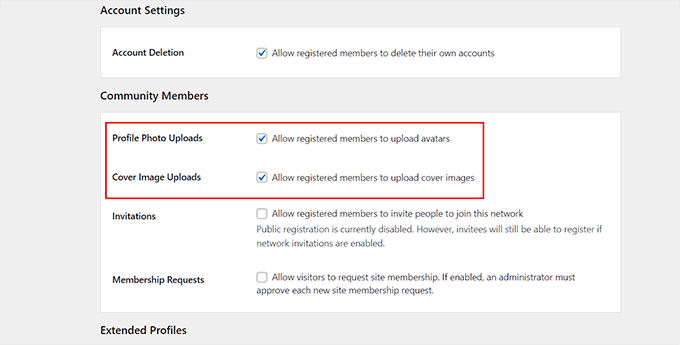
You’ll be capable to then moreover select if you want to permit customers to delete their accounts, upload profile footage, or quilt footage. You’ll be capable to moreover allow consumers to invite people to enroll in your crew.
Then, transfer ahead and click on at the ‘Save Settings’ button to store your settings.
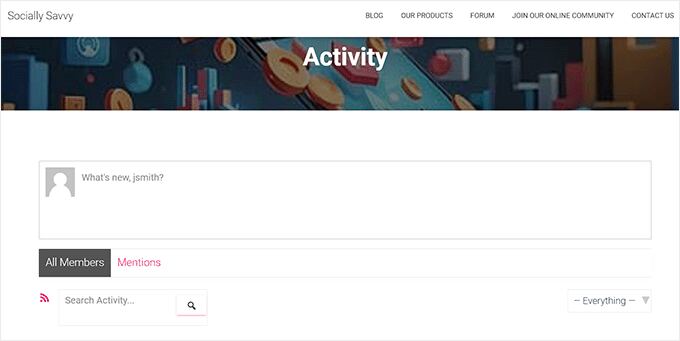
Now BuddyPress will mechanically create a Members and Task Streams internet web page for your web page.
This is how the Task internet web page seemed on our demo web page.
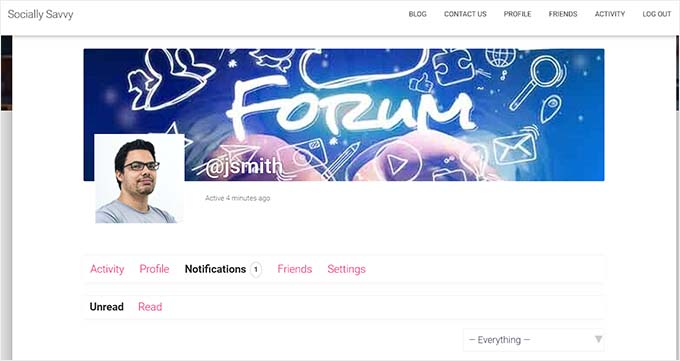
Consumers will now have the ability to create their profiles, add quilt footage, send good friend requests, and upload profile footage for your social media web page.
Right here’s a preview of a profile internet web page on our demo web page.
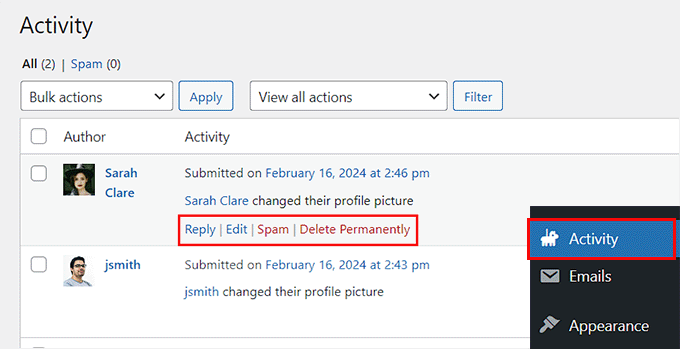
You’ll be capable to moreover arrange different consumers registering for your web page by means of visiting the Task menu tab from the WordPress dashboard.
Proper right here, you’ll keep a log of all of the movements being performed by means of consumers. You’ll be capable to moreover edit the movement, delete it, or mark it as unsolicited mail from proper right here.
You’ll be capable to arrange new signups by means of visiting the Consumers » Arrange Signups tab from the admin sidebar.
Once you could be there, you’ll activate an account, send an piece of email for verification, or delete it in step with your liking.

If you want to have, you’ll moreover add different profile fields for purchasers, add member varieties, create groups, and arrange piece of email notifications correct from your WordPress dashboard.
For additonal detailed instructions on the ones choices, you’ll see our tutorial on the best way to flip your WordPress website online right into a social community.
Step 6: Use bbPress to Create a Dialogue board (Not obligatory)
It’s additionally a good idea in an effort to upload a dialogue board in your social media web page.
This may increasingly every so often allow consumers to begin out conversation threads and proportion their concepts on different topics with each other. This will also be great for boosting engagement and motivating other consumers to sign up for your web page.
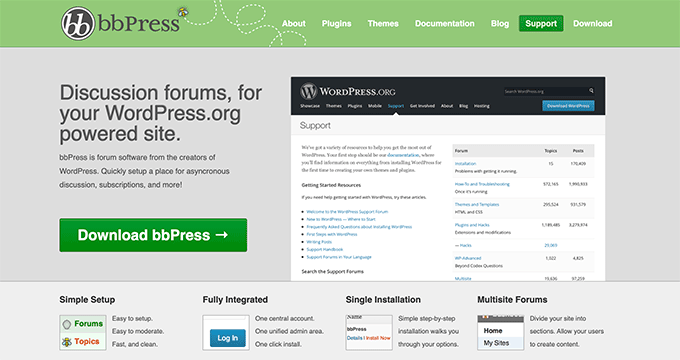
You’ll be capable to merely create a dialogue board with bbPress on account of it’s the very best WordPress discussion board plugin on the market. Plus, the plugin is completely free, making it a actually very best variety.
Upon plugin activation, simply visit the Forums » Add New internet web page from the WordPress dashboard and add a name for the dialogue board that you just’re growing.
After that, you’ll add an overview and configure the visibility to public, personal, or registered consumers most simple.
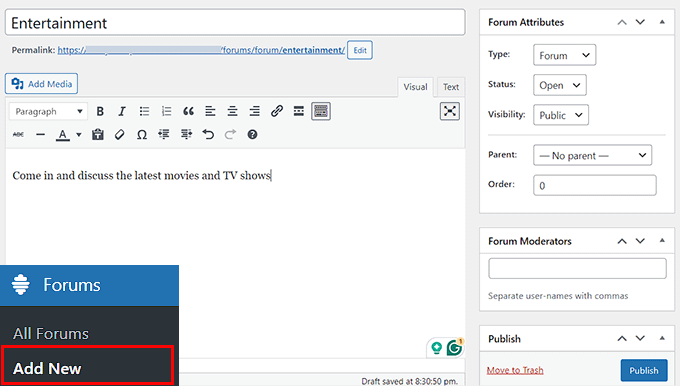
Once you could be achieved, merely click on at the ‘Put up’ button to make your dialogue board reside.
With bbPress, you’ll moreover affordable the dialogue board, upload a score machine, create categories, and prepare different forums as sought after.
For detailed instructions, please see our tutorial on the best way to upload a discussion board in WordPress.
Step 7: Create a Navigation Menu and Homepage
Now that you just’ve prepare your social media web page and created pages for it, it is important to add the ones links to the navigation menu. This may increasingly every so often allow consumers to easily to seek out all of the pages they wish to your web page.
To try this, visit the Glance » Menus internet web page from the WordPress dashboard and magnify the ‘BuddyPress Member’ tab inside the left column.
From proper right here, take a look at the decisions for all of the pages that you need in an effort to upload to the navigation menu and click on at the ‘Add to menu’ button.
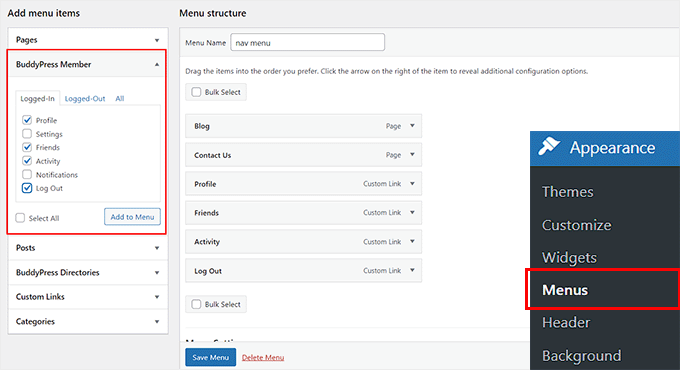
After that, click on at the ‘Save Menu’ button to store your settings.
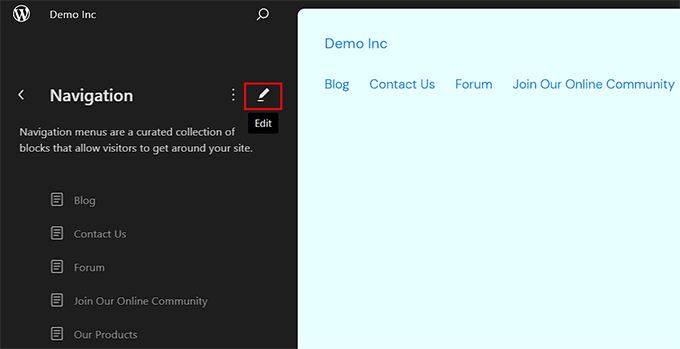
If you’re using a block theme, then you definately’ll need to visit the Glance » Editor internet web page from the WordPress dashboard instead.
This may increasingly every so often open all of the web page editor, where you must make a selection the ‘Navigation’ tab.
This may increasingly every so often open a list of all of the navigation menu items inside the sidebar on the left.
Proper right here, simply click on on on the ‘Edit’ button.
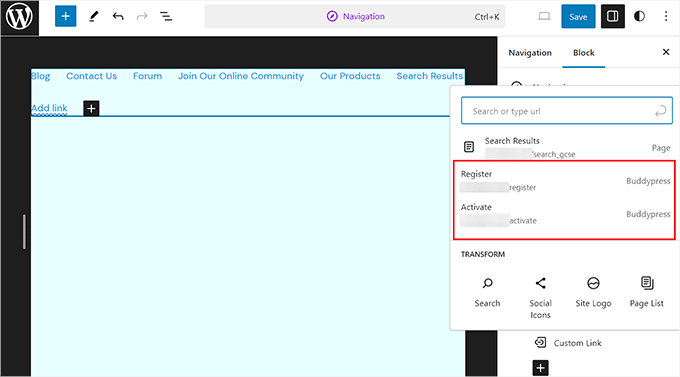
Now, all of the web page editor might be offered on the show with the navigation menu settings unfold out inside the block panel.
From proper right here, click on at the ‘+’ button and select the ‘Custom designed Link’ block.

A custom designed link will now be added in your navigation menu, and a recommended will open up inside the block panel at the right kind.
Proper right here, simply kind ‘BuddyPress’ into the quest box to view all of the pages created by means of the plugin. You’ll be capable to then make a selection the one you need in an effort to upload in your web page’s menu.
Finally, click on at the ‘Save’ button on the most productive to store your settings. For additonal details, see our tutorial on the best way to upload a navigation menu in WordPress.
Next, you might also need to add a lovely homepage in your social media web page. This internet web page might be your web page’s introduction to consumers so chances are you’ll need to make it visually fascinating.
To create a lovely internet web page, you’ll see our tutorial on the best way to create a customized house web page in WordPress.

Once you have finished designing the internet web page, you’ll set it as your social media web page’s homepage by means of visiting the Settings » Finding out internet web page from your WordPress dashboard.
Proper right here, select the ‘A static internet web page’ selection inside the ‘Your homepage presentations’ segment. Next, open the ‘Homepage’ dropdown and make a selection the internet web page you need to use.
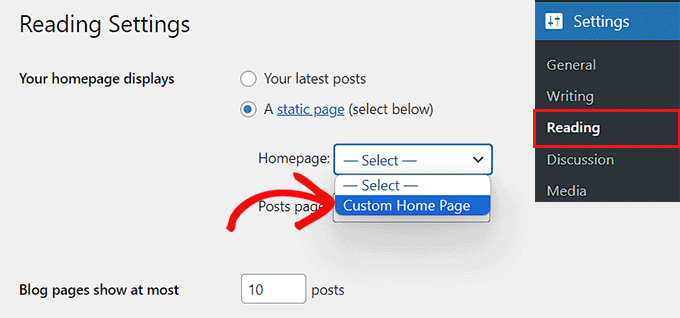
After that, don’t omit to click on at the ‘Save Changes’ button to store your settings.
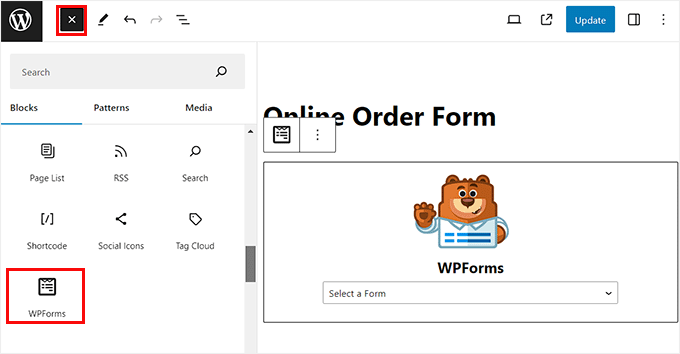
Step 8: Use WPForms to Add a Contact Form
Once you have prepare your social media web page, it’s time to add a marginally form. This way lets in consumers to the touch you if they have any queries and can boost engagement.
So that you can upload a marginally form, you’ll use WPForms, which is the very best WordPress touch shape plugin on the market.
It comes with a drag-and-drop builder, 1400+ premade templates, whole unsolicited mail protection, and further.
First, it is very important arrange and switch at the WPForms plugin. For details, see our tutorial on the best way to set up a WordPress plugin.
Upon activation, you’ll use the ‘Simple Contact Form’ template and then add it to any internet web page or post using the WPForms block.
For detailed information, you’ll check out our tutorial on the best way to create a touch shape in WordPress.
With the exception of a marginally form, you’ll moreover add a industry phone supplier in your social media platform to give a boost to the buyer experience.
This manner, consumers can merely achieve out to you for time-sensitive issues or within the match that they need to record an beside the point incident for your platform straight away.
You’ll be capable to merely add a industry phone supplier using Nextiva, which is the very best telephone provider for small companies. It’s easy to use, provides a very simple setup, has numerous choices, and has inexpensive pricing, making it a actually very best variety.

Additionally, you’ll moreover use the platform for online faxing, reside chat, online surveys, CRM, identify analytics, and further.
For detailed instructions, see our tutorial on the best way to arrange an auto-attendant telephone machine in your website online.
Step 9: Use All in One Search engine optimization to Make stronger Internet web site Rankings
Now that you just’ve created a social media web page, it is important to give a boost to its search engine ratings. This may occasionally put across additional guests to the platform, building up brand awareness, and in any case permit you to expand your social neighborhood.
We advise using All in One Search engine optimization for WordPress.
It’s the very best Search engine marketing plugin on the market that accommodates a very good and beginner-friendly setup wizard that can assist you make a selection the most efficient Search engine optimization settings for your corporation.
Additionally, it has choices like an on-page Search engine optimization checklist, XML sitemaps, a broken link checker, a schema generator, and further.
You’ll be capable to moreover add FAQs and their schema, follow specific individual keyword results, do image Search engine optimization, and use the hyperlink assistant serve as to further optimize your web page.
AIOSEO moreover integrates with other social media networks like Facebook and Twitter and optimizes your content material subject material for social media sharing.
For additonal details, you’ll see our entire WordPress Search engine marketing information.
Bonus Apparatus to Make stronger Your Social Media Internet web site
Listed below are some bonus apparatus that you just’ll use for your social media web page to boost conversions, get additional visitors, and develop into successful from your web page:
- MonsterInsights: It’s the very best analytics resolution on the market that can assist you see where your visitors are coming from and optimize your social media method in response to exact knowledge.
- PrettyLinks: A good way to develop into successful for your social media web page is to turn ads and affiliate links. PrettyLinks is a wonderful online marketing device that lets you create and cloak affiliate links for your web page.
- RafflePress: It’s the very best giveaway plugin on the market that can help you host giveaways and contests for your social media web page.
- OptinMonster: It’s the very best lead technology device that can help you create popups, sliders, and banners to get additional signups and individuals.
We hope this newsletter helped you learn how to create a social media web page in WordPress. You might also need to see our novice’s knowledge on the best way to create an intranet for small companies with WordPress and our very best choices for the very best plugins to transform a WordPress website online right into a cellular app.
For those who occur to preferred this newsletter, then please subscribe to our YouTube Channel for WordPress video tutorials. You’ll be capable to moreover to seek out us on Twitter and Fb.
The post The way to Make a Social Media Website online (Newbie’s Information) first appeared on WPBeginner.
0 Comments