

Combining scroll animation with icons can carry the design of your web page in distinctive techniques. On this instructional, we’re going to discover the right way to upload scroll-animated icons to phase backgrounds in Divi. With masses of icons to make a choice from and with a lot of integrated animation results to be had in Divi, we’ll display you ways you’ll be able to create numerous background animations to carry our designs to a complete new stage.
Let’s get began!
Sneak Peek
Here’s a fast take a look at the design we’ll construct on this instructional.
And right here is an advantage design that presentations you what’s conceivable with a couple of tweaks.
Obtain the Format for FREE
To put your palms at the designs from this instructional, you’ll first wish to obtain it the usage of the button beneath. To achieve get entry to to the obtain it is important to subscribe to our Divi Day-to-day e mail listing through the usage of the shape beneath. As a brand new subscriber, you’ll obtain much more Divi goodness and a unfastened Divi Format pack each Monday! In the event you’re already at the listing, merely input your e mail deal with beneath and click on obtain. You’ll now not be “resubscribed” or obtain additional emails.
@media most effective display screen and ( max-width: 767px ) {.et_bloom .et_bloom_optin_1 .carrot_edge.et_bloom_form_right .et_bloom_form_content:ahead of { border-top-color: #ffffff !necessary; border-left-color: clear !necessary; }.et_bloom .et_bloom_optin_1 .carrot_edge.et_bloom_form_left .et_bloom_form_content:after { border-bottom-color: #ffffff !necessary; border-left-color: clear !necessary; }
}.et_bloom .et_bloom_optin_1 .et_bloom_form_content button { background-color: #f92c8b !necessary; } .et_bloom .et_bloom_optin_1 .et_bloom_form_content .et_bloom_fields i { colour: #f92c8b !necessary; } .et_bloom .et_bloom_optin_1 .et_bloom_form_content .et_bloom_custom_field_radio i:ahead of { background: #f92c8b !necessary; } .et_bloom .et_bloom_optin_1 .et_bloom_border_solid { border-color: #f7f9fb !necessary } .et_bloom .et_bloom_optin_1 .et_bloom_form_content button { background-color: #f92c8b !necessary; } .et_bloom .et_bloom_optin_1 .et_bloom_form_container h2, .et_bloom .et_bloom_optin_1 .et_bloom_form_container h2 span, .et_bloom .et_bloom_optin_1 .et_bloom_form_container h2 sturdy { font-family: “Open Sans”, Helvetica, Arial, Lucida, sans-serif; }.et_bloom .et_bloom_optin_1 .et_bloom_form_container p, .et_bloom .et_bloom_optin_1 .et_bloom_form_container p span, .et_bloom .et_bloom_optin_1 .et_bloom_form_container p sturdy, .et_bloom .et_bloom_optin_1 .et_bloom_form_container shape enter, .et_bloom .et_bloom_optin_1 .et_bloom_form_container shape button span { font-family: “Open Sans”, Helvetica, Arial, Lucida, sans-serif; } p.et_bloom_popup_input { padding-bottom: 0 !necessary;}

Obtain For Unfastened
Sign up for the Divi E-newsletter and we will be able to e mail you a replica of without equal Divi Touchdown Web page Format Pack, plus heaps of different superb and unfastened Divi assets, pointers and tips. Apply alongside and you’ll be a Divi grasp very quickly. If you’re already subscribed merely sort to your e mail deal with beneath and click on obtain to get entry to the structure pack.
You’ve effectively subscribed. Please take a look at your e mail deal with to substantiate your subscription and get get entry to to unfastened weekly Divi structure packs!
To import the phase structure on your Divi Library, navigate to the Divi Library.
Click on the Import button.
Within the portability popup, choose the import tab and make a choice the obtain record out of your laptop.
Then click on the import button.
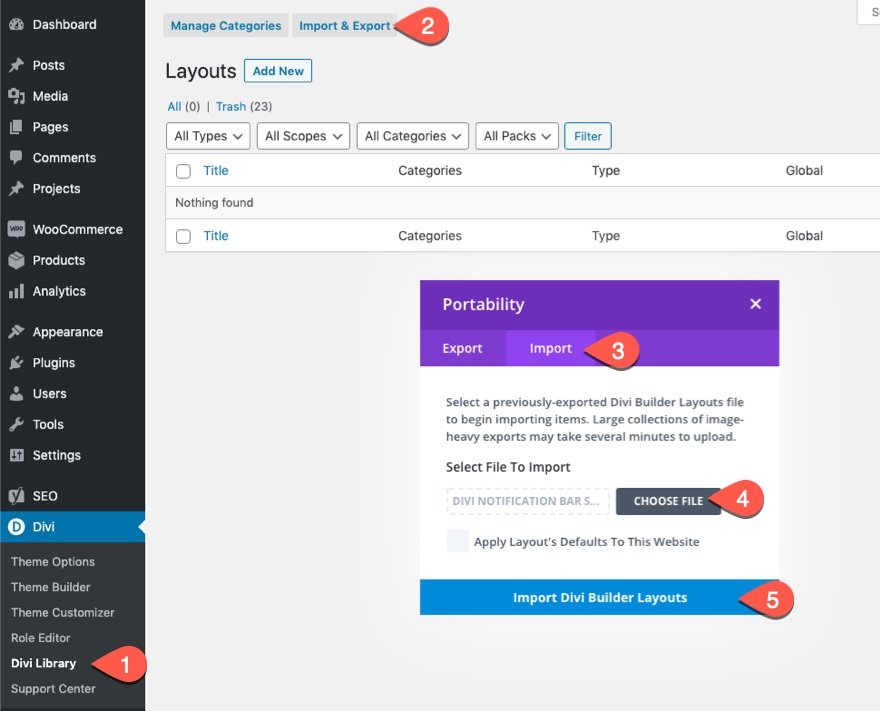
As soon as performed, the phase structure shall be to be had within the Divi Builder.
Let’s get to the educational, lets?
What You Want to Get Began
To get began, it is important to do the next:
- In the event you haven’t but, install and activate the Divi Theme.
- Create a brand new web page in WordPress and use the Divi Builder to edit the web page at the entrance finish (visible builder).
- Make a selection the choice “Construct From Scratch”.
After that, you’ll have a clean canvas to start out designing in Divi.
The best way to Upload Scroll-Animated Icons to Phase Backgrounds in Divi
The Key Thought In brief Defined
The method of including scroll-animated icons to phase backgrounds comes to 4 key portions.
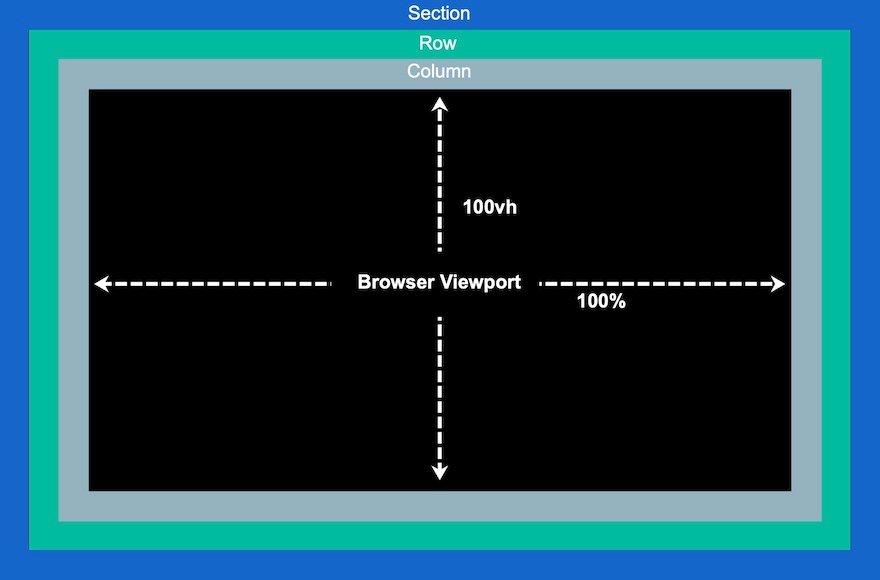
1: Making a Fullscreen Canvas
First, we wish to create a fullscreen canvas the usage of through customizing a bit, row, and column in order that each and every of them spans the total width and top of the browser. This may give us one of those unhindered inventive area we wish to fill with icons.
2: Including and Positioning the Icons
Now, we will strategically position the icons throughout the fullscreen canvas (or column) to construct our scroll-animated icon background design.
![]()
3: Including Scroll Animaiton to the Icons
As soon as the icons are in position, we will upload our scroll become results (or animation) to each and every of them.
![]()
4: Including Content material to the Vanguard of the Phase
After the background design is whole with scroll-animated icons, we will upload the content material we wish to the exhibit at the vanguard.

Now that we’ve got an concept of what to do, let’s dive in!
Section 1: Growing the Fullscreen Canvas (Putting in place the Phase, Row, and Column)
Let’s start through including a one-column row to the common phase.
![]()
Phase Settings
Open the phase settings and upload a background colour as follows:
- Background Colour: #000
![]()
Below the design tab, upload a min-height of 100vh to ensure the phase spans the total top of the viewport.
- Min Peak: 100vh (desktop), 600px (pill and contact)
![]()
Row Settings
Subsequent, open the row settings and replace the sizing in order that it additionally spans the total width and top of the phase/viewport.
- Use Customized Gutter Width: YES
- Gutter Width: 1
- Width: 100%
- Max Width: 100%
- Peak: 100%
- Padding: 0px peak, 0px backside
![]()
Below the complicated tab, give the row an absolute place.
- Place: Absolute
![]()
Column Peak
Now that our phase and row are in position, it is very important give the column a min-height of 100% in order that it is going to additionally span the total width and top of the phase/viewport.
![]()
At this level, we’ve got necessarily created a fullscreen canvas that permits us to fill the column with icons.
Section 2: Growing and Positioning the Icons throughout the Column
Now we’re able to start out growing and positioning the icons with the column. The speculation is to strategically position the icon inside this fullscreen column to construct our scroll-animated icon background design.
![]()
Growing and Positioning Icon 1
We’ll get started through growing our first icon after which positioning it the usage of the Divi Builder.
Upload an Icon Module to the column.
![]()
Open the Icon Settings and pick out an icon from the icon picker.
![]()
Below the design tab, replace the icon colour and dimension as follows:
- Icon Colour: #fff
- Icon Measurement: 3vw (desktop), 40px (pill), 30px (telephone)
![]()
Below the Complex tab, replace the placement and offsets as follows:
- Place: Absolute
- Location: Backside Left
- Vertical Offset: 10%
- Horizontal Offset: 10%
NOTE: Understand that the proportion period unit this is relative to the ground and left CSS Houses. On this case, a vertical offset of 10% is similar to “backside: 10%” in CSS and a horizontal offset is similar to “left: 10%”. As a result of our column is fullscreen, icons will stay responsive when adjusting the browser top and width. In different phrases, they’ll stay their place on other display screen sizes.
![]()
Growing and Positioning Icon 2
To create the second one icon, replica the prevailing icon. Then open the settings of the replica icon and replace the placement settings as follows:
- Vertical Offset: 30%
- Horizontal Offset: 40%
![]()
Growing and Positioning Icon 3
To create the 3rd icon, replica the former icon. Then open the settings of the replica icon and replace the placement settings as follows:
- Vertical Offset: 20%
- Horizontal Offset: 30%
![]()
Growing and Positioning Icon 4
To create the fourth icon, replica the former icon. Then open the settings of the replica icon and replace the placement settings as follows:
- Vertical Offset: 70%
- Horizontal Offset: 40%
![]()
Growing and Positioning Icon 5
To create the 5th icon, replica the former icon. Then open the settings of the replica icon and replace the placement settings as follows:
- Vertical Offset: 60%
- Horizontal Offset: 50%
![]()
Growing and Positioning Icon 6
To create the 6th icon, replica the former icon. Then open the settings of the replica icon and replace the placement settings as follows:
- Vertical Offset: 65%
- Horizontal Offset: 60%
![]()
Growing and Positioning Icon 7
To create the 7th icon, replica the former icon. Then open the settings of the replica icon and replace the placement settings as follows:
- Vertical Offset: 28%
- Horizontal Offset: 70%
![]()
Growing and Positioning Icon 8
To create the 8th icon, replica the former icon. Then open the settings of the replica icon and replace the placement settings as follows:
- Vertical Offset: 50%
- Horizontal Offset: 80%
![]()
Growing and Positioning Icon 9
To create the 9th and ultimate icon, replica the former icon. Then open the settings of the replica icon and replace the placement settings as follows:
- Vertical Offset: 15%
- Horizontal Offset: 90%
![]()
Section 3: Including Scroll Animation to Icons
As soon as the icons had been strategically located, we’re able so as to add the scroll animations to each and every of the icons.
![]()
Multi-Choose the Icons
For this case, we’re going to upload the similar scroll animations to all 9 of the icons. However, you’ll be able to make a choice to offer distinctive scroll animations to each and every of them in my view if you select. So as to add the scroll animations to the entire icons directly, use multi-select (cling ctrl or cmd whilst deciding on the icon modules) to make a choice the entire icons within the column. Then open the settings of one of the vital decided on modules.
![]()
This may carry up the part settings modal. Below the complicated tab, open the Scroll Results choice crew toggle. There you’ll see the Scroll Grow to be Results. We can be including all six results to be had (Vertical Movement, Horizontal Movement, Fade In and Out, Scaling Up and Down, Rotating, and Blur).
Including Scroll Grow to be Results
Vertical Movement
Be sure that the Vertical Movement tab is chosen and replace the next:
- Permit Vertical Movement: YES
- Beginning Offset: 2 (at 0%)
- Finishing Offset: -2 (at 100%)
For pill show replace the offsets as follows:
- Beginning Offset: 1 (at 0%)
- Finishing Offset: -1 (at 100%)
For telephone show replace the offsets as follows:
- Beginning Offset: 0.5 (at 0%)
- Finishing Offset: -0.5 (at 100%)
![]()
Horizontal Movement
Subsequent, choose the Horizontal Movement tab and replace the next:
- Permit Horizontal Movement: YES
- Beginning Offset: -1 (at 0%)
- Finishing Offset: 1 (at 100%)
For pill show, replace the offsets as follows:
- Beginning Offset: 0 (at 0%)
- Finishing Offset: 0 (at 100%)
![]()
Fading In and Out
Subsequent, choose the Fading In and Out tab and replace the next:
- Permit Fading In and Out: YES
- Mid Opacity: 50% (at 50%)
![]()
Scaling Up and Down
Subsequent, choose the Scaling Up and Down tab and replace the next:
- Permit Scaling Up and Down: YES
- Beginning Scale: 0% (at 0%)
- Mid Scale: 50% (at 50%)
![]()
Rotating
Subsequent, choose the Rotating tab and replace the next:
- Permit Rotating: YES
- Beginning Rotation: 0% (at 0%)
- Mid Rotation: 90% (at 50%)
- Finishing Rotation: 180% (at 100%)
![]()
Blur
Subsequent, choose the Blur tab and allow the blur impact:
- Permit Blur: YES
![]()
Preview
Here’s a fast take a look at the scroll-animated icons in motion.
Section 4: Including Content material to the Vanguard of the Phase
Now that we’ve got our scroll-animated icons for our background, we’re able so as to add the content material we wish to show in the vanguard. The speculation is to stay the row (with the column and icons) in the back of any further row(s) of content material we wish to be displayed in entrance of that background.
On this instance, we’re going to upload a one-column row with a easy heading.
First, upload a brand new one-column row without delay underneath the prevailing row.
![]()
The present row has an absolute place so including any other one will position the row on the peak of the phase as anticipated.
Within the new row, upload a textual content module.
![]()
Open the textual content settings and upload the next HTML within the frame content material:
<h1>Divi</h1>
![]()
Below the design tab, replace the heading textual content types as follows:
- Heading Font: Poppins
- Heading Textual content Alignment: Heart
- Heading Textual content Measurement: 8vw (desktop), 40px (pill and contact)
![]()
Row Place
So as to ensure that the row (and heading) are located within the middle of the phase, open the row settings and replace the placement as follows:
- Place: Absolute
- Location: Heart
![]()
Completing Touches: Phase Background Symbol and Overflow
To complete off the design, open the phase settings and upload a background symbol. For this case, I’m the usage of a picture from our Synthetic Intelligence Format Pack.
![]()
Below the complicated tab, ensure that the overflow is hidden through updating the visibility choices:
- Horizontal Overflow: Hidden
- Vertical Overflow: Hidden
This may ensure that the vertical scroll bar doesn’t display up when an icon is animated out of doors the phase.
![]()
Ultimate Outcome
Now let’s check out the general consequence on desktop and pill.
Further Design Instance (Incorporated in FREE obtain)
I couldn’t assist however get just a little extra inventive with this design. So, I added an extra design instance that makes use of animated icons to spotlight the heading. It’s incorporated within the unfastened obtain originally of the object.
Here’s the preview.
Ultimate Ideas
Now and again it’s amusing to get inventive and exhibit simply how robust (and amusing) Divi may also be as a visible web page builder. I feel this instructional has helped spotlight simply how efficient Divi may also be at making web page background sections come to lifestyles. The truth that you’ll be able to upload scroll become results to masses of various icons opens the door for a wide variety of inventive designs and animations. With a bit of luck, this will give you a spice up of inspiration to make use of scroll-animated icons in much more inventive techniques.
I look ahead to listening to from you within the feedback.
Cheers!
.inline-code{padding: 0px 4px; colour: purple; font-family: Monaco,consolas,bitstream vera sans mono,courier new,Courier,monospace!necessary} video.with-border {border-radius: 8px;box-shadow: 0 8px 60px 0 rgba(103,151,255,.11), 0 12px 90px 0 rgba(103,151,255,.11);show:block;margin: 0 auto;}
The submit How to Add Scroll-Animated Icons to Section Backgrounds in Divi gave the impression first on Elegant Themes Blog.

0 Comments